Loading...
Loading...
Loading...
Loading...
Loading...
Loading...
Loading...
Loading...
Loading...
Loading...
Loading...
Loading...
Loading...
Loading...
Loading...
Loading...
Loading...
Loading...
Loading...
Loading...
Loading...
Loading...
Loading...
Loading...
Loading...
Loading...
Loading...
Loading...
Loading...
Loading...
Loading...
Loading...
Loading...
Loading...
Loading...
Loading...
Loading...
Loading...
Loading...
Loading...
Loading...
Loading...
Loading...
Loading...
Loading...
Loading...
Loading...
Loading...
Loading...
Loading...
Loading...
Loading...
Loading...
Loading...
Loading...
Loading...
Loading...
Loading...
Loading...
Loading...
Loading...
Loading...
Loading...
Loading...
Loading...
Loading...
Loading...
Loading...
Loading...
Loading...
Loading...
Loading...
Loading...
Loading...
Loading...
Loading...
Loading...
Loading...
Loading...
Loading...
Loading...
Loading...
Loading...
Loading...
Loading...
Loading...
Loading...
Loading...
Loading...
Loading...
Loading...
Loading...
Loading...
Loading...
Loading...
Loading...
Loading...
Loading...
Loading...
Loading...
These steps will guide a user how to install a tar-ball package on base Linux based machine
admin@fmcli:~$ fmcli
fmcli# configure terminal
fmcli(config)# router bgp 1001
fmcli(config-router)# neighbor 10.10.10.1 remote-as 100
...
...ip,user,passwd
10.4.4.61,admin,YourPaSsWoRd
10.4.4.62,admin,YourPaSsWoRd
...
...
...Installer will proceed with FMCLI-install ...
468025bd9c12: Loading layer [==================================================>] 2.56kB/2.56kB
1961412d5783: Loading layer [==================================================>] 36.56MB/36.56MB
de3513fa22d1: Loading layer [==================================================>] 42.69MB/42.69MB
ca3343e443b5: Loading layer [==================================================>] 1.421MB/1.421MB
Loaded image: avizdock/agent_installer:latest
Docker image 'avizdock/agent_installer:latest' is loaded.
f404ff0948564cd6813550368668f3b1c3548cdf47d79f1ad8d858769fa25f38
Docker container 'agent_installer' is running.
CONTAINER ID IMAGE COMMAND CREATED STATUS PORTS NAMES
f404ff094856 avizdock/agent_installer:latest "python3" Less than a second ago Up Less than a second agent_installer
Docker container 'ones-fm' is running.
Update success for 10.4.4.61
Update success for 10.4.4.62
Ignore below Error if Installing Agent via docker installer
ones-fm container is not running
Server IP: 172.17.0.3
fm_port: None
[{'ip': '10.4.4.61', 'passwd': 'YourPaSsWoRd', 'user': 'admin', 'server_ip': '172.17.0.3', 'fm_port': None}, {'ip': '10.4.4.62', 'passwd': 'YourPaSsWoRd', 'user': 'admin', 'server_ip': '172.17.0.3', 'fm_port': None}]
Operation = install
##### params = {'ip': '10.4.4.61', 'passwd': 'YourPaSsWoRd', 'user': 'admin', 'server_ip': '172.17.0.3', 'fm_port': None} #####
###############Connecting to switch###############
##### params = {'ip': '10.4.4.62', 'passwd': 'YourPaSsWoRd', 'user': 'admin', 'server_ip': '172.17.0.3', 'fm_port': None} #####
###############Connecting to switch###############
...
...
...
#################### Installing FMCLI on the device 10.4.4.61 ######################
#################### Installing FMCLI on the device 10.4.4.62 ######################
####### Debug LOGS on the device 10.4.4.61 #######
fmcli-app/
fmcli-app/libhiredis.so.1.1.0
fmcli-app/fmcli.sh
fmcli-app/fmcli
fmcli-app/ip_validate
fmcli-app/fmcli.cli
fmcli-app/fmcli.version
...
...
...
####### Debug LOGS on the device 10.4.4.62 #######
fmcli-app/
fmcli-app/libhiredis.so.1.1.0
fmcli-app/fmcli.sh
fmcli-app/fmcli
fmcli-app/ip_validate
fmcli-app/fmcli.cli
fmcli-app/fmcli.version
FM-Agent installed successfully on the device 10.4.4.62........
####### Deleting ones-fm_1713190726_4057596 dir on the device 10.4.4.62 #######
Print deployment of FM-Agent to switch 10.4.4.62 is Completed
FMCLI install Result
{'10.4.4.61': 'PASS', '10.4.4.62': 'PASS'}
╒═════════╤═══════════╤══════════════════╕
│ SL.No │ Device │ install Result │
╞═════════╪═══════════╪══════════════════╡
│ 1 │ 10.4.4.61 │ PASS │
├─────────┼───────────┼──────────────────┤
│ 2 │ 10.4.4.62 │ PASS │
╘═════════╧═══════════╧══════════════════╛root@Switch:~$ sudo fmcli
fmcli# Installer will proceed with FMCLI-uninstall ...
a09c0ffdcba2: Loading layer [==================================================>] 2.56kB/2.56kB
8c6091db46c1: Loading layer [==================================================>] 36.63MB/36.63MB
38f3a9e347f1: Loading layer [==================================================>] 42.69MB/42.69MB
7783a5157651: Loading layer [==================================================>] 1.421MB/1.421MB
Loaded image: avizdock/agent_installer:latest
Docker image 'avizdock/agent_installer:latest' is loaded.
7724e9ab3a139f6c74fdf8f2f9536891a1ffc6c88168011dee5d6a8bc24d6041
Docker container 'agent_installer' is running.
CONTAINER ID IMAGE COMMAND CREATED STATUS PORTS NAMES
7724e9ab3a13 avizdock/agent_installer:latest "python3" Less than a second ago Up Less than a second agent_installer
Docker container 'ones-fm' is running.
Update success for 10.4.4.68
Ignore below Error if Installing Agent via docker installer
ones-fm container is not running
Server IP: 172.17.0.3
fm_port: None
[{'ip': '10.4.4.68', 'passwd': 'YourPaSsWoRd', 'user': 'admin', 'server_ip': '172.17.0.3', 'fm_port': None}]
Operation = uninstall
##### params = {'ip': '10.4.4.68', 'passwd': 'YourPaSsWoRd', 'user': 'admin', 'server_ip': '172.17.0.3', 'fm_port': None} #####
###############Connecting to switch###############
<paramiko.client.SSHClient object at 0x7fc2bb03e190>
Connection to switch 10.4.4.68 successfull.....................
/home/ones_fm_agent
############### Uninstalling FM Agent ###############
FMCLI uninstall Result
{'10.4.4.68': 'PASS'}
╒═════════╤═══════════╤════════════════════╕
│ SL.No │ Device │ uninstall Result │
╞═════════╪═══════════╪════════════════════╡
│ 1 │ 10.4.4.68 │ PASS │
╘═════════╧═══════════╧════════════════════╛Installer will proceed with FMCLI-installresetconfig ...
468025bd9c12: Loading layer [==================================================>] 2.56kB/2.56kB
1961412d5783: Loading layer [==================================================>] 36.56MB/36.56MB
de3513fa22d1: Loading layer [==================================================>] 42.69MB/42.69MB
ca3343e443b5: Loading layer [==================================================>] 1.421MB/1.421MB
Loaded image: avizdock/agent_installer:latest
Docker image 'avizdock/agent_installer:latest' is loaded.
bf5fee40fc8d6ba3e16525fdddf329a79d1a5701d096fa9d52f95d8d05ed2273
...
...
...
##### params = {'ip': '10.4.4.61', 'passwd': 'YourPaSsWoRd', 'user': 'admin', 'server_ip': '172.17.0.3', 'fm_port': None} #####
###############Connecting to switch###############
Connection to switch 10.4.4.61 successfull.....................
/home/ones_fm_agent
Creating work directory on the device 10.4.4.61........
...
...
...
#################### Installing FMCLI on the device 10.4.4.61 ######################
...
...
...
FM-Agent installed successfully on the device 10.4.4.61........
####### Deleting ones-fm_1713191010_027004 dir on the device 10.4.4.61 #######
Print deployment of FM-Agent to switch 10.4.4.61 is Completed
#################### Cleaning config on the device 10.4.4.61 ######################
File '/usr/lib/frr/frr-reload.py' exists in container 'bgp'
Skip scp as File: /usr/lib/frr/frr-reload.py exits inside bgp container
...
...
...
###### Config Reset Successful !!! #######
#######
╒═════════╤═══════════╤══════════════════╤══════════════════════╕
│ SL.No │ Device │ Install Result │ ConfigReset Result │
╞═════════╪═══════════╪══════════════════╪══════════════════════╡
│ 1 │ 10.4.4.61 │ PASS │ PASS │
╘═════════╧═══════════╧══════════════════╧══════════════════════╛Installer will proceed with FMCLI-upgrade ...
468025bd9c12: Loading layer [==================================================>] 2.56kB/2.56kB
1961412d5783: Loading layer [==================================================>] 36.56MB/36.56MB
de3513fa22d1: Loading layer [==================================================>] 42.69MB/42.69MB
ca3343e443b5: Loading layer [==================================================>] 1.421MB/1.421MB
Loaded image: avizdock/agent_installer:latest
Docker image 'avizdock/agent_installer:latest' is loaded.
d77a146cae3a6abb3d980961b9af7adc14632c96b35789076e098e8138474102
...
...
...
Server IP: 172.17.0.3
fm_port: None
[{'ip': '10.4.4.61', 'passwd': 'YourPaSsWoRd', 'user': 'admin', 'server_ip': '172.17.0.3', 'fm_port': None}]
Operation = upgrade
##### params = {'ip': '10.4.4.61', 'passwd': 'YourPaSsWoRd', 'user': 'admin', 'server_ip': '172.17.0.3', 'fm_port': None} #####
###############Connecting to switch###############
<paramiko.client.SSHClient object at 0x7f500f363190>
Connection to switch 10.4.4.61 successfull.....................
#################### Upgrading FMCLI on the device 10.4.4.61 ######################
####### Debug LOGS on the device 10.4.4.61 #######
...
...
...
FM-Agent Upgraded successfully on the device 10.4.4.61........
####### Deleting ones-fm_1713191627_4676907 dir on the device 10.4.4.61 #######
Print deployment of FM-Agent to switch 10.4.4.61 is Completed
FMCLI upgrade Result
{'10.4.4.61': 'PASS'}
╒═════════╤═══════════╤══════════════════╕
│ SL.No │ Device │ upgrade Result │
╞═════════╪═══════════╪══════════════════╡
│ 1 │ 10.4.4.61 │ PASS │
╘═════════╧═══════════╧══════════════════╛
Installing Open Networking Enterprise Suite (ONES)
..................................................
ONES is getting installed for the first time, choose appropriate options when prompted...
....................
Installing prerequisites for ONES application
....................
....................
....................
....................
Installing ONES application...
Do you want to install domain SSL certificate(if not, installation will proceed with a self signed certificate)? [y/n]: y
Enter the path to the private key file: ./certs/server.pem
Enter the path to the certificate file: ./certs/server.crt.pemLocal backup:
Do you want to enable DB backups? [y/n]y
Where do you want to store the backups? [local/remote]: local #local keyword trigger local database on server
Enter the backup directory: ./backups #Enter the server directory in which user wants to take backup
Enter the number of backups (between 1 and 3) to retain (Older backups will be deleted): 1 #Enter the number of backup user wants to create
Enter the backup interval in seconds (3600 seconds or higher): 86400 #Enter the value in seconds to take a backup Remote backup:
Do you want to enable DB backup feature? [y/n]: y
Where do you want to store the backups? [local/remote]: remote #remote keyword trigger remote database on server
Please make sure the remote server is reachable via SSH
Enter the remote machine IP: 10.0.0.1
Enter the remote machine username: admin
Enter the remote machine password:
Enter the backup directory: ~/backups #Enter the remote server directory in which user wants to take backup
Backup is being done in 10.0.0.1 at ~/backups
Enter the number of backups (between 1 and 100) to retain (Older backups will be deleted): 5 #Enter the number of backup user wants to create
Enter the backup interval in seconds (3600 seconds or higher): 86400 #Enter the value in seconds to take a backup No:
Do you want to enable certificate based authentication between ONES controller and devices? [y/n]: nYes:
Do you want to enable certificate based authentication between ONES controller and devices? [y/n]: y
Enter the path to the ca-cert.pem file: ca-cert.pem
Enter the path to the server-cert.pem file: server-cert.pem
Enter the path to the server-key.pem file: server-key.pem
Enter the path to the client-cert.pem file: client-cert.pem
Enter the path to the client-key.pem file: client-key.pem
Proceeding with certificates for Agent Auto Registration
Enter the path to the ca-cert-reg.pem file: ca-cert-reg.pem
Enter the path to the server-cert.pem file: server-cert.pem
Enter the path to the server-key.pem file: server-key.pem
Enter the path to the client-cert.pem file: client-cert.pem
Enter the path to the client-key.pem file: client-key.pem
Enter the ONES App URL: https://192.168.1.1Enter the ONES App URL: https://ones.aviznetworks.comInstalling Open Networking Enterprise Suite (ONES)
..................................................
....................
....................
....................
....................
....................
Installing ONES application...
Do you want to install domain SSL certificate(if not, installation will proceed with a self signed certificate)? [y/n]: n
Using self signed certificates...
Do you want to enable ONE-DL feature? [y/n]: y
Since ONE-DL configuration has been chosen, please provide the information below...
Enter EC2 ONE-DL Backend Public DNS Endpoint: ec2-69-696-9-69.us-west-2.compute.amazonaws.com
Successfully copied 2.05kB to /home/aviz/ONES2.1/collector_old.json
Previous collector has no excluded tables..........
Do you want to enable DB backup feature? [y/n]: n
Do you want to enable certificate based authentication between ONES controller and devices? [y/n]: n
Enter the ONES App URL [https://<host-ip or domain>]: https://192.168.1.1
Setting up the environment and loading essential dockers...
cfb9c9006507: Loading layer [==================================================>] 68.31MB/68.31MB
a7b5f6d81cf5: Loading layer [==================================================>] 2.56kB/2.56kB
aad629396b2c: Loading layer [==================================================>] 143.1MB/143.1MB
5f70bf18a086: Loading layer [==================================================>] 1.024kB/1.024kB
Loaded image: avizdock/ones-collector:v2.1.0
...
...
...
Name Command State Ports
------------------------------------------------------------------------------------------------------------------------------------------------------------------------------------
api-server java -jar /app/apiserver.jar Up 0.0.0.0:8080->8080/tcp,:::8080->8080/tcp
broker /etc/confluent/docker/run Up 0.0.0.0:29092->29092/tcp,:::29092->29092/tcp, 0.0.0.0:9092->9092/tcp,:::9092->9092/tcp,
0.0.0.0:9101->9101/tcp,:::9101->9101/tcp
docker python3 app.py Up
kafka-connect /etc/confluent/docker/run Up (healthy) 0.0.0.0:8083->8083/tcp,:::8083->8083/tcp, 9092/tcp
ksqldb-server /etc/confluent/docker/run Up 0.0.0.0:8088->8088/tcp,:::8088->8088/tcp
ones-collector java -jar -XX:MaxGCPauseMi ... Up 0.0.0.0:50053->50053/tcp,:::50053->50053/tcp, 8093/tcp
ones-collector-db /docker-entrypoint.sh postgres Up 0.0.0.0:5432->5432/tcp,:::5432->5432/tcp, 8008/tcp, 8081/tcp
ones-fm /bin/sh -c { gunicorn --wo ... Up 0.0.0.0:8787->8080/tcp,:::8787->8080/tcp
ones-fm-db docker-entrypoint.sh postgres Up 0.0.0.0:2345->5432/tcp,:::2345->5432/tcp
ones-gateway ./gnmi-gateway -TargetLoad ... Up 0.0.0.0:9339->9339/tcp,:::9339->9339/tcp
ones-pty-server docker-entrypoint.sh node ... Up 0.0.0.0:8885->8885/tcp,:::8885->8885/tcp
ones-rule-service java -jar /app/rule-engine.jar Up 8080/tcp
ones-rule-service-db docker-entrypoint.sh postgres Up 5432/tcp
ones-ui docker-entrypoint.sh node ... Up 3002/tcp, 0.0.0.0:443->443/tcp,:::443->443/tcp
schema-registry /etc/confluent/docker/run Up 0.0.0.0:8081->8081/tcp,:::8081->8081/tcp
stream-processor java -jar /app/stream-proc ... Up 8080/tcp
zookeeper /etc/confluent/docker/run Up 0.0.0.0:2181->2181/tcp,:::2181->2181/tcp, 2888/tcp, 3888/tcp
Finishing up ONES Installation...
............................................................
Upgraded ONES application successfully...
....................
Open the ONES application at https://192.168.1.1switch-1# configure terminal
switch-1(config)#
switch-1# feature grpc
switch-1(config)#
switch(config)# grpc use-vrf defaultbash$ ssh username@myswitch
Password: <passw0rd>
myswitch> enable
myswitch# configure terminal
myswitch(config)# management api http-commands
myswitch(config-mgmt-api-http-cmds)# no shutdown myswitch(config-mgmt-api-http-cmds)# show management api http-commands
Enabled: Yes
HTTPS server: running, set to use port 443
HTTP server: shutdown, set to use port 80
Local HTTP server: shutdown, no authentication, set to use port 8080
Unix Socket server: shutdown, no authentication
VRFs: defaultnetq config add agent gnmi-enable true
netq config add agent opta-enable false
netq config add agent gnmi-port 9339
netq config restart agent
netq config status agent
netq config add agent gnmi-port 50052
netq config restart agent
netq config status agent
cumulus@cumulus:mgmt:~$ cat /etc/netq/netq.yml
netq-agent:
is-gnmi-enabled: true
is-opta-enabled: false
netq-gnmi:
gnmi_port: 9339ZOOKEEPER_SERVER_VALUE= //Public DNS
KAFKA_SERVER_VALUE= //Public DNS
SCHEMA_REGISTRY_SERVER_VALUE=
INSTANCE_ID= //Instance ID
VPC_ID= //VPC ID
REGION= //REGION ID
SG_ID= //SG IDDocument the `instance_id`, `vpc_id`, `region`, and `security_group_id` of the provisioned instance.sudo apt update
sudo apt install apt-transport-https ca-certificates curl software-properties-common
curl -fsSL https://download.docker.com/linux/ubuntu/gpg | sudo gpg --dearmor -o /usr/share/keyrings/docker-archive-keyring.gpg
echo "deb [arch=$(dpkg --print-architecture) signed-by=/usr/share/keyrings/docker-archive-keyring.gpg] https://download.docker.com/linux/ubuntu $(lsb_release -cs) stable" | sudo tee /etc/apt/sources.list.d/docker.list > /dev/null
sudo apt update
apt-cache policy docker-ce
sudo apt install docker-ce
mkdir -p ~/.docker/cli-plugins/
curl -SL https://github.com/docker/compose/releases/download/v2.3.3/docker-compose-linux-x86_64 -o ~/.docker/cli-plugins/docker-compose
chmod +x ~/.docker/cli-plugins/docker-compose
docker compose version
ubuntu@ip-172-31-28-5:~/ONES-DL-CLOUD$ tar -xvf one-dl.tar.gz
docker-compose.yml
one-dl-multitenant-installer.sh
.envaviz@aviz % ssh -i ones-dl-qa.pem ubuntu@34.215.5.89
Welcome to Ubuntu 22.04.3 LTS (GNU/Linux 6.2.0-1018-aws x86_64)
* Documentation: https://help.ubuntu.com
* Management: https://landscape.canonical.com
* Support: https://ubuntu.com/pro
System information as of Thu Mar 7 06:17:12 UTC 2024
System load: 0.01513671875 Processes: 224
Usage of /: 1.0% of 247.92GB Users logged in: 1
ZOOKEEPER_SERVER_VALUE=ec2-35-93-19-159.us-west-2.compute.amazonaws.com
KAFKA_SERVER_VALUE=ec2-35-93-19-159.us-west-2.compute.amazonaws.com
SCHEMA_REGISTRY_SERVER_VALUE=ec2-35-93-19-159.us-west-2.compute.amazonaws.com
INSTANCE_ID=i-06e36f82c35173cc9
VPC_ID=vpc-09a64a3439e9c1022
REGION=us-west-2
SG_ID=sg-0057cdb5b97e1d218
~
".env" 7L, 323B 1,1 All
Memory usage: 0% IPv4 address for docker0: 172.17.0.1
Swap usage: 0% IPv4 address for ens5: 172.31.28.5
Expanded Security Maintenance for Applications is not enabled.
39 updates can be applied immediately.
25 of these updates are standard security updates.
To see these additional updates run: apt list --upgradable
7 additional security updates can be applied with ESM Apps.
Learn more about enabling ESM Apps service at https://ubuntu.com/esm
Last login: Thu Mar 7 06:10:37 2024 from 18.237.140.163
ubuntu@ip-172-31-28-5:~$
ubuntu@ip-172-31-28-5:~$ pwd
/home/ubuntu
ubuntu@ip-172-31-28-5:~$ cd ONES-DL-CLOUD/
ubuntu@ip-172-31-28-5:~/ONES-DL-CLOUD$ pwd
/home/ubuntu/ONES-DL-CLOUD
ubuntu@ip-172-31-28-5:~/ONES-DL-CLOUD$ ls
one-dl.tar.gz
ubuntu@ip-172-31-28-5:~/ONES-DL-CLOUD$ tar -xvf one-dl.tar.gz
docker-compose.yml
one-dl-multitenant-installer.sh
.env
ubuntu@ip-172-31-28-5:~/ONES-DL-CLOUD$ vi .env
ZOOKEEPER_SERVER_VALUE=ec2-35-93-19-159.us-west-2.compute.amazonaws.com
KAFKA_SERVER_VALUE=ec2-35-93-19-159.us-west-2.compute.amazonaws.com
SCHEMA_REGISTRY_SERVER_VALUE=ec2-35-93-19-159.us-west-2.compute.amazonaws.com
INSTANCE_ID=i-06e36f82c35173cc9
VPC_ID=vpc-09a64a3439e9c1022
REGION=us-west-2
SG_ID=sg-0057cdb5b97e1d218
ubuntu@ip-172-31-28-5:~/ONES-DL-CLOUD$ cat .env
ZOOKEEPER_SERVER_VALUE=ec2-35-93-19-159.us-west-2.compute.amazonaws.com
KAFKA_SERVER_VALUE=ec2-35-93-19-159.us-west-2.compute.amazonaws.com
SCHEMA_REGISTRY_SERVER_VALUE=ec2-35-93-19-159.us-west-2.compute.amazonaws.com
INSTANCE_ID=i-06e36f82c35173cc9
VPC_ID=vpc-09a64a3439e9c1022
REGION=us-west-2
SG_ID=sg-0057cdb5b97e1d218
ubuntu@ip-172-31-28-5:~/ONES-DL-CLOUD$ cp .env .env-backup
ubuntu@ip-172-31-28-5:~/ONES-DL-CLOUD$ cat .env-backup
ZOOKEEPER_SERVER_VALUE=ec2-35-93-19-159.us-west-2.compute.amazonaws.com
KAFKA_SERVER_VALUE=ec2-35-93-19-159.us-west-2.compute.amazonaws.com
SCHEMA_REGISTRY_SERVER_VALUE=ec2-35-93-19-159.us-west-2.compute.amazonaws.com
INSTANCE_ID=i-06e36f82c35173cc9
VPC_ID=vpc-09a64a3439e9c1022
REGION=us-west-2
SG_ID=sg-0057cdb5b97e1d218
ubuntu@ip-172-31-28-5:~/ONES-DL-CLOUD$ ls
docker-compose.yml one-dl-multitenant-installer.sh one-dl.tar.gz
ubuntu@ip-172-31-28-5:~/ONES-DL-CLOUD$ ./one-dl-multitenant-installer.sh
SHELL=/bin/bash
REGION=us-west-2
KAFKA_SERVER_VALUE=ec2-34-215-5-89.us-west-2.compute.amazonaws.com
PWD=/home/ubuntu/ONES-DL-CLOUD
LOGNAME=ubuntu
XDG_SESSION_TYPE=tty
SCHEMA_REGISTRY_SERVER_VALUE=ec2-34-215-5-89.us-west-2.compute.amazonaws.com
MOTD_SHOWN=pam
HOME=/home/ubuntu
LANG=C.UTF-8
LS_COLORS=rs=0:di=01;34:ln=01;36:mh=00:pi=40;33:so=01;35:do=01;35:bd=40;33;01:cd=40;33;01:or=40;31;01:mi=00:su=37;41:sg=30;43:ca=30;41:tw=30;42:ow=34;42:st=37;44:ex=01;32:*.tar=01;31:*.tgz=01;31:*.arc=01;31:*.arj=01;31:*.taz=01;31:*.lha=01;31:*.lz4=01;31:*.lzh=01;31:*.lzma=01;31:*.tlz=01;31:*.txz=01;31:*.tzo=01;31:*.t7z=01;31:*.zip=01;31:*.z=01;31:*.dz=01;31:*.gz=01;31:*.lrz=01;31:*.lz=01;31:*.lzo=01;31:*.xz=01;31:*.zst=01;31:*.tzst=01;31:*.bz2=01;31:*.bz=01;31:*.tbz=01;31:*.tbz2=01;31:*.tz=01;31:*.deb=01;31:*.rpm=01;31:*.jar=01;31:*.war=01;31:*.ear=01;31:*.sar=01;31:*.rar=01;31:*.alz=01;31:*.ace=01;31:*.zoo=01;31:*.cpio=01;31:*.7z=01;31:*.rz=01;31:*.cab=01;31:*.wim=01;31:*.swm=01;31:*.dwm=01;31:*.esd=01;31:*.jpg=01;35:*.jpeg=01;35:*.mjpg=01;35:*.mjpeg=01;35:*.gif=01;35:*.bmp=01;35:*.pbm=01;35:*.pgm=01;35:*.ppm=01;35:*.tga=01;35:*.xbm=01;35:*.xpm=01;35:*.tif=01;35:*.tiff=01;35:*.png=01;35:*.svg=01;35:*.svgz=01;35:*.mng=01;35:*.pcx=01;35:*.mov=01;35:*.mpg=01;35:*.mpeg=01;35:*.m2v=01;35:*.mkv=01;35:*.webm=01;35:*.webp=01;35:*.ogm=01;35:*.mp4=01;35:*.m4v=01;35:*.mp4v=01;35:*.vob=01;35:*.qt=01;35:*.nuv=01;35:*.wmv=01;35:*.asf=01;35:*.rm=01;35:*.rmvb=01;35:*.flc=01;35:*.avi=01;35:*.fli=01;35:*.flv=01;35:*.gl=01;35:*.dl=01;35:*.xcf=01;35:*.xwd=01;35:*.yuv=01;35:*.cgm=01;35:*.emf=01;35:*.ogv=01;35:*.ogx=01;35:*.aac=00;36:*.au=00;36:*.flac=00;36:*.m4a=00;36:*.mid=00;36:*.midi=00;36:*.mka=00;36:*.mp3=00;36:*.mpc=00;36:*.ogg=00;36:*.ra=00;36:*.wav=00;36:*.oga=00;36:*.opus=00;36:*.spx=00;36:*.xspf=00;36:
VPC_ID=vpc-09a64a3439e9c1022
LC_TERMINAL=iTerm2
SSH_CONNECTION=43.224.130.156 61180 172.31.28.5 22
LESSCLOSE=/usr/bin/lesspipe %s %s
XDG_SESSION_CLASS=user
TERM=xterm-256color
LESSOPEN=| /usr/bin/lesspipe %s
USER=ubuntu
SG_ID=sg-04c3752b777d8f77e
LC_TERMINAL_VERSION=3.4.16
SHLVL=2
XDG_SESSION_ID=5
LC_CTYPE=C.UTF-8
XDG_RUNTIME_DIR=/run/user/1000
SSH_CLIENT=43.224.130.156 61180 22
XDG_DATA_DIRS=/usr/local/share:/usr/share:/var/lib/snapd/desktop
ZOOKEEPER_SERVER_VALUE=ec2-34-215-5-89.us-west-2.compute.amazonaws.com
PATH=/usr/local/sbin:/usr/local/bin:/usr/sbin:/usr/bin:/sbin:/bin:/usr/games:/usr/local/games:/snap/bin
INSTANCE_ID=i-01300eb6edb18273b
DBUS_SESSION_BUS_ADDRESS=unix:path=/run/user/1000/bus
SSH_TTY=/dev/pts/1
OLDPWD=/home/ubuntu
_=/usr/bin/env
us-west-2 i-01300eb6edb18273b vpc-09a64a3439e9c1022 sg-04c3752b777d8f77e
Error response from daemon: No such container: zookeeper
Error response from daemon: No such container: kafka
Error response from daemon: No such container: schema-registry
Error response from daemon: No such container: kafka-connect
Error response from daemon: No such container: zookeeper
Error response from daemon: No such container: kafka
Error response from daemon: No such container: schema-registry
Error response from daemon: No such container: kafka-connect
{
"Return": true,
"SecurityGroupRules": [
{
"SecurityGroupRuleId": "sgr-07f887d736a7c773c",
"GroupId": "sg-04c3752b777d8f77e",
"GroupOwnerId": "259789323334",
"IsEgress": false,
"IpProtocol": "tcp",
"FromPort": 29092,
"ToPort": 29092,
"CidrIpv4": "0.0.0.0/0"
}
]
}
{
"Return": true,
"SecurityGroupRules": [
{
"SecurityGroupRuleId": "sgr-0d446cf43dbf8c55a",
"GroupId": "sg-04c3752b777d8f77e",
"GroupOwnerId": "259789323334",
"IsEgress": false,
"IpProtocol": "tcp",
"FromPort": 9092,
"ToPort": 9092,
"CidrIpv4": "0.0.0.0/0"
}
]
}
{
"Return": true,
"SecurityGroupRules": [
{
"SecurityGroupRuleId": "sgr-08d752b5cbfea8b1c",
"GroupId": "sg-04c3752b777d8f77e",
"GroupOwnerId": "259789323334",
"IsEgress": false,
"IpProtocol": "tcp",
"FromPort": 2181,
"ToPort": 2181,
"CidrIpv4": "0.0.0.0/0"
}
]
}
{
"Return": true,
"SecurityGroupRules": [
{
"SecurityGroupRuleId": "sgr-058962812f2650b4e",
"GroupId": "sg-04c3752b777d8f77e",
"GroupOwnerId": "259789323334",
"IsEgress": false,
"IpProtocol": "tcp",
"FromPort": 8083,
"ToPort": 8083,
"CidrIpv4": "0.0.0.0/0"
}
]
}
{
"Return": true,
"SecurityGroupRules": [
{
"SecurityGroupRuleId": "sgr-03a801549ac17a74d",
"GroupId": "sg-04c3752b777d8f77e",
"GroupOwnerId": "259789323334",
"IsEgress": false,
"IpProtocol": "tcp",
"FromPort": 8081,
"ToPort": 8081,
"CidrIpv4": "0.0.0.0/0"
}
]
}
{
"Return": true,
"SecurityGroupRules": [
{
"SecurityGroupRuleId": "sgr-01ae4abe9d99c0086",
"GroupId": "sg-04c3752b777d8f77e",
"GroupOwnerId": "259789323334",
"IsEgress": false,
"IpProtocol": "tcp",
"FromPort": 8181,
"ToPort": 8181,
"CidrIpv4": "0.0.0.0/0"
}
]
}
[+] Running 10/10
✔ zookeeper 9 layers [⣿⣿⣿⣿⣿⣿⣿⣿⣿] 0B/0B Pulled 5.1s
✔ 23828d760c7b Pull complete 0.6s
✔ e2670537dceb Pull complete 0.5s
✔ 3c059ccfa418 Pull complete 0.6s
✔ a23d33d59f2a Pull complete 0.7s
✔ 842a648f5439 Pull complete 0.9s
✔ 278244c5561f Pull complete 0.9s
✔ 0ab51e87b8dc Pull complete 1.0s
✔ 26ff518a75d1 Pull complete 1.4s
✔ 050c7bc3a5c4 Pull complete 1.1s
[+] Running 1/1
✔ Container zookeeper Started 4.2s
[+] Running 12/12
✔ kafka 11 layers [⣿⣿⣿⣿⣿⣿⣿⣿⣿⣿⣿] 0B/0B Pulled 9.4s
✔ fe36fc382320 Pull complete 0.7s
✔ 4250354b4fb7 Pull complete 2.1s
✔ c4c5f447179d Pull complete 0.3s
✔ 17fe3a92262f Pull complete 0.6s
✔ 5420596c14ab Pull complete 1.1s
✔ 0e55377ebe37 Pull complete 0.9s
✔ da7039bb2113 Pull complete 1.1s
✔ d389b3791c2e Pull complete 1.4s
✔ c24709eccb2a Pull complete 1.4s
✔ ad79ffd84e00 Pull complete 2.4s
✔ 218229bf30d9 Pull complete 1.7s
[+] Running 1/1
✔ Container kafka Started 5.7s
[+] Running 12/12
✔ schema-registry 11 layers [⣿⣿⣿⣿⣿⣿⣿⣿⣿⣿⣿] 0B/0B Pulled 17.9s
✔ fe36fc382320 Already exists 0.0s
✔ 4250354b4fb7 Already exists 0.0s
✔ c4c5f447179d Already exists 0.0s
✔ 17fe3a92262f Already exists 0.0s
✔ 5420596c14ab Already exists 0.0s
✔ 0e55377ebe37 Already exists 0.0s
✔ da7039bb2113 Already exists 0.0s
✔ d389b3791c2e Already exists 0.0s
✔ c24709eccb2a Already exists 0.0s
✔ e69ded016b1a Pull complete 8.9s
✔ 83e8ec805f43 Pull complete 0.3s
[+] Running 1/1
✔ Container schema-registry Started 18.7s
[+] Running 21/21
✔ kafka-connect 20 layers [⣿⣿⣿⣿⣿⣿⣿⣿⣿⣿⣿⣿⣿⣿⣿⣿⣿⣿⣿⣿] 0B/0B Pulled 18.1s
✔ a49367d57626 Pull complete 0.7s
✔ eeec2f37f4a0 Pull complete 2.8s
✔ ae805807db54 Pull complete 1.4s
✔ c553584e96cc Pull complete 1.1s
✔ 28769e081b94 Pull complete 2.4s
✔ 151cf144f79d Pull complete 1.9s
✔ 04292bb11042 Pull complete 2.3s
✔ c2e0c70921ea Pull complete 2.7s
✔ e8d7f71a6ca4 Pull complete 2.9s
✔ eb27eb7b8f05 Pull complete 4.7s
✔ 9bb8b7d5f6a0 Pull complete 3.3s
✔ 302eaef771e0 Pull complete 11.7s
✔ 1d0d5b44b6f1 Pull complete 3.8s
✔ 22df7873ee50 Pull complete 4.4s
✔ 4f4fb700ef54 Pull complete 4.7s
✔ 972adc085ab6 Pull complete 7.0s
✔ c4f994822767 Pull complete 6.1s
✔ 70547799762d Pull complete 7.0s
✔ 3f0c034e271c Pull complete 7.5s
✔ b6195a937e7b Pull complete 7.7s
[+] Running 1/1
✔ Container kafka-connect Started 4.6s
ubuntu@ip-172-31-28-5:~/ONES-DL-CLOUD$
ubuntu@ip-172-31-28-5:~/ONES-DL-CLOUD$ sudo su
root@ip-172-31-28-5:/home/ubuntu/ONES-DL-CLOUD# docker ps
CONTAINER ID IMAGE COMMAND CREATED STATUS PORTS NAMES
ab8aa46cc746 avizdock/kafka-connect:latest "/etc/confluent/dock…" 28 seconds ago Up 23 seconds (health: starting) kafka-connect
346522f4baf5 confluentinc/cp-schema-registry "/etc/confluent/dock…" About a minute ago Up About a minute schema-registry
23c50c44bc5b confluentinc/cp-kafka:latest "/etc/confluent/dock…" 2 minutes ago Up 2 minutes kafka
633eba10034d zookeeper "/docker-entrypoint.…" 3 minutes ago Up 3 minutes zookeeper
root@ip-172-31-28-5:/home/ubuntu/ONES-DL-CLOUD#switch# show run grpc
!Command: show running-config grpc
!Running configuration last done at: Mon Jan 29 13:59:36 2024
!Time: Mon Jan 29 14:06:27 2024
version 9.3(9) Bios:version 04.18
feature grpc
grpc use-vrf defaultswitch# show grpc gnmi service statistics
=============
gRPC Endpoint
=============
Vrf : management
Server address : [::]:50051
Status : Running - certificate expired
Cert notBefore : Jan 10 07:07:03 2024 GMT
Cert notAfter : Jan 11 07:07:03 2024 GMT
Max concurrent calls : 8
Listen calls : 1
Active calls : 0
Number of created calls : 32
Number of bad calls : 29
Subscription stream/once/poll : 15/0/0
Max gNMI::Get concurrent : 5
Max grpc message size : 8388608
gNMI Synchronous calls : 20496
gNMI Synchronous errors : 0
gNMI Adapter errors : 0
gNMI Dtx errors : 0
=============
gRPC Endpoint
=============
Vrf : default
Server address : [::]:50051
Status : Running - certificate expired
Cert notBefore : Jan 10 07:07:03 2024 GMT
Cert notAfter : Jan 11 07:07:03 2024 GMT
Max concurrent calls : 8
Listen calls : 1
Active calls : 0
Number of created calls : 1
Number of bad calls : 0
Subscription stream/once/poll : 0/0/0
Max gNMI::Get concurrent : 5
Max grpc message size : 8388608
gNMI Synchronous calls : 0
gNMI Synchronous errors : 0
gNMI Adapter errors : 0
gNMI Dtx errors : 0
switch# show grpc gnmi rpc summary
=============
gRPC Endpoint
=============
Vrf : management
Server address : [::]:50051
Status : Running - certificate expired
Cert notBefore : Jan 10 07:07:03 2024 GMT
Cert notAfter : Jan 11 07:07:03 2024 GMT
Capability rpcs : 20474
Capability errors : 0
Get rpcs : 22
Get errors : 0
Set rpcs : 0
Set errors : 0
Resource Exhausted : 0
Option Unsupported : 0
Invalid Argument : 0
Operation Aborted : 0
Internal Error : 0
Unknown Error : 0
RPC Type State Last Activity Cnt Req Cnt Resp Client
--------------- ---------- -------------- ---------- ---------- ----------------------------------------
Subscribe Listen 01/29 08:42:41 0 0
=============
gRPC Endpoint
=============
Vrf : default
Server address : [::]:50051
Status : Running - certificate expired
Cert notBefore : Jan 10 07:07:03 2024 GMT
Cert notAfter : Jan 11 07:07:03 2024 GMT
Capability rpcs : 0
Capability errors : 0
Get rpcs : 0
Get errors : 0
Set rpcs : 0
Set errors : 0
Resource Exhausted : 0
Option Unsupported : 0
Invalid Argument : 0
Operation Aborted : 0
Internal Error : 0
Unknown Error : 0
RPC Type State Last Activity Cnt Req Cnt Resp Client
--------------- ---------- -------------- ---------- ---------- ----------------------------------------
Subscribe Listen 01/10 08:12:32 0 0
switch#
switch# show grpc gnmi transactions
=============
gRPC Endpoint
=============
Vrf : management
Server address : [::]:50051
Status : Running - certificate expired
Cert notBefore : Jan 10 07:07:03 2024 GMT
Cert notAfter : Jan 11 07:07:03 2024 GMT
RPC DataType Session Time In Duration(ms) Status
------------ ---------- --------------- -------------------- ------------ ------
Capabilities - 0 01/29 12:04:07 0 0
Capabilities - 0 01/29 12:03:47 0 0
Capabilities - 0 01/29 12:03:35 0 0
Get ALL 3698131864 01/29 08:43:34 1186 0
...
...
...
switch# show telemetry yang direct-path cisco-nxos-device
1) Cisco-NX-OS-device:System/lldp-items
2) Cisco-NX-OS-device:System/mac-items
3) Cisco-NX-OS-device:System/intf-items
4) Cisco-NX-OS-device:System/procsys-items
5) Cisco-NX-OS-device:System/ipqos-items/queuing-items/policy-items/out-items
6) Cisco-NX-OS-device:System/ch-itemsDoes the ONES-agent is integrated with SONiC NOS? (yes/no): no
Do you want to add only Collector IP for auto-discovery and skip the agent installation ?(yes/no): yes
Enter the ip address of collectors to auto-discover. Do not enter more than 2. Eg - 10.1.1.10,10.2.2.5 : 10.4.5.254
Do you want to restrict access only to provided collector ip?
Note: Providing Yes will restrict access to agent only with the provided collector IP Address
Enter Yes/No: No
468025bd9c12: Loading layer [==================================================>] 2.56kB/2.56kB
1961412d5783: Loading layer [==================================================>] 36.56MB/36.56MB
de3513fa22d1: Loading layer [==================================================>] 42.69MB/42.69MB
ca3343e443b5: Loading layer [==================================================>] 1.421MB/1.421MB
Loaded image: avizdock/agent_installer:latest
Docker image 'avizdock/agent_installer:latest' is loaded.
6466655d5e7dc2631ea51df49e41d75661547603aaa0ddd4615778170fa33a70
Docker container 'agent_installer' is running.
CONTAINER ID IMAGE COMMAND CREATED STATUS PORTS NAMES
6466655d5e7d avizdock/agent_installer:latest "python3" 1 second ago Up Less than a second agent_installer
10.4.5.254
no
no
Selecting ‘Yes’ will exclusively initiate the day-2 deployment of the Ones-Agent,
involving a reconfiguration of the existing agent to establish communication with the specified collector(s).
Choosing ‘No’ will initiate the deployment of the Ones-Agent as an independent third-party container.
[{'ip': '10.4.4.61', 'user': 'admin', 'passwd': 'YourPaSsWoRd', 'layer': 'Leaf', 'region': 'Nyk', 'azid': '1', 'brickid': '1', 'rackid': '1', 'installation_instance': 1, 'agentip': '10.4.4.61', 'collectorip': '10.4.5.254', 'restrict_collector_ip': 'no'}]
Agent installation skipped successfully........
Adding Collector IP for auto-discovery...........
###############Connecting to switch###############
Connection to switch 10.4.4.61 successful.....................
...
...
...
Docker agent_installer has been stopped
agent_installer
Docker agent_installer has been removed
Untagged: avizdock/agent_installer:latest
Deleted: sha256:6604bbec1feedd9169ea6cca598650bf2f1fe659ae587e9637f80adabe877eeb
Deleted: sha256:4754441bc1128ca32bd0085e2a366e111b4882359cdebc92560d243a671f33e3
Deleted: sha256:c803c23f2ec84e2601fa5e5d954b1cbf406167ae057d7200e9d2f61ba1f402fa
Deleted: sha256:f9279b9fbc87fee822c69ea9cacc2f9d9a10d9c54bbc21732205684ea3bcf0b1
Deleted: sha256:27ea50b3cb2914caa5f99e5268ba0b47e15fb7c490275f560c54e400162e2cc3
Docker image has been removedsudo ln -s /etc/nginx/sites-{available,enabled}/nvue.conf
sudo sed -i 's/listen localhost:8765 ssl;/listen \[::\]:8765 ipv6only=off ssl;/g' /etc/nginx/sites-available/nvue.conf
sudo systemctl restart nginxInstalling Open Networking Enterprise Suite (ONES)
..................................................
ONES is getting installed for the first time, choose appropriate options when prompted...
....................
Installing prerequisites for ONES application
....................
....................
....................
....................
Installing ONES application...
Do you want to install domain SSL certificate(if not, installation will proceed with a self signed certificate)? [y/n]: n
Using self signed certificates...
Do you want to enable ONE-DL feature? [y/n]: y
Since ONE-DL configuration has been chosen, please provide the information below...
Enter EC2 ONE-DL Backend Public DNS Endpoint: <Path>Do you want to enable ONE-DL feature? [y/n]: nip,user,passwd,layer,region,azid,brickid,rackid
10.4.4.61,admin,YourPaSsWoRd,Superspine,SanJose,1,1,1
10.4.4.61,admin,YourPaSsWoRd,Spine,SanJose,1,1,1
10.4.4.62,admin,YourPaSsWoRd,Leaf,SanJose,1,1,1
10.4.4.61,admin,YourPaSsWoRd,ToR,SanJose,1,1,1
...
...
...Does the ONES-agent is integrated with SONiC NOS? (yes/no): noDo you want to add only Collector IP for auto-discovery and skip the agent installation ?(yes/no): no Enter the ip address of collectors to auto-discover. Do not enter more than 2. Eg - 10.1.1.10, 10.2.2.5 : 10.4.4.11Do you want to restrict access only to provided collector ip?
Note: Providing Yes will restrict access to agent only with the provided collector IP Address
Enter Yes/No : YesDoes the ONES-agent is integrated with SONiC NOS? (yes/no): no
Do you want to add only Collector IP for auto-discovery and skip the agent installation ?(yes/no): no
Enter the ip address of collectors to auto-discover. Do not enter more than 2. Eg - 10.1.1.10,10.2.2.5 : 10.4.4.11
Do you want to restrict access only to provided collector ip?
Note: Providing Yes will restrict access to agent only with the provided collector IP Address
Enter Yes/No: No
468025bd9c12: Loading layer [==================================================>] 2.56kB/2.56kB
1961412d5783: Loading layer [==================================================>] 36.56MB/36.56MB
de3513fa22d1: Loading layer [==================================================>] 42.69MB/42.69MB
ca3343e443b5: Loading layer [==================================================>] 1.421MB/1.421MB
Loaded image: avizdock/agent_installer:latest
Docker image 'avizdock/agent_installer:latest' is loaded.
ab76dcd0da078a25570efe51a0057040f47e8a4a5c7320a47eb7a63ac5b42d8c
Docker container 'agent_installer' is running.
...
...
...
###############Connecting to switch###############
Connection to switch 10.4.4.61 successful.....................
Looking for previous installation........................
...
...
...
Loading Docker image on the device 10.4.4.61 ###########################################
Docker image loaded successfully on the device 10.4.4.61........
Getting name of the loaded image
image = ##avizdock/ones-agent:v2.1.0##
Running docker.....................
docker run -it -v /var/run/docker.sock:/var/run/docker.sock -v /host/reboot-cause:/host/reboot-cause -v /etc/sonic:/etc/sonic -v /var/run/redis:/var/run/redis -v /var/run:/var/hostrun --log-driver local --log-opt max-size=5m --log-opt max-file=3 --cpu-period=100000 --cpu-quota=50000 --net=host --privileged -dt --name ones-agent avizdock/ones-agent:v2.1.0
b'a01ff31e2f11613e608d7aa425748c69e4d803c5c3cd8a14a1524d173b5e9549\n'
Loading Service file on the device 10.4.4.61........
Service file loaded successfully on the device 10.4.4.61##################
Enabling ones-agent.service 10.4.4.61 ##################
Enabled ones-agent as service successfully on the device 10.4.4.61 ##################
Starting ones-agent service on the device 10.4.4.61........
started ones-agent service successfully on the device 10.4.4.61 ##################
Enabling ones-agent to restart after booting on the device 10.4.4.61........
Made ones-agent immune to booting on the device 10.4.4.61########################
Copying ones-agent.tar file
ones-agent.tar file copied successfully on the device 10.4.4.61........
Copying agent.conf file
agent.conf file copied successfully on the device 10.4.4.61........
Copying ones-agent.service file
ones-agent.service file copied successfully on the device 10.4.4.61........
Copying ones_agent_ip_rule.sh file
ones_agent_ip_rule.sh file copied successfully on the device 10.4.4.61........
Copying ones_agent_start.sh file
ones_agent_start.sh file copied successfully on the device 10.4.4.61........
##################################################################
Status of ones-agent.service is - Active: active (running) since Mon 2024-04-15 19:32:21 IST; 1min 35s ago
Deployment of ones-agent to switch 10.4.4.61 is successful
agent_installer
Docker agent_installer has been stopped
agent_installer
Docker agent_installer has been removed
Untagged: avizdock/agent_installer:latest
Deleted: sha256:6604bbec1feedd9169ea6cca598650bf2f1fe659ae587e9637f80adabe877eeb
Deleted: sha256:4754441bc1128ca32bd0085e2a366e111b4882359cdebc92560d243a671f33e3
Deleted: sha256:c803c23f2ec84e2601fa5e5d954b1cbf406167ae057d7200e9d2f61ba1f402fa
Deleted: sha256:f9279b9fbc87fee822c69ea9cacc2f9d9a10d9c54bbc21732205684ea3bcf0b1
Deleted: sha256:27ea50b3cb2914caa5f99e5268ba0b47e15fb7c490275f560c54e400162e2cc3
Docker image has been removed<domain type='kvm' xmlns:qemu='http://libvirt.org/schemas/domain/qemu/1.0'>
<name>ONES_VM01</name>
<memory unit='KiB'>4194304</memory>
<currentMemory unit='KiB'>4194304</currentMemory>
<vcpu placement='static'>4</vcpu>
<resource>
<partition>/machine</partition>
</resource>
<os>
<type arch='x86_64' machine='pc-i440fx-1.5'>hvm</type>
<boot dev='hd'/>
</os>
<features>
<acpi/>
<apic/>
</features>
<clock offset='utc'/>
<on_poweroff>destroy</on_poweroff>
<on_reboot>restart</on_reboot>
<on_crash>restart</on_crash>
<devices>
<emulator>/usr/bin/qemu-system-x86_64</emulator>
<disk type='file' device='disk'>
<driver name='qemu' type='qcow2' cache='writeback'/>
<source file='/home/oper/taas_vm/ones.qcow2' />
<target bus='virtio' dev='vda'/>
</disk>
<serial type='pty'>
<source path='/dev/pts/3'/>
<target port='0'/>
</serial>
<!-- Management interface eth0 -->
<interface type='network'>
<model type='e1000' />
<source network='br0'/>
<address type='pci' domain='0x0000' bus='0x00' slot='0x00' function='0x0'/>
</interface>
<controller type='usb' index='0'/>
<memballoon model='virtio'>
<alias name='balloon0'/>
<address type='pci' domain='0x0000' bus='0x00' slot='0x04' function='0x0'/>
</memballoon>
</devices>
</domain>Line #2 The Name of the VM
Line #3 The amount of System Memory for the VM
Line #4 The amount of System Memory for the VM
Line #5 The number of vCPU Core for the VM
Line #25 The Path to the qcow2 VM image file
Line #35 The name of the Linux bridge on the host machine<network>
<name>br0</name>
<forward mode="bridge" />
<bridge name="br0" />
</network>Line #4 the name of the Linux bridge on the host machine#Execute the below command to attach the VM to the Linux Bridge
sonic@sonic-39:~$ virsh net-define bridged-network.xml
sonic@sonic-39:~$ virsh net-start br0
sonic@sonic-39:~$ virsh net-autostart br0
sonic@sonic-39:~$ virsh net-list
Name State Autostart Persistent
----------------------------------------------------------
br0 active yes yes
sonic@sonic-39:~$ virsh create <VM XML configuration file>
#sonic@sonic-39:~$ virsh create ones.xml
#Domain ONES_VM01 created from ones.xml
#sonic@sonic-39:~$
sonic@sonic-39:~$ virsh list
Id Name State
----------------------------------------------------
8 ONES_VM01 running
sonic@sonic-39:~$ Username: aviz
Password: Aviz@123Username: aviz
Password: Aviz@123python3 vm-hdd-expand.pyThis section explains how large data centers can be designed seamlessly using ONES.
inventory:
- ipAddress: "10.4.4.61"
layer: "Spine"
region: "San Jose"
azId: 1
brickId: 1
user: "admin"
password: "YourPaSsWoRd"
type: "cumulus"
- ipAddress: "10.4.4.62"
layer: "Spine"
region: "San Jose"
azId: 1
brickId: 1
user: "admin"
password: "YourPaSsWoRd"
type: "arista"
- ipAddress: "10.4.4.63"
layer: "Spine"
region: "San Jose"
azId: 1
brickId: 1
user: "admin"
password: "YourPaSsWoRd"
type: cisco-nxos
- ipAddress: "10.4.4.64"
layer: "Spine"
region: "San Jose"
azId: 1
brickId: 1
user: "admin"
password: "YourPaSsWoRd"
type: "sonic"
The device should not have any IP, VLAN, Portchannel, BGP, SAG, or MCLAG config on any of the Interfaces to avoid overlapping during the orchestration and run into cleanup issues.
Post that, the user needs to save the config to a file, in case of any orchestration failure, or misconfiguration user can rollback to the saved config.


Inventory:
SSpines: 0
Spines: 2
Leafs: 4
Tors: 0
Connectivity:
SSpine: []
Spine:
- switchId: 1
switchName: "Spine-1"
ipAddress: "100.100.10.11"
ASN: 2001
Credentials:
user: "admin"
password: "admin"
mclag:
Links:
- link: "S1_Ethernet0 | L1_Ethernet48"
staticLink: true
properties:
- link: "S1_Ethernet4 | L2_Ethernet48"
staticLink: true
properties:
- link: "S1_Ethernet8 | L3_Ethernet48"
staticLink: true
properties:
- link: "S1_Ethernet12 | L4_Ethernet48"
staticLink: true
properties:
- switchId: 2
switchName: "Spine-2"
ipAddress: "100.100.10.12"
ASN: 2002
Credentials:
user: "admin"
password: "admin"
mclag:
Links:
- link: "S2_Ethernet0 | L1_Ethernet52"
staticLink: true
properties:
- link: "S2_Ethernet4 | L2_Ethernet52"
staticLink: true
properties:
- link: "S2_Ethernet8 | L3_Ethernet52"
staticLink: true
properties:
- link: "S2_Ethernet12 | L4_Ethernet52"
staticLink: true
properties:
Leaf:
- switchId: 1
switchName: "Leaf-1"
ipAddress: "100.100.10.13"
ASN: 1001
Credentials:
user: "admin"
password: "admin"
mclag:
Links:
- link: "L1_Ethernet48 | S1_Ethernet0"
staticLink: true
properties:
- link: "L1_Ethernet52 | S2_Ethernet0"
staticLink: true
properties:
- link: "L1_Ethernet0 | H1_Ethernet0"
staticLink: true
properties:
mode: "L2-Trunk"
vlan: 201
vrf: 1
- switchId: 2
switchName: "Leaf-2"
ipAddress: "100.100.10.14"
ASN: 1002
Credentials:
user: "admin"
password: "admin"
mclag:
Links:
- link: "L2_Ethernet48 | S1_Ethernet4"
staticLink: true
properties:
- link: "L2_Ethernet52 | S2_Ethernet4"
staticLink: true
properties:
- link: "L2_Ethernet4 | H2_Ethernet1"
staticLink: true
properties:
mode: "L2-Trunk"
vlan: 202
vrf: 2
- switchId: 3
switchName: "Leaf-3"
ipAddress: "100.100.10.15"
ASN: 1003
Credentials:
user: "admin"
password: "admin"
mclag:
Links:
- link: "L3_Ethernet48 | S1_Ethernet8"
staticLink: true
properties:
- link: "L3_Ethernet52 | S2_Ethernet8"
staticLink: true
properties:
- link: "L3_Ethernet0 | H3_Ethernet0"
staticLink: true
properties:
mode: "L2-Trunk"
vlan: 203
vrf: 1
- switchId: 4
switchName: "Leaf-4"
ipAddress: "100.100.10.16"
ASN: 1004
Credentials:
user: "admin"
password: "admin"
mclag:
Links:
- link: "L4_Ethernet48 | S1_Ethernet12"
staticLink: true
properties:
- link: "L4_Ethernet52 | S2_Ethernet12"
staticLink: true
properties:
- link: "L4_Ethernet4 | H4_Ethernet1"
staticLink: true
properties:
mode: "L2-Trunk"
vlan: 204
vrf: 2
Tor: []
BGP:
BGP_U: false
ND_RA: 30
PhysicalIfCfg:
FEC: "Off"
MTU: 9000
AdminStatus: "Up"
ASN:
SSpine: "10000-20000"
Spine: "21000-50000"
Leaf: "51000-60000"
Tor: "61000-70000"
IPv4Pool:
Loopback: "10.10.10.0/24"
LeafSpine: "40.0.0.0/24"
LeafTor: "39.0.0.0/24"
Host: "49.0.0.0/24"
IPv6Pool:
LeafSpine:
LeafTor:
Host:
NTP:
server: "100.100.10.10"
timezone: "Asia/Kolkata"
SYSLOG:
server: "100.100.10.10"
SNMP:
trapserver: "100.100.10.10"
Parameters:
vlan: "200-205"
vni: "20000-20005"
anycast_gateway: "100.10.0.0/23"
anycast_mac: "00:11:22:33:44:55"
hosts_per_vlan: 10
routing_symmetric: true
irb_vlan: "300-305"
irb_vni: "30000-30005"
sag: trueInventory:
SSpines: 0
Spines: 2
Leafs: 4
Tors: 0
Connectivity:
SSpine: []
Spine:
- switchId: 1
switchName: "Spine-1"
ipAddress: "100.100.10.11"
ASN: 21001
Credentials:
user: "admin"
password: "admin"
mclag:
Links:
- link: "S1_Ethernet0 | L1_Ethernet48"
staticLink: true
properties:
- link: "S1_Ethernet4 | L2_Ethernet48"
staticLink: true
properties:
- link: "S1_Ethernet8 | L3_Ethernet48"
staticLink: true
properties:
- link: "S1_Ethernet12 | L4_Ethernet48"
staticLink: true
properties:
- switchId: 2
switchName: "Spine-2"
ipAddress: "100.100.10.12"
ASN: 21002
Credentials:
user: "admin"
password: "admin"
mclag:
Links:
- link: "S2_Ethernet0 | L1_Ethernet52"
staticLink: true
properties:
- link: "S2_Ethernet4 | L2_Ethernet52"
staticLink: true
properties:
- link: "S2_Ethernet8 | L3_Ethernet52"
staticLink: true
properties:
- link: "S2_Ethernet12 | L4_Ethernet52"
staticLink: true
properties:
Leaf:
- switchId: 1
switchName: "Leaf-1"
ipAddress: "100.100.10.13"
ASN: 31001
Credentials:
user: "admin"
password: "admin"
mclag:
enabled: true
peer: "L2"
keepalive_vlan: 10
Links:
- link: "L1_Ethernet48 | S1_Ethernet0"
staticLink: true
properties:
- link: "L1_Ethernet52 | S2_Ethernet0"
staticLink: true
properties:
- link: "L1_Ethernet56 | L2_Ethernet56"
staticLink: true
properties:
mode: "MC-LAG"
- link: "L1_Ethernet0 | H1_Ethernet0"
staticLink: true
properties:
mode: "L2-Trunk"
vlan: 500
mc_po_group: 500
vrf: 1
- link: "L1_Ethernet4 | H2_Ethernet0"
staticLink: true
properties:
mode: "L2-Trunk"
vlan: 501
mc_po_group: 501
vrf: 1
- switchId: 2
switchName: "Leaf-2"
ipAddress: "100.100.10.14"
ASN: 31001
Credentials:
user: "admin"
password: "admin"
mclag:
enabled: true
peer: "L1"
keepalive_vlan: 10
Links:
- link: "L2_Ethernet48 | S1_Ethernet4"
staticLink: true
properties:
- link: "L2_Ethernet52 | S2_Ethernet4"
staticLink: true
properties:
- link: "L2_Ethernet56 | L1_Ethernet56"
staticLink: true
properties:
mode: "MC-LAG"
- link: "L2_Ethernet0 | H1_Ethernet1"
staticLink: true
properties:
mode: "L2-Trunk"
vlan: 500
mc_po_group: 500
vrf: 1
- link: "L2_Ethernet4 | H2_Ethernet1"
staticLink: true
properties:
mode: "L2-Trunk"
vlan: 501
mc_po_group: 501
vrf: 1
- switchId: 3
switchName: "Leaf-3"
ipAddress: "100.100.10.15"
ASN: 31002
Credentials:
user: "admin"
password: "admin"
mclag:
enabled: true
peer: "L4"
keepalive_vlan: 10
Links:
- link: "L3_Ethernet48 | S1_Ethernet8"
staticLink: true
properties:
- link: "L3_Ethernet52 | S2_Ethernet8"
staticLink: true
properties:
- link: "L3_Ethernet56 | L4_Ethernet56"
staticLink: true
properties:
mode: "MC-LAG"
- link: "L3_Ethernet0 | H3_Ethernet0"
staticLink: true
properties:
mode: "L2-Trunk"
vlan: 500
mc_po_group: 500
vrf: 1
- link: "L3_Ethernet4 | H4_Ethernet0"
staticLink: true
properties:
mode: "L2-Trunk"
vlan: 501
mc_po_group: 501
vrf: 1
- switchId: 4
switchName: "Leaf-4"
ipAddress: "100.100.10.16"
ASN: 31002
Credentials:
user: "admin"
password: "admin"
mclag:
enabled: true
peer: "L3"
keepalive_vlan: 10
Links:
- link: "L4_Ethernet48 | S1_Ethernet12"
staticLink: true
properties:
- link: "L4_Ethernet52 | S2_Ethernet12"
staticLink: true
properties:
- link: "L4_Ethernet56 | L3_Ethernet56"
staticLink: true
properties:
mode: "MC-LAG"
- link: "L4_Ethernet0 | H3_Ethernet1"
staticLink: true
properties:
mode: "L2-Trunk"
vlan: 500
mc_po_group: 500
vrf: 1
- link: "L4_Ethernet4 | H4_Ethernet1"
staticLink: true
properties:
mode: "L2-Trunk"
vlan: 501
mc_po_group: 501
vrf: 1
Tor: []
BGP:
BGP_U: false
ND_RA: 30
PhysicalIfCfg:
FEC: "Off"
MTU: 9000
AdminStatus: "Up"
ASN:
SSpine: "10000-20000"
Spine: "21000-50000"
Leaf: "51000-60000"
Tor: "61000-70000"
IPv4Pool:
Loopback: "49.10.10.0/24"
LeafSpine: "39.0.0.0/24"
LeafTor: "29.0.0.0/24"
Host: "19.0.0.0/24"
IPv6Pool:
LeafSpine:
LeafTor:
Host:
NTP:
server: "100.100.10.10"
timezone: "Asia/Kolkata"
SYSLOG:
server: "100.100.10.10"
SNMP:
trapserver: "100.100.10.10"
Parameters:
vlan: "500-505"
vni: "50000-50005"
anycast_gateway: "200.10.0.0/23"
anycast_mac: "00:11:22:33:44:55"
hosts_per_vlan: 10
routing_symmetric: true
irb_vlan: "400-405"
irb_vni: "40000-40005"
sag: False
Inventory:
SSpines: 0
Spines: 2
Leafs: 4
Tors: 0
Connectivity:
SSpine: []
Spine:
- switchId: 1
switchName: "Spine-1"
ipAddress: "100.100.10.11"
ASN: 2001
Credentials:
user: "admin"
password: "admin"
mclag:
Links:
- link: "S1_Ethernet0 | L1_Ethernet48"
staticLink: true
properties:
- link: "S1_Ethernet4 | L2_Ethernet48"
staticLink: true
properties:
- link: "S1_Ethernet8 | L3_Ethernet48"
staticLink: true
properties:
- link: "S1_Ethernet12 | L4_Ethernet48"
staticLink: true
properties:
- switchId: 2
switchName: "Spine-2"
ipAddress: "100.100.10.12"
ASN: 2002
Credentials:
user: "admin"
password: "admin"
mclag:
Links:
- link: "S2_Ethernet0 | L1_Ethernet52"
staticLink: true
properties:
- link: "S2_Ethernet4 | L2_Ethernet52"
staticLink: true
properties:
- link: "S2_Ethernet8 | L3_Ethernet52"
staticLink: true
properties:
- link: "S2_Ethernet12 | L4_Ethernet52"
staticLink: true
properties:
Leaf:
- switchId: 1
switchName: "Leaf-1"
ipAddress: "100.100.10.13"
ASN: 1001
Credentials:
user: "admin"
password: "admin"
mclag:
Links:
- link: "L1_Ethernet48 | S1_Ethernet0"
staticLink: true
properties:
- link: "L1_Ethernet52 | S2_Ethernet0"
staticLink: true
properties:
- link: "L1_Ethernet0 | H1_Ethernet0"
staticLink: true
properties:
mode: "L2-Trunk"
vlan: 201
vrf: 1
- switchId: 2
switchName: "Leaf-2"
ipAddress: "100.100.10.14"
ASN: 1002
Credentials:
user: "admin"
password: "admin"
mclag:
Links:
- link: "L2_Ethernet48 | S1_Ethernet4"
staticLink: true
properties:
- link: "L2_Ethernet52 | S2_Ethernet4"
staticLink: true
properties:
- link: "L2_Ethernet4 | H2_Ethernet1"
staticLink: true
properties:
mode: "L2-Trunk"
vlan: 202
vrf: 2
- switchId: 3
switchName: "Leaf-3"
ipAddress: "100.100.10.15"
ASN: 1003
Credentials:
user: "admin"
password: "admin"
mclag:
Links:
- link: "L3_Ethernet48 | S1_Ethernet8"
staticLink: true
properties:
- link: "L3_Ethernet52 | S2_Ethernet8"
staticLink: true
properties:
- link: "L3_Ethernet0 | H3_Ethernet0"
staticLink: true
properties:
mode: "L2-Trunk"
vlan: 203
vrf: 1
- switchId: 4
switchName: "Leaf-4"
ipAddress: "100.100.10.16"
ASN: 1004
Credentials:
user: "admin"
password: "admin"
mclag:
Links:
- link: "L4_Ethernet48 | S1_Ethernet12"
staticLink: true
properties:
- link: "L4_Ethernet52 | S2_Ethernet12"
staticLink: true
properties:
- link: "L4_Ethernet4 | H4_Ethernet1"
staticLink: true
properties:
mode: "L2-Trunk"
vlan: 204
vrf: 2
Tor: []
BGP:
BGP_U: false
ND_RA: 30
PhysicalIfCfg:
FEC: "Off"
MTU: 9000
AdminStatus: "Up"
ASN:
SSpine: "10000-20000"
Spine: "21000-50000"
Leaf: "51000-60000"
Tor: "61000-70000"
IPv4Pool:
Loopback: "10.10.10.0/24"
LeafSpine: "40.0.0.0/24"
LeafTor: "39.0.0.0/24"
Host: "49.0.0.0/24"
IPv6Pool:
LeafSpine:
LeafTor:
Host:
NTP:
server: "100.100.10.10"
timezone: "Asia/Kolkata"
SYSLOG:
server: "100.100.10.10"
SNMP:
trapserver: "100.100.10.10"
Parameters:
vlan: "200-205"
vni: "20000-20005"
anycast_gateway: "100.10.0.0/23"
anycast_mac: "00:11:22:33:44:55"
hosts_per_vlan: 10
routing_symmetric: true
irb_vlan: "300-305"
irb_vni: "30000-30005"
sag: False
Inventory:
SSpines: 0
Spines: 2
Leafs: 4
Tors: 0
Connectivity:
SSpine: []
Spine:
- switchId: 1
switchName: "Spine-1"
ipAddress: "100.100.10.11"
ASN: 2001
Credentials:
user: "admin"
password: "admin"
mclag:
Links:
- link: "S1_Ethernet0 | L1_Ethernet48"
staticLink: true
properties:
- link: "S1_Ethernet4 | L2_Ethernet48"
staticLink: true
properties:
- link: "S1_Ethernet8 | L3_Ethernet48"
staticLink: true
properties:
- link: "S1_Ethernet12 | L4_Ethernet48"
staticLink: true
properties:
- switchId: 2
switchName: "Spine-2"
ipAddress: "100.100.10.12"
ASN: 2002
Credentials:
user: "admin"
password: "admin"
mclag:
Links:
- link: "S2_Ethernet0 | L1_Ethernet52"
staticLink: true
properties:
- link: "S2_Ethernet4 | L2_Ethernet52"
staticLink: true
properties:
- link: "S2_Ethernet8 | L3_Ethernet52"
staticLink: true
properties:
- link: "S2_Ethernet12 | L4_Ethernet52"
staticLink: true
properties:
Leaf:
- switchId: 1
switchName: "Leaf-1"
ipAddress: "100.100.10.13"
ASN: 1001
Credentials:
user: "admin"
password: "admin"
mclag:
enabled: true
peer: "L2"
keepalive_vlan: 998
Links:
- link: "L1_Ethernet48 | S1_Ethernet0"
staticLink: true
properties:
- link: "L1_Ethernet52 | S2_Ethernet0"
staticLink: true
properties:
- link: "L1_Ethernet56 | L2_Ethernet56"
staticLink: true
properties:
mode: "MC-LAG"
- link: "L1_Ethernet0 | H1_Ethernet0"
staticLink: true
properties:
mode: "L2-Trunk"
vlan: 300
mc_po_group: 300
vrf: "evpn"
- link: "L1_Ethernet4 | H2_Ethernet0"
staticLink: true
properties:
mode: "L2-Trunk"
vlan: 301
mc_po_group: 301
vrf: "evpn"
- switchId: 2
switchName: "Leaf-2"
ipAddress: "100.100.10.14"
ASN: 1001
Credentials:
user: "admin"
password: "admin"
mclag:
enabled: true
peer: "L1"
keepalive_vlan: 998
Links:
- link: "L2_Ethernet48 | S1_Ethernet4"
staticLink: true
properties:
- link: "L2_Ethernet52 | S2_Ethernet4"
staticLink: true
properties:
- link: "L2_Ethernet56 | L1_Ethernet56"
staticLink: true
properties:
mode: "MC-LAG"
- link: "L2_Ethernet0 | H1_Ethernet1"
staticLink: true
properties:
mode: "L2-Trunk"
vlan: 300
mc_po_group: 300
vrf: "evpn"
- link: "L2_Ethernet4 | H2_Ethernet1"
staticLink: true
properties:
mode: "L2-Trunk"
vlan: 301
mc_po_group: 301
vrf: "evpn"
- switchId: 3
switchName: "Leaf-3"
ipAddress: "100.100.10.15"
ASN: 1002
Credentials:
user: "admin"
password: "admin"
mclag:
enabled: true
peer: "L4"
keepalive_vlan: 998
Links:
- link: "L3_Ethernet48 | S1_Ethernet8"
staticLink: true
properties:
- link: "L3_Ethernet52 | S2_Ethernet8"
staticLink: true
properties:
- link: "L3_Ethernet56 | L4_Ethernet56"
staticLink: true
properties:
mode: "MC-LAG"
- link: "L3_Ethernet0 | H3_Ethernet0"
staticLink: true
properties:
mode: "L2-Trunk"
vlan: 300
mc_po_group: 300
vrf: "evpn"
- link: "L3_Ethernet4 | H4_Ethernet0"
staticLink: true
properties:
mode: "L2-Trunk"
vlan: 301
mc_po_group: 301
vrf: "evpn"
- switchId: 4
switchName: "Leaf-4"
ipAddress: "100.100.10.16"
ASN: 1002
Credentials:
user: "admin"
password: "admin"
mclag:
enabled: true
peer: "L3"
keepalive_vlan: 998
Links:
- link: "L4_Ethernet48 | S1_Ethernet12"
staticLink: true
properties:
- link: "L4_Ethernet52 | S2_Ethernet12"
staticLink: true
properties:
- link: "L4_Ethernet56 | L3_Ethernet56"
staticLink: true
properties:
mode: "MC-LAG"
- link: "L4_Ethernet0 | H3_Ethernet1"
staticLink: true
properties:
mode: "L2-Trunk"
vlan: 300
mc_po_group: 300
vrf: "evpn"
- link: "L4_Ethernet4 | H4_Ethernet1"
staticLink: true
properties:
mode: "L2-Trunk"
vlan: 301
mc_po_group: 301
vrf: "evpn"
Tor: []
BGP:
BGP_U: true
ND_RA: 30
PhysicalIfCfg:
FEC: "Off"
MTU: 9000
AdminStatus: "Up"
ASN:
SSpine: "10000-20000"
Spine: "21000-50000"
Leaf: "51000-60000"
Tor: "61000-70000"
IPv4Pool:
Loopback: "10.10.200.0/24"
LeafSpine: "40.0.0.0/24"
LeafTor: "39.0.0.0/24"
Host: "49.0.0.0/24"
IPv6Pool:
LeafSpine:
LeafTor:
Host:
NTP:
server: "100.100.10.10"
timezone: "Asia/Kolkata"
SYSLOG:
server: "100.100.10.10"
SNMP:
trapserver: "100.100.10.10"
Parameters:
vlan: "300-310"
vni: "10300-10310"
anycast_gateway: "208.64.160.0/23"
anycast_mac: "00:11:22:33:44:55"
hosts_per_vlan: 10
routing_symmetric: true
irb_vlan: "800-805"
irb_vni: "10800-10805"
sag: true
Inventory:
SSpines: 0
Spines: 2
Leafs: 4
Tors: 0
Connectivity:
SSpine: []
Spine:
- switchId: 1
switchName: "Spine-1"
ipAddress: "100.100.10.11"
ASN: 2001
Credentials:
user: "admin"
password: "admin"
mclag:
Links:
- link: "S1_Ethernet0 | L1_Ethernet48"
staticLink: true
properties:
- link: "S1_Ethernet4 | L2_Ethernet48"
staticLink: true
properties:
- link: "S1_Ethernet8 | L3_Ethernet48"
staticLink: true
properties:
- link: "S1_Ethernet12 | L4_Ethernet48"
staticLink: true
properties:
- switchId: 2
switchName: "Spine-2"
ipAddress: "100.100.10.12"
ASN: 2002
Credentials:
user: "admin"
password: "admin"
mclag:
Links:
- link: "S2_Ethernet0 | L1_Ethernet52"
staticLink: true
properties:
- link: "S2_Ethernet4 | L2_Ethernet52"
staticLink: true
properties:
- link: "S2_Ethernet8 | L3_Ethernet52"
staticLink: true
properties:
- link: "S2_Ethernet12 | L4_Ethernet52"
staticLink: true
properties:
Leaf:
- switchId: 1
switchName: "Leaf-1"
ipAddress: "100.100.10.13"
ASN: 1001
Credentials:
user: "admin"
password: "admin"
mclag:
Links:
- link: "L1_Ethernet48 | S1_Ethernet0"
staticLink: true
properties:
- link: "L1_Ethernet52 | S2_Ethernet0"
staticLink: true
properties:
- link: "L1_Ethernet0 | H1_Ethernet0"
staticLink: true
properties:
mode: "L2-Trunk"
vlan: 201
- switchId: 2
switchName: "Leaf-2"
ipAddress: "100.100.10.14"
ASN: 1002
Credentials:
user: "admin"
password: "admin"
mclag:
Links:
- link: "L2_Ethernet48 | S1_Ethernet4"
staticLink: true
properties:
- link: "L2_Ethernet52 | S2_Ethernet4"
staticLink: true
properties:
- link: "L2_Ethernet4 | H2_Ethernet1"
staticLink: true
properties:
mode: "L2-Trunk"
vlan: 202
- switchId: 3
switchName: "Leaf-3"
ipAddress: "100.100.10.15"
ASN: 1003
Credentials:
user: "admin"
password: "admin"
mclag:
Links:
- link: "L3_Ethernet48 | S1_Ethernet8"
staticLink: true
properties:
- link: "L3_Ethernet52 | S2_Ethernet8"
staticLink: true
properties:
- link: "L3_Ethernet0 | H3_Ethernet0"
staticLink: true
properties:
mode: "L2-Trunk"
vlan: 203
- switchId: 4
switchName: "Leaf-4"
ipAddress: "100.100.10.16"
ASN: 1004
Credentials:
user: "admin"
password: "admin"
mclag:
Links:
- link: "L4_Ethernet48 | S1_Ethernet12"
staticLink: true
properties:
- link: "L4_Ethernet52 | S2_Ethernet12"
staticLink: true
properties:
- link: "L4_Ethernet4 | H4_Ethernet1"
staticLink: true
properties:
mode: "L2-Trunk"
vlan: 204
Tor: []
BGP:
BGP_U: false
ND_RA: 30
PhysicalIfCfg:
FEC: "Off"
MTU: 9000
AdminStatus: "Up"
ASN:
SSpine: "10000-20000"
Spine: "21000-50000"
Leaf: "51000-60000"
Tor: "61000-70000"
IPv4Pool:
Loopback: "10.10.10.0/24"
LeafSpine:
LeafTor:
Host:
IPv6Pool:
LeafSpine: 2000::0/64
LeafTor: 1000::0/64
Host:
NTP:
server: "100.100.10.10"
timezone: "Asia/Kolkata"
SYSLOG:
server: "100.100.10.10"
SNMP:
trapserver: "100.100.10.10"
Parameters:
vlan: "200-205"
vni: "20000-20005"
anycast_gateway: 3000::0/64
anycast_mac: "00:11:22:33:44:55"
hosts_per_vlan: 10
routing_symmetric: false
sag: false
Inventory:
SSpines: 0
Spines: 2
Leafs: 4
Tors: 0
Connectivity:
SSpine: []
Spine:
- switchId: 1
switchName: "Spine-1"
ipAddress: "100.100.10.11"
ASN: 1001
Credentials:
user: "admin"
password: "admin"
mclag:
Links:
- link: "S1_Ethernet0 | L1_Ethernet48"
staticLink: true
properties:
- link: "S1_Ethernet4 | L2_Ethernet48"
staticLink: true
properties:
- link: "S1_Ethernet8 | L3_Ethernet48"
staticLink: true
properties:
- link: "S1_Ethernet12 | L4_Ethernet48"
staticLink: true
properties:
- switchId: 2
switchName: "Spine-2"
ipAddress: "100.100.10.12"
ASN: 1001
Credentials:
user: "admin"
password: "admin"
mclag:
Links:
- link: "S2_Ethernet0 | L1_Ethernet52"
staticLink: true
properties:
- link: "S2_Ethernet4 | L2_Ethernet52"
staticLink: true
properties:
- link: "S2_Ethernet8 | L3_Ethernet52"
staticLink: true
properties:
- link: "S2_Ethernet12 | L4_Ethernet52"
staticLink: true
properties:
Leaf:
- switchId: 1
switchName: "Leaf-1"
ipAddress: "100.100.10.13"
ASN: 1001
Credentials:
user: "admin"
password: "admin"
mclag:
Links:
- link: "L1_Ethernet48 | S1_Ethernet0"
staticLink: true
properties:
- link: "L1_Ethernet52 | S2_Ethernet0"
staticLink: true
properties:
- link: "L1_Ethernet0 | H1_Ethernet0"
staticLink: true
properties:
mode: "L2-Trunk"
vlan: 201
- switchId: 2
switchName: "Leaf-2"
ipAddress: "100.100.10.14"
ASN: 1001
Credentials:
user: "admin"
password: "admin"
mclag:
Links:
- link: "L2_Ethernet48 | S1_Ethernet4"
staticLink: true
properties:
- link: "L2_Ethernet52 | S2_Ethernet4"
staticLink: true
properties:
- link: "L2_Ethernet4 | H2_Ethernet1"
staticLink: true
properties:
mode: "L2-Trunk"
vlan: 202
- switchId: 3
switchName: "Leaf-3"
ipAddress: "100.100.10.15"
ASN: 1001
Credentials:
user: "admin"
password: "admin"
mclag:
Links:
- link: "L3_Ethernet48 | S1_Ethernet8"
staticLink: true
properties:
- link: "L3_Ethernet52 | S2_Ethernet8"
staticLink: true
properties:
- link: "L3_Ethernet0 | H3_Ethernet0"
staticLink: true
properties:
mode: "L2-Trunk"
vlan: 203
- switchId: 4
switchName: "Leaf-4"
ipAddress: "100.100.10.16"
ASN: 1001
Credentials:
user: "admin"
password: "admin"
mclag:
Links:
- link: "L4_Ethernet48 | S1_Ethernet12"
staticLink: true
properties:
- link: "L4_Ethernet52 | S2_Ethernet12"
staticLink: true
properties:
- link: "L4_Ethernet4 | H4_Ethernet1"
staticLink: true
properties:
mode: "L2-Trunk"
vlan: 204
Tor: []
BGP:
BGP_U: false
ND_RA: 30
PhysicalIfCfg:
FEC: "Off"
MTU: 9000
AdminStatus: "Up"
ASN:
SSpine: "10000-20000"
Spine: "21000-50000"
Leaf: "51000-60000"
Tor: "61000-70000"
IPv4Pool:
Loopback: "10.10.10.0/24"
LeafSpine: "40.0.0.0/24"
LeafTor: "39.0.0.0/24"
Host: "49.0.0.0/24"
IPv6Pool:
LeafSpine:
LeafTor:
Host:
NTP:
server: "100.100.10.10"
timezone: "Asia/Kolkata"
SYSLOG:
server: "100.100.10.10"
SNMP:
trapserver: "100.100.10.10"
Parameters:
vlan: "200-205"
vni: "20000-20005"
anycast_gateway: "100.10.0.0/23"
anycast_mac: "00:11:22:33:44:55"
hosts_per_vlan: 10
routing_symmetric: false
sag: FalseInventory:
SSpines: 0
Spines: 2
Leafs: 4
Tors: 0
Connectivity:
SSpine: []
Spine:
- switchId: 1
switchName: "Spine-1"
ipAddress: "100.100.10.11"
ASN: 2001
Credentials:
user: "admin"
password: "admin"
mclag:
Links:
- link: "S1_Ethernet0 | L1_Ethernet48"
staticLink: true
properties:
- link: "S1_Ethernet4 | L2_Ethernet48"
staticLink: true
properties:
- link: "S1_Ethernet8 | L3_Ethernet48"
staticLink: true
properties:
- link: "S1_Ethernet12 | L4_Ethernet48"
staticLink: true
properties:
- switchId: 2
switchName: "Spine-2"
ipAddress: "100.100.10.12"
ASN: 2002
Credentials:
user: "admin"
password: "admin"
mclag:
Links:
- link: "S2_Ethernet0 | L1_Ethernet52"
staticLink: true
properties:
- link: "S2_Ethernet4 | L2_Ethernet52"
staticLink: true
properties:
- link: "S2_Ethernet8 | L3_Ethernet52"
staticLink: true
properties:
- link: "S2_Ethernet12 | L4_Ethernet52"
staticLink: true
properties:
Leaf:
- switchId: 1
switchName: "Leaf-1"
ipAddress: "100.100.10.13"
ASN: 1001
Credentials:
user: "admin"
password: "admin"
mclag:
Links:
- link: "L1_Ethernet48 | S1_Ethernet0"
staticLink: true
properties:
- link: "L1_Ethernet52 | S2_Ethernet0"
staticLink: true
properties:
- link: "L1_Ethernet0 | H1_Ethernet0"
staticLink: true
properties:
mode: "L2-Trunk"
vlan: 201
- switchId: 2
switchName: "Leaf-2"
ipAddress: "100.100.10.14"
ASN: 1002
Credentials:
user: "admin"
password: "admin"
mclag:
Links:
- link: "L2_Ethernet48 | S1_Ethernet4"
staticLink: true
properties:
- link: "L2_Ethernet52 | S2_Ethernet4"
staticLink: true
properties:
- link: "L2_Ethernet4 | H2_Ethernet1"
staticLink: true
properties:
mode: "L2-Trunk"
vlan: 202
- switchId: 3
switchName: "Leaf-3"
ipAddress: "100.100.10.15"
ASN: 1003
Credentials:
user: "admin"
password: "admin"
mclag:
Links:
- link: "L3_Ethernet48 | S1_Ethernet8"
staticLink: true
properties:
- link: "L3_Ethernet52 | S2_Ethernet8"
staticLink: true
properties:
- link: "L3_Ethernet0 | H3_Ethernet0"
staticLink: true
properties:
mode: "L2-Trunk"
vlan: 203
- switchId: 4
switchName: "Leaf-4"
ipAddress: "100.100.10.16"
ASN: 1004
Credentials:
user: "admin"
password: "admin"
mclag:
Links:
- link: "L4_Ethernet48 | S1_Ethernet12"
staticLink: true
properties:
- link: "L4_Ethernet52 | S2_Ethernet12"
staticLink: true
properties:
- link: "L4_Ethernet4 | H4_Ethernet1"
staticLink: true
properties:
mode: "L2-Trunk"
vlan: 204
Tor: []
BGP:
BGP_U: false
ND_RA: 30
PhysicalIfCfg:
FEC: "Off"
MTU: 9000
AdminStatus: "Up"
ASN:
SSpine: "10000-20000"
Spine: "21000-50000"
Leaf: "51000-60000"
Tor: "61000-70000"
IPv4Pool:
Loopback: "10.10.10.0/24"
LeafSpine: "40.0.0.0/24"
LeafTor: "39.0.0.0/24"
Host: "49.0.0.0/24"
IPv6Pool:
LeafSpine:
LeafTor:
Host:
NTP:
server: "100.100.10.10"
timezone: "Asia/Kolkata"
SYSLOG:
server: "100.100.10.10"
SNMP:
trapserver: "100.100.10.10"
Parameters:
vlan: "200-205"
vni: "20000-20005"
anycast_gateway: 4000::0/64
anycast_mac: "00:11:22:33:44:55"
hosts_per_vlan: 10
routing_symmetric: false
sag: true
Inventory:
SSpines: 0
Spines: 2
Leafs: 4
Tors: 0
Connectivity:
SSpine: []
Spine:
- switchId: 1
switchName: "Spine-1"
ipAddress: "100.100.10.11"
ASN: 1001
Credentials:
user: "admin"
password: "admin"
mclag:
Links:
- link: "S1_Ethernet0 | L1_Ethernet48"
staticLink: true
properties:
- link: "S1_Ethernet4 | L2_Ethernet48"
staticLink: true
properties:
- link: "S1_Ethernet8 | L3_Ethernet48"
staticLink: true
properties:
- link: "S1_Ethernet12 | L4_Ethernet48"
staticLink: true
properties:
- switchId: 2
switchName: "Spine-2"
ipAddress: "100.100.10.12"
ASN: 1001
Credentials:
user: "admin"
password: "admin"
mclag:
Links:
- link: "S2_Ethernet0 | L1_Ethernet52"
staticLink: true
properties:
- link: "S2_Ethernet4 | L2_Ethernet52"
staticLink: true
properties:
- link: "S2_Ethernet8 | L3_Ethernet52"
staticLink: true
properties:
- link: "S2_Ethernet12 | L4_Ethernet52"
staticLink: true
properties:
Leaf:
- switchId: 1
switchName: "Leaf-1"
ipAddress: "100.100.10.13"
ASN: 1001
Credentials:
user: "admin"
password: "admin"
mclag:
Links:
- link: "L1_Ethernet48 | S1_Ethernet0"
staticLink: true
properties:
- link: "L1_Ethernet52 | S2_Ethernet0"
staticLink: true
properties:
- switchId: 2
switchName: "Leaf-2"
ipAddress: "100.100.10.14"
ASN: 1001
Credentials:
user: "admin"
password: "admin"
mclag:
Links:
- link: "L2_Ethernet48 | S1_Ethernet4"
staticLink: true
properties:
- link: "L2_Ethernet52 | S2_Ethernet4"
staticLink: true
properties:
- switchId: 3
switchName: "Leaf-3"
ipAddress: "100.100.10.15"
ASN: 1001
Credentials:
user: "admin"
password: "admin"
mclag:
Links:
- link: "L3_Ethernet48 | S1_Ethernet8"
staticLink: true
properties:
- link: "L3_Ethernet52 | S2_Ethernet8"
staticLink: true
properties:
- switchId: 4
switchName: "Leaf-4"
ipAddress: "100.100.10.16"
ASN: 1001
Credentials:
user: "admin"
password: "admin"
mclag:
Links:
- link: "L4_Ethernet48 | S1_Ethernet12"
staticLink: true
properties:
- link: "L4_Ethernet52 | S2_Ethernet12"
staticLink: true
properties:
Tor: []
BGP:
BGP_U: false
ND_RA: 30
PhysicalIfCfg:
FEC: "Off"
MTU: 9000
AdminStatus: "Up"
ASN:
SSpine: "10000-20000"
Spine: "21000-50000"
Leaf: "51000-60000"
Tor: "61000-70000"
IPv4Pool:
Loopback: "10.10.10.0/24"
LeafSpine: "40.0.0.0/24"
LeafTor: "39.0.0.0/24"
Host: "49.0.0.0/24"
IPv6Pool:
LeafSpine:
LeafTor:
Host:
NTP:
server: "100.100.10.10"
timezone: "Asia/Kolkata"
SYSLOG:
server: "100.100.10.10"
SNMP:
trapserver: "100.100.10.10"
Parameters:
vlan: "200-205"
vni: "20000-20005"
anycast_gateway: "100.10.0.0/23"
anycast_mac: "00:11:22:33:44:55"
hosts_per_vlan: 10
routing_symmetric: false
irb_vlan: "300-305"
irb_vni: "30000-30005"
sag: true
Inventory:
SSpines: 0
Spines: 2
Leafs: 4
Tors: 0
Connectivity:
SSpine: []
Spine:
- switchId: 1
switchName: "Spine-1"
ipAddress: "100.100.10.11"
ASN: 2001
Credentials:
user: "admin"
password: "admin"
mclag:
Links:
- link: "S1_Ethernet0 | L1_Ethernet48"
staticLink: true
properties:
- link: "S1_Ethernet4 | L2_Ethernet48"
staticLink: true
properties:
- link: "S1_Ethernet8 | L3_Ethernet48"
staticLink: true
properties:
- link: "S1_Ethernet12 | L4_Ethernet48"
staticLink: true
properties:
- switchId: 2
switchName: "Spine-2"
ipAddress: "100.100.10.12"
ASN: 2002
Credentials:
user: "admin"
password: "admin"
mclag:
Links:
- link: "S2_Ethernet0 | L1_Ethernet52"
staticLink: true
properties:
- link: "S2_Ethernet4 | L2_Ethernet52"
staticLink: true
properties:
- link: "S2_Ethernet8 | L3_Ethernet52"
staticLink: true
properties:
- link: "S2_Ethernet12 | L4_Ethernet52"
staticLink: true
properties:
Leaf:
- switchId: 1
switchName: "Leaf-1"
ipAddress: "100.100.10.13"
ASN: 1001
Credentials:
user: "admin"
password: "admin"
mclag:
Links:
- link: "L1_Ethernet48 | S1_Ethernet0"
staticLink: true
properties:
- link: "L1_Ethernet52 | S2_Ethernet0"
staticLink: true
properties:
- link: "L1_Ethernet0 | H1_Ethernet0"
staticLink: true
properties:
mode: "L2-Trunk"
vlan: 201
- switchId: 2
switchName: "Leaf-2"
ipAddress: "100.100.10.14"
ASN: 1002
Credentials:
user: "admin"
password: "admin"
mclag:
Links:
- link: "L2_Ethernet48 | S1_Ethernet4"
staticLink: true
properties:
- link: "L2_Ethernet52 | S2_Ethernet4"
staticLink: true
properties:
- link: "L2_Ethernet4 | H2_Ethernet1"
staticLink: true
properties:
mode: "L2-Trunk"
vlan: 202
- switchId: 3
switchName: "Leaf-3"
ipAddress: "100.100.10.15"
ASN: 1003
Credentials:
user: "admin"
password: "admin"
mclag:
Links:
- link: "L3_Ethernet48 | S1_Ethernet8"
staticLink: true
properties:
- link: "L3_Ethernet52 | S2_Ethernet8"
staticLink: true
properties:
- link: "L3_Ethernet0 | H3_Ethernet0"
staticLink: true
properties:
mode: "L2-Trunk"
vlan: 203
- switchId: 4
switchName: "Leaf-4"
ipAddress: "100.100.10.16"
ASN: 1004
Credentials:
user: "admin"
password: "admin"
mclag:
Links:
- link: "L4_Ethernet48 | S1_Ethernet12"
staticLink: true
properties:
- link: "L4_Ethernet52 | S2_Ethernet12"
staticLink: true
properties:
- link: "L4_Ethernet4 | H4_Ethernet1"
staticLink: true
properties:
mode: "L2-Trunk"
vlan: 204
Tor: []
BGP:
BGP_U: true
ND_RA: 30
PhysicalIfCfg:
FEC: "Off"
MTU: 9000
AdminStatus: "Up"
ASN:
SSpine: "10000-20000"
Spine: "21000-50000"
Leaf: "51000-60000"
Tor: "61000-70000"
IPv4Pool:
Loopback: "10.10.10.0/24"
LeafSpine: "40.0.0.0/24"
LeafTor: "39.0.0.0/24"
Host: "49.0.0.0/24"
IPv6Pool:
LeafSpine:
LeafTor:
Host:
NTP:
server: "100.100.10.10"
timezone: "Asia/Kolkata"
SYSLOG:
server: "100.100.10.10"
SNMP:
trapserver: "100.100.10.10"
Parameters:
vlan: "200-205"
vni: "20000-20005"
anycast_gateway: "100.10.0.0/23"
anycast_mac: "00:11:22:33:44:55"
hosts_per_vlan: 10
routing_symmetric: false
sag: false
Inventory:
SSpines: 0
Spines: 2
Leafs: 4
Tors: 0
Connectivity:
SSpine: []
Spine:
- switchId: 1
switchName: "Spine-1"
ipAddress: "100.100.10.11"
ASN: 1001
Credentials:
user: "admin"
password: "admin"
mclag:
Links:
- link: "S1_Ethernet0 | L1_Ethernet48"
staticLink: true
properties:
- link: "S1_Ethernet4 | L2_Ethernet48"
staticLink: true
properties:
- link: "S1_Ethernet8 | L3_Ethernet48"
staticLink: true
properties:
- link: "S1_Ethernet12 | L4_Ethernet48"
staticLink: true
properties:
- switchId: 2
switchName: "Spine-2"
ipAddress: "100.100.10.12"
ASN: 1001
Credentials:
user: "admin"
password: "admin"
mclag:
Links:
- link: "S2_Ethernet0 | L1_Ethernet52"
staticLink: true
properties:
- link: "S2_Ethernet4 | L2_Ethernet52"
staticLink: true
properties:
- link: "S2_Ethernet8 | L3_Ethernet52"
staticLink: true
properties:
- link: "S2_Ethernet12 | L4_Ethernet52"
staticLink: true
properties:
Leaf:
- switchId: 1
switchName: "Leaf-1"
ipAddress: "100.100.10.13"
ASN: 1001
Credentials:
user: "admin"
password: "admin"
mclag:
Links:
- link: "L1_Ethernet48 | S1_Ethernet0"
staticLink: true
properties:
- link: "L1_Ethernet52 | S2_Ethernet0"
staticLink: true
properties:
- link: "L1_Ethernet0 | H1_Ethernet0"
staticLink: true
properties:
mode: "L2-Trunk"
vlan: 201
mc_po_group: 201
- switchId: 2
switchName: "Leaf-2"
ipAddress: "100.100.10.14"
ASN: 1001
Credentials:
user: "admin"
password: "admin"
mclag:
Links:
- link: "L2_Ethernet48 | S1_Ethernet4"
staticLink: true
properties:
- link: "L2_Ethernet52 | S2_Ethernet4"
staticLink: true
properties:
- link: "L2_Ethernet4 | H2_Ethernet1"
staticLink: true
properties:
mode: "L2-Trunk"
vlan: 202
mc_po_group: 202
- switchId: 3
switchName: "Leaf-3"
ipAddress: "100.100.10.15"
ASN: 1001
Credentials:
user: "admin"
password: "admin"
mclag:
Links:
- link: "L3_Ethernet48 | S1_Ethernet8"
staticLink: true
properties:
- link: "L3_Ethernet52 | S2_Ethernet8"
staticLink: true
properties:
- link: "L3_Ethernet0 | H3_Ethernet0"
staticLink: true
properties:
mode: "L2-Trunk"
vlan: 203
mc_po_group: 203
- switchId: 4
switchName: "Leaf-4"
ipAddress: "100.100.10.16"
ASN: 1001
Credentials:
user: "admin"
password: "admin"
mclag:
Links:
- link: "L4_Ethernet48 | S1_Ethernet12"
staticLink: true
properties:
- link: "L4_Ethernet52 | S2_Ethernet12"
staticLink: true
properties:
- link: "L4_Ethernet4 | H4_Ethernet1"
staticLink: true
properties:
mode: "L2-Trunk"
vlan: 204
mc_po_group: 204
Tor: []
BGP:
BGP_U: true
ND_RA: 30
PhysicalIfCfg:
FEC: "Off"
MTU: 9000
AdminStatus: "Up"
ASN:
SSpine: "10000-20000"
Spine: "21000-50000"
Leaf: "51000-60000"
Tor: "61000-70000"
IPv4Pool:
Loopback: "10.10.10.0/24"
LeafSpine: "40.0.0.0/24"
LeafTor: "39.0.0.0/24"
Host: "49.0.0.0/24"
IPv6Pool:
LeafSpine:
LeafTor:
Host:
NTP:
server: "100.100.10.10"
timezone: "Asia/Kolkata"
SYSLOG:
server: "100.100.10.10"
SNMP:
trapserver: "100.100.10.10"
Parameters:
vlan: "200-205"
vni: "20000-20005"
anycast_gateway: "100.10.0.0/23"
anycast_mac: "00:11:22:33:44:55"
hosts_per_vlan: 10
routing_symmetric: false
sag: trueInventory:
SSpines: 0
Spines: 2
Leafs: 4
Tors: 0
Connectivity:
SSpine: []
Spine:
- switchId: 1
switchName: "Spine-1"
ipAddress: "100.100.10.11"
ASN: 2001
Credentials:
user: "admin"
password: "admin"
mclag:
Links:
- link: "S1_Ethernet0 | L1_Ethernet48"
staticLink: true
properties:
- link: "S1_Ethernet4 | L2_Ethernet48"
staticLink: true
properties:
- link: "S1_Ethernet8 | L3_Ethernet48"
staticLink: true
properties:
- link: "S1_Ethernet12 | L4_Ethernet48"
staticLink: true
properties:
- switchId: 2
switchName: "Spine-2"
ipAddress: "100.100.10.12"
ASN: 2002
Credentials:
user: "admin"
password: "admin"
mclag:
Links:
- link: "S2_Ethernet0 | L1_Ethernet52"
staticLink: true
properties:
- link: "S2_Ethernet4 | L2_Ethernet52"
staticLink: true
properties:
- link: "S2_Ethernet8 | L3_Ethernet52"
staticLink: true
properties:
- link: "S2_Ethernet12 | L4_Ethernet52"
staticLink: true
properties:
Leaf:
- switchId: 1
switchName: "Leaf-1"
ipAddress: "100.100.10.13"
ASN: 1001
Credentials:
user: "admin"
password: "admin"
mclag:
Links:
- link: "L1_Ethernet48 | S1_Ethernet0"
staticLink: true
properties:
- link: "L1_Ethernet52 | S2_Ethernet0"
staticLink: true
properties:
- link: "L1_Ethernet0 | H1_Ethernet0"
staticLink: true
properties:
mode: "L2-Trunk"
vlan: 201
- switchId: 2
switchName: "Leaf-2"
ipAddress: "100.100.10.14"
ASN: 1002
Credentials:
user: "admin"
password: "admin"
mclag:
Links:
- link: "L2_Ethernet48 | S1_Ethernet4"
staticLink: true
properties:
- link: "L2_Ethernet52 | S2_Ethernet4"
staticLink: true
properties:
- link: "L2_Ethernet4 | H2_Ethernet1"
staticLink: true
properties:
mode: "L2-Trunk"
vlan: 202
- switchId: 3
switchName: "Leaf-3"
ipAddress: "100.100.10.15"
ASN: 1003
Credentials:
user: "admin"
password: "admin"
mclag:
Links:
- link: "L3_Ethernet48 | S1_Ethernet8"
staticLink: true
properties:
- link: "L3_Ethernet52 | S2_Ethernet8"
staticLink: true
properties:
- link: "L3_Ethernet0 | H3_Ethernet0"
staticLink: true
properties:
mode: "L2-Trunk"
vlan: 203
- switchId: 4
switchName: "Leaf-4"
ipAddress: "100.100.10.16"
ASN: 1004
Credentials:
user: "admin"
password: "admin"
mclag:
Links:
- link: "L4_Ethernet48 | S1_Ethernet12"
staticLink: true
properties:
- link: "L4_Ethernet52 | S2_Ethernet12"
staticLink: true
properties:
- link: "L4_Ethernet4 | H4_Ethernet1"
staticLink: true
properties:
mode: "L2-Trunk"
vlan: 204
Tor: []
BGP:
BGP_U: false
ND_RA: 30
PhysicalIfCfg:
FEC: "Off"
MTU: 9000
AdminStatus: "Up"
ASN:
SSpine: "10000-20000"
Spine: "21000-50000"
Leaf: "51000-60000"
Tor: "61000-70000"
IPv4Pool:
Loopback: "10.10.10.0/24"
LeafSpine: "49.0.0.0/24"
LeafTor: "40.0.0.0/24"
Host: "39.0.0.0/24"
IPv6Pool:
LeafSpine:
LeafTor:
Host:
NTP:
server: "100.100.10.10"
timezone: "Asia/Kolkata"
SYSLOG:
server: "100.100.10.10"
SNMP:
trapserver: "100.100.10.10"
Parameters:
vlan: "200-205"
vni: "20000-20005"
anycast_gateway: "106.10.0.0/23"
anycast_mac: "00:11:22:33:55:44"
hosts_per_vlan: 10
routing_symmetric: false
sag: False
Inventory:
SSpines: 0
Spines: 2
Leafs: 4
Tors: 0
Connectivity:
SSpine: []
Spine:
- switchId: 1
switchName: "Spine-1"
ipAddress: "100.100.10.11"
ASN: 1001
Credentials:
user: "admin"
password: "admin"
mclag:
Links:
- link: "S1_Ethernet0 | L1_Ethernet48"
staticLink: true
properties:
- link: "S1_Ethernet4 | L2_Ethernet48"
staticLink: true
properties:
- link: "S1_Ethernet8 | L3_Ethernet48"
staticLink: true
properties:
- link: "S1_Ethernet12 | L4_Ethernet48"
staticLink: true
properties:
- switchId: 2
switchName: "Spine-2"
ipAddress: "100.100.10.12"
ASN: 1001
Credentials:
user: "admin"
password: "admin"
mclag:
Links:
- link: "S2_Ethernet0 | L1_Ethernet52"
staticLink: true
properties:
- link: "S2_Ethernet4 | L2_Ethernet52"
staticLink: true
properties:
- link: "S2_Ethernet8 | L3_Ethernet52"
staticLink: true
properties:
- link: "S2_Ethernet12 | L4_Ethernet52"
staticLink: true
properties:
Leaf:
- switchId: 1
switchName: "Leaf-1"
ipAddress: "100.100.10.13"
ASN: 1001
Credentials:
user: "admin"
password: "admin"
mclag:
Links:
- link: "L1_Ethernet48 | S1_Ethernet0"
staticLink: true
properties:
- link: "L1_Ethernet52 | S2_Ethernet0"
staticLink: true
properties:
- link: "L1_Ethernet0 | H1_Ethernet0"
staticLink: true
properties:
mode: "L2-Trunk"
vlan: 901
- switchId: 2
switchName: "Leaf-2"
ipAddress: "100.100.10.14"
ASN: 1001
Credentials:
user: "admin"
password: "admin"
mclag:
Links:
- link: "L2_Ethernet48 | S1_Ethernet4"
staticLink: true
properties:
- link: "L2_Ethernet52 | S2_Ethernet4"
staticLink: true
properties:
- link: "L2_Ethernet4 | H2_Ethernet1"
staticLink: true
properties:
mode: "L2-Trunk"
vlan: 902
- switchId: 3
switchName: "Leaf-3"
ipAddress: "100.100.10.15"
ASN: 1001
Credentials:
user: "admin"
password: "admin"
mclag:
Links:
- link: "L3_Ethernet48 | S1_Ethernet8"
staticLink: true
properties:
- link: "L3_Ethernet52 | S2_Ethernet8"
staticLink: true
properties:
- link: "L3_Ethernet0 | H3_Ethernet0"
staticLink: true
properties:
mode: "L2-Trunk"
vlan: 903
- switchId: 4
switchName: "Leaf-4"
ipAddress: "100.100.10.16"
ASN: 1001
Credentials:
user: "admin"
password: "admin"
mclag:
Links:
- link: "L4_Ethernet48 | S1_Ethernet12"
staticLink: true
properties:
- link: "L4_Ethernet52 | S2_Ethernet12"
staticLink: true
properties:
- link: "L4_Ethernet4 | H4_Ethernet1"
staticLink: true
properties:
mode: "L2-Trunk"
vlan: 904
Tor: []
BGP:
BGP_U: true
ND_RA: 30
PhysicalIfCfg:
FEC: "Off"
MTU: 9000
AdminStatus: "Up"
ASN:
SSpine: "10000-20000"
Spine: "21000-50000"
Leaf: "51000-60000"
Tor: "61000-70000"
IPv4Pool:
Loopback: "10.10.10.0/24"
LeafSpine: "40.0.0.0/24"
LeafTor: "39.0.0.0/24"
Host: "49.0.0.0/24"
IPv6Pool:
LeafSpine:
LeafTor:
Host:
NTP:
server: "100.100.10.10"
timezone: "Asia/Kolkata"
SYSLOG:
server: "100.100.10.10"
SNMP:
trapserver: "100.100.10.10"
Parameters:
vlan: "900-905"
vni: "20000-20005"
anycast_gateway: "100.10.0.0/23"
anycast_mac: "00:11:22:33:44:55"
hosts_per_vlan: 10
routing_symmetric: false
sag: true
Inventory:
SSpines: 0
Spines: 2
Leafs: 4
Tors: 0
Connectivity:
SSpine: []
Spine:
- switchId: 1
switchName: "Spine-1"
ipAddress: "100.100.10.11"
ASN: 2001
Credentials:
user: "admin"
password: "admin"
mclag:
Links:
- link: "S1_Ethernet0 | L1_Ethernet48"
staticLink: true
properties:
- link: "S1_Ethernet4 | L2_Ethernet48"
staticLink: true
properties:
- link: "S1_Ethernet8 | L3_Ethernet48"
staticLink: true
properties:
- link: "S1_Ethernet12 | L4_Ethernet48"
staticLink: true
properties:
- switchId: 2
switchName: "Spine-2"
ipAddress: "100.100.10.12"
ASN: 2002
Credentials:
user: "admin"
password: "admin"
mclag:
Links:
- link: "S2_Ethernet0 | L1_Ethernet52"
staticLink: true
properties:
- link: "S2_Ethernet4 | L2_Ethernet52"
staticLink: true
properties:
- link: "S2_Ethernet8 | L3_Ethernet52"
staticLink: true
properties:
- link: "S2_Ethernet12 | L4_Ethernet52"
staticLink: true
properties:
Leaf:
- switchId: 1
switchName: "Leaf-1"
ipAddress: "100.100.10.13"
ASN: 1001
Credentials:
user: "admin"
password: "admin"
mclag:
Links:
- link: "L1_Ethernet48 | S1_Ethernet0"
staticLink: true
properties:
- link: "L1_Ethernet52 | S2_Ethernet0"
staticLink: true
properties:
- switchId: 2
switchName: "Leaf-2"
ipAddress: "100.100.10.14"
ASN: 1002
Credentials:
user: "admin"
password: "admin"
mclag:
Links:
- link: "L2_Ethernet48 | S1_Ethernet4"
staticLink: true
properties:
- link: "L2_Ethernet52 | S2_Ethernet4"
staticLink: true
properties:
- switchId: 3
switchName: "Leaf-3"
ipAddress: "100.100.10.15"
ASN: 1003
Credentials:
user: "admin"
password: "admin"
mclag:
Links:
- link: "L3_Ethernet48 | S1_Ethernet8"
staticLink: true
properties:
- link: "L3_Ethernet52 | S2_Ethernet8"
staticLink: true
properties:
- switchId: 4
switchName: "Leaf-4"
ipAddress: "100.100.10.16"
ASN: 1004
Credentials:
user: "admin"
password: "admin"
mclag:
Links:
- link: "L4_Ethernet48 | S1_Ethernet12"
staticLink: true
properties:
- link: "L4_Ethernet52 | S2_Ethernet12"
staticLink: true
properties:
Tor: []
BGP:
BGP_U: false
ND_RA: 30
PhysicalIfCfg:
FEC: "Off"
MTU: 9000
AdminStatus: "Up"
ASN:
SSpine: "10000-20000"
Spine: "21000-50000"
Leaf: "51000-60000"
Tor: "61000-70000"
IPv4Pool:
Loopback: "10.10.10.0/24"
LeafSpine: "40.0.0.0/24"
LeafTor: "39.0.0.0/24"
Host: "49.0.0.0/24"
IPv6Pool:
LeafSpine:
LeafTor:
Host:
NTP:
server: "100.100.10.10"
timezone: "Asia/Kolkata"
SYSLOG:
server: "100.100.10.10"
SNMP:
trapserver: "100.100.10.10"
Parameters:
vlan: "200-205"
vni: "20000-20005"
anycast_gateway: "100.10.0.0/23"
anycast_mac: "00:11:22:33:44:55"
hosts_per_vlan: 10
routing_symmetric: false
irb_vlan: "300-305"
irb_vni: "30000-30005"
sag: true Inventory:
SSpines: 0
Spines: 2
Leafs: 4
Tors: 0
Connectivity:
SSpine: []
Spine:
- switchId: 1
switchName: "Spine-1"
ipAddress: "100.100.10.11"
ASN: 2001
Credentials:
user: "admin"
password: "admin"
mclag:
Links:
- link: "S1_Ethernet0 | L1_Ethernet48"
staticLink: true
properties:
- link: "S1_Ethernet4 | L2_Ethernet48"
staticLink: true
properties:
- link: "S1_Ethernet8 | L3_Ethernet48"
staticLink: true
properties:
- link: "S1_Ethernet12 | L4_Ethernet48"
staticLink: true
properties:
- switchId: 2
switchName: "Spine-2"
ipAddress: "100.100.10.12"
ASN: 2002
Credentials:
user: "admin"
password: "admin"
mclag:
Links:
- link: "S2_Ethernet0 | L1_Ethernet52"
staticLink: true
properties:
- link: "S2_Ethernet4 | L2_Ethernet52"
staticLink: true
properties:
- link: "S2_Ethernet8 | L3_Ethernet52"
staticLink: true
properties:
- link: "S2_Ethernet12 | L4_Ethernet52"
staticLink: true
properties:
Leaf:
- switchId: 1
switchName: "Leaf-1"
ipAddress: "100.100.10.13"
ASN: 1001
Credentials:
user: "admin"
password: "admin"
mclag:
enabled: true
peer: "L2"
keepalive_vlan: 10
Links:
- link: "L1_Ethernet48 | S1_Ethernet0"
staticLink: true
properties:
- link: "L1_Ethernet52 | S2_Ethernet0"
staticLink: true
properties:
- link: "L1_Ethernet56 | L2_Ethernet56"
staticLink: true
properties:
mode: "MC-LAG"
- link: "L1_Ethernet0 | H1_Ethernet0"
staticLink: true
properties:
mode: "L2-Trunk"
vlan: 201
mc_po_group: 201
- link: "L1_Ethernet4 | H2_Ethernet0"
staticLink: true
properties:
mode: "L2-Trunk"
vlan: 202
mc_po_group: 202
- switchId: 2
switchName: "Leaf-2"
ipAddress: "100.100.10.14"
ASN: 1002
Credentials:
user: "admin"
password: "admin"
mclag:
enabled: true
peer: "L1"
keepalive_vlan: 10
Links:
- link: "L2_Ethernet48 | S1_Ethernet4"
staticLink: true
properties:
- link: "L2_Ethernet52 | S2_Ethernet4"
staticLink: true
properties:
- link: "L2_Ethernet56 | L1_Ethernet56"
staticLink: true
properties:
mode: "MC-LAG"
- link: "L2_Ethernet0 | H1_Ethernet1"
staticLink: true
properties:
mode: "L2-Trunk"
vlan: 201
mc_po_group: 201
- link: "L2_Ethernet4 | H2_Ethernet1"
staticLink: true
properties:
mode: "L2-Trunk"
vlan: 202
mc_po_group: 202
- switchId: 3
switchName: "Leaf-3"
ipAddress: "100.100.10.15"
ASN: 1003
Credentials:
user: "admin"
password: "admin"
mclag:
enabled: true
peer: "L4"
keepalive_vlan: 10
Links:
- link: "L3_Ethernet48 | S1_Ethernet8"
staticLink: true
properties:
- link: "L3_Ethernet52 | S2_Ethernet8"
staticLink: true
properties:
- link: "L3_Ethernet56 | L4_Ethernet56"
staticLink: true
properties:
mode: "MC-LAG"
- link: "L3_Ethernet0 | H3_Ethernet0"
staticLink: true
properties:
mode: "L2-Trunk"
vlan: 203
mc_po_group: 203
- link: "L3_Ethernet4 | H4_Ethernet0"
staticLink: true
properties:
mode: "L2-Trunk"
vlan: 204
mc_po_group: 204
- switchId: 4
switchName: "Leaf-4"
ipAddress: "100.100.10.16"
ASN: 1004
Credentials:
user: "admin"
password: "admin"
mclag:
enabled: true
peer: "L3"
keepalive_vlan: 10
Links:
- link: "L4_Ethernet48 | S1_Ethernet12"
staticLink: true
properties:
- link: "L4_Ethernet52 | S2_Ethernet12"
staticLink: true
properties:
- link: "L4_Ethernet56 | L3_Ethernet56"
staticLink: true
properties:
mode: "MC-LAG"
- link: "L4_Ethernet0 | H3_Ethernet1"
staticLink: true
properties:
mode: "L2-Trunk"
vlan: 203
mc_po_group: 203
- link: "L4_Ethernet4 | H4_Ethernet1"
staticLink: true
properties:
mode: "L2-Trunk"
vlan: 204
mc_po_group: 204
Tor: []
BGP:
BGP_U: true
ND_RA: 30
PhysicalIfCfg:
FEC: "Off"
MTU: 9000
AdminStatus: "Up"
ASN:
SSpine: "10000-20000"
Spine: "21000-50000"
Leaf: "51000-60000"
Tor: "61000-70000"
IPv4Pool:
Loopback: "10.10.10.0/24"
LeafSpine:
LeafTor:
Host:
IPv6Pool:
LeafSpine: 1000::0/64
LeafTor: 2000::0/64
Host:
NTP:
server: "100.100.10.10"
timezone: "Asia/Kolkata"
SYSLOG:
server: "100.100.10.10"
SNMP:
trapserver: "100.100.10.10"
Parameters:
vlan: "200-205"
vni: "20000-20005"
anycast_gateway: "4000::0/64"
anycast_mac: "00:11:22:33:44:55"
hosts_per_vlan: 10
routing_symmetric: false
sag: tru4Inventory:
SSpines: 0
Spines: 2
Leafs: 4
Tors: 0
Connectivity:
SSpine: []
Spine:
- switchId: 1
switchName: "Spine-1"
ipAddress: "100.100.10.11"
ASN: 2001
Credentials:
user: "admin"
password: "admin"
mclag:
Links:
- link: "S1_Ethernet0 | L1_Ethernet48"
staticLink: true
properties:
- link: "S1_Ethernet4 | L2_Ethernet48"
staticLink: true
properties:
- link: "S1_Ethernet8 | L3_Ethernet48"
staticLink: true
properties:
- link: "S1_Ethernet12 | L4_Ethernet48"
staticLink: true
properties:
- switchId: 2
switchName: "Spine-2"
ipAddress: "100.100.10.12"
ASN: 2001
Credentials:
user: "admin"
password: "admin"
mclag:
Links:
- link: "S2_Ethernet0 | L1_Ethernet52"
staticLink: true
properties:
- link: "S2_Ethernet4 | L2_Ethernet52"
staticLink: true
properties:
- link: "S2_Ethernet8 | L3_Ethernet52"
staticLink: true
properties:
- link: "S2_Ethernet12 | L4_Ethernet52"
staticLink: true
properties:
Leaf:
- switchId: 1
switchName: "Leaf-1"
ipAddress: "100.100.10.13"
ASN: 2001
Credentials:
user: "admin"
password: "admin"
mclag:
enabled: true
peer: "L2"
keepalive_vlan: 10
Links:
- link: "L1_Ethernet48 | S1_Ethernet0"
staticLink: true
properties:
- link: "L1_Ethernet52 | S2_Ethernet0"
staticLink: true
properties:
- link: "L1_Ethernet56 | L2_Ethernet56"
staticLink: true
properties:
mode: "MC-LAG"
- link: "L1_Ethernet0 | H1_Ethernet0"
staticLink: true
properties:
mode: "L2-Trunk"
vlan: 201
mc_po_group: 201
- link: "L1_Ethernet4 | H2_Ethernet0"
staticLink: true
properties:
mode: "L2-Trunk"
vlan: 202
mc_po_group: 202
- switchId: 2
switchName: "Leaf-2"
ipAddress: "100.100.10.14"
ASN: 2001
Credentials:
user: "admin"
password: "admin"
mclag:
enabled: true
peer: "L1"
keepalive_vlan: 10
Links:
- link: "L2_Ethernet48 | S1_Ethernet4"
staticLink: true
properties:
- link: "L2_Ethernet52 | S2_Ethernet4"
staticLink: true
properties:
- link: "L2_Ethernet56 | L1_Ethernet56"
staticLink: true
properties:
mode: "MC-LAG"
- link: "L2_Ethernet0 | H1_Ethernet1"
staticLink: true
properties:
mode: "L2-Trunk"
vlan: 201
mc_po_group: 201
- link: "L2_Ethernet4 | H2_Ethernet1"
staticLink: true
properties:
mode: "L2-Trunk"
vlan: 202
mc_po_group: 202
- switchId: 3
switchName: "Leaf-3"
ipAddress: "100.100.10.15"
ASN: 2001
Credentials:
user: "admin"
password: "admin"
mclag:
enabled: true
peer: "L4"
keepalive_vlan: 10
Links:
- link: "L3_Ethernet48 | S1_Ethernet8"
staticLink: true
properties:
- link: "L3_Ethernet52 | S2_Ethernet8"
staticLink: true
properties:
- link: "L3_Ethernet56 | L4_Ethernet56"
staticLink: true
properties:
mode: "MC-LAG"
- link: "L3_Ethernet0 | H3_Ethernet0"
staticLink: true
properties:
mode: "L2-Trunk"
vlan: 203
mc_po_group: 203
- link: "L3_Ethernet4 | H4_Ethernet0"
staticLink: true
properties:
mode: "L2-Trunk"
vlan: 204
mc_po_group: 204
- switchId: 4
switchName: "Leaf-4"
ipAddress: "100.100.10.16"
ASN: 2001
Credentials:
user: "admin"
password: "admin"
mclag:
enabled: true
peer: "L3"
keepalive_vlan: 10
Links:
- link: "L4_Ethernet48 | S1_Ethernet12"
staticLink: true
properties:
- link: "L4_Ethernet52 | S2_Ethernet12"
staticLink: true
properties:
- link: "L4_Ethernet56 | L3_Ethernet56"
staticLink: true
properties:
mode: "MC-LAG"
- link: "L4_Ethernet0 | H3_Ethernet1"
staticLink: true
properties:
mode: "L2-Trunk"
vlan: 203
mc_po_group: 203
- link: "L4_Ethernet4 | H4_Ethernet1"
staticLink: true
properties:
mode: "L2-Trunk"
vlan: 204
mc_po_group: 204
Tor: []
BGP:
BGP_U: false
ND_RA: 30
PhysicalIfCfg:
FEC: "Off"
MTU: 9000
AdminStatus: "Up"
ASN:
SSpine: "10000-20000"
Spine: "21000-50000"
Leaf: "51000-60000"
Tor: "61000-70000"
IPv4Pool:
Loopback: "10.10.10.0/24"
LeafSpine: "40.0.0.0/24"
LeafTor: "39.0.0.0/24"
Host: "49.0.0.0/24"
IPv6Pool:
LeafSpine:
LeafTor:
Host:
NTP:
server: "100.100.10.10"
timezone: "Asia/Kolkata"
SYSLOG:
server: "100.100.10.10"
SNMP:
trapserver: "100.100.10.10"
Parameters:
vlan: "200-205"
vni: "20000-20005"
anycast_gateway: "100.10.0.0/23"
anycast_mac: "00:11:22:33:44:55"
hosts_per_vlan: 10
routing_symmetric: false
sag: falseInventory:
SSpines: 0
Spines: 2
Leafs: 4
Tors: 0
Connectivity:
SSpine: []
Spine:
- switchId: 1
switchName: "Spine-1"
ipAddress: "100.100.10.11"
ASN: 2001
Credentials:
user: "admin"
password: "admin"
mclag:
Links:
- link: "S1_Ethernet0 | L1_Ethernet48"
staticLink: true
properties:
- link: "S1_Ethernet4 | L2_Ethernet48"
staticLink: true
properties:
- link: "S1_Ethernet8 | L3_Ethernet48"
staticLink: true
properties:
- link: "S1_Ethernet12 | L4_Ethernet48"
staticLink: true
properties:
- switchId: 2
switchName: "Spine-2"
ipAddress: "100.100.10.12"
ASN: 2002
Credentials:
user: "admin"
password: "admin"
mclag:
Links:
- link: "S2_Ethernet0 | L1_Ethernet52"
staticLink: true
properties:
- link: "S2_Ethernet4 | L2_Ethernet52"
staticLink: true
properties:
- link: "S2_Ethernet8 | L3_Ethernet52"
staticLink: true
properties:
- link: "S2_Ethernet12 | L4_Ethernet52"
staticLink: true
properties:
Leaf:
- switchId: 1
switchName: "Leaf-1"
ipAddress: "100.100.10.13"
ASN: 3001
Credentials:
user: "admin"
password: "admin"
mclag:
enabled: true
peer: "L2"
keepalive_vlan: 10
Links:
- link: "L1_Ethernet48 | S1_Ethernet0"
staticLink: true
properties:
- link: "L1_Ethernet52 | S2_Ethernet0"
staticLink: true
properties:
- link: "L1_Ethernet56 | L2_Ethernet56"
staticLink: true
properties:
mode: "MC-LAG"
- link: "L1_Ethernet0 | H1_Ethernet0"
staticLink: true
properties:
mode: "L2-Trunk"
vlan: 201
mc_po_group: 201
- link: "L1_Ethernet4 | H2_Ethernet0"
staticLink: true
properties:
mode: "L2-Trunk"
vlan: 202
mc_po_group: 202
- switchId: 2
switchName: "Leaf-2"
ipAddress: "100.100.10.14"
ASN: 3002
Credentials:
user: "admin"
password: "admin"
mclag:
enabled: true
peer: "L1"
keepalive_vlan: 10
Links:
- link: "L2_Ethernet48 | S1_Ethernet4"
staticLink: true
properties:
- link: "L2_Ethernet52 | S2_Ethernet4"
staticLink: true
properties:
- link: "L2_Ethernet56 | L1_Ethernet56"
staticLink: true
properties:
mode: "MC-LAG"
- link: "L2_Ethernet0 | H1_Ethernet1"
staticLink: true
properties:
mode: "L2-Trunk"
vlan: 201
mc_po_group: 201
- link: "L2_Ethernet4 | H2_Ethernet1"
staticLink: true
properties:
mode: "L2-Trunk"
vlan: 202
mc_po_group: 202
- switchId: 3
switchName: "Leaf-3"
ipAddress: "100.100.10.15"
ASN: 3003
Credentials:
user: "admin"
password: "admin"
mclag:
enabled: true
peer: "L4"
keepalive_vlan: 10
Links:
- link: "L3_Ethernet48 | S1_Ethernet8"
staticLink: true
properties:
- link: "L3_Ethernet52 | S2_Ethernet8"
staticLink: true
properties:
- link: "L3_Ethernet56 | L4_Ethernet56"
staticLink: true
properties:
mode: "MC-LAG"
- link: "L3_Ethernet0 | H3_Ethernet0"
staticLink: true
properties:
mode: "L2-Trunk"
vlan: 203
mc_po_group: 203
- link: "L3_Ethernet4 | H4_Ethernet0"
staticLink: true
properties:
mode: "L2-Trunk"
vlan: 204
mc_po_group: 204
- switchId: 4
switchName: "Leaf-4"
ipAddress: "100.100.10.16"
ASN: 3004
Credentials:
user: "admin"
password: "admin"
mclag:
enabled: true
peer: "L3"
keepalive_vlan: 10
Links:
- link: "L4_Ethernet48 | S1_Ethernet12"
staticLink: true
properties:
- link: "L4_Ethernet52 | S2_Ethernet12"
staticLink: true
properties:
- link: "L4_Ethernet56 | L3_Ethernet56"
staticLink: true
properties:
mode: "MC-LAG"
- link: "L4_Ethernet0 | H3_Ethernet1"
staticLink: true
properties:
mode: "L2-Trunk"
vlan: 203
mc_po_group: 203
- link: "L4_Ethernet4 | H4_Ethernet1"
staticLink: true
properties:
mode: "L2-Trunk"
vlan: 204
mc_po_group: 204
Tor: []
BGP:
BGP_U: false
ND_RA: 30
PhysicalIfCfg:
FEC: "Off"
MTU: 9000
AdminStatus: "Up"
ASN:
SSpine: "10000-20000"
Spine: "21000-50000"
Leaf: "51000-60000"
Tor: "61000-70000"
IPv4Pool:
Loopback: "10.10.10.0/24"
LeafSpine: "40.0.0.0/24"
LeafTor: "39.0.0.0/24"
Host: "49.0.0.0/24"
IPv6Pool:
LeafSpine:
LeafTor:
Host:
NTP:
server: "100.100.10.10"
timezone: "Asia/Kolkata"
SYSLOG:
server: "100.100.10.10"
SNMP:
trapserver: "100.100.10.10"
Parameters:
vlan: "200-205"
vni: "20000-20005"
anycast_gateway: "100.10.0.0/23"
anycast_mac: "00:11:22:33:44:55"
hosts_per_vlan: 10
routing_symmetric: false
sag: false Inventory:
SSpines: 0
Spines: 2
Leafs: 4
Tors: 0
Connectivity:
SSpine: []
Spine:
- switchId: 1
switchName: "Spine-1"
ipAddress: "100.100.10.11"
ASN: 2001
Credentials:
user: "admin"
password: "admin"
mclag:
Links:
- link: "S1_Ethernet0 | L1_Ethernet48"
staticLink: true
properties:
- link: "S1_Ethernet4 | L2_Ethernet48"
staticLink: true
properties:
- link: "S1_Ethernet8 | L3_Ethernet48"
staticLink: true
properties:
- link: "S1_Ethernet12 | L4_Ethernet48"
staticLink: true
properties:
- switchId: 2
switchName: "Spine-2"
ipAddress: "100.100.10.12"
ASN: 2001
Credentials:
user: "admin"
password: "admin"
mclag:
Links:
- link: "S2_Ethernet0 | L1_Ethernet52"
staticLink: true
properties:
- link: "S2_Ethernet4 | L2_Ethernet52"
staticLink: true
properties:
- link: "S2_Ethernet8 | L3_Ethernet52"
staticLink: true
properties:
- link: "S2_Ethernet12 | L4_Ethernet52"
staticLink: true
properties:
Leaf:
- switchId: 1
switchName: "Leaf-1"
ipAddress: "100.100.10.13"
ASN: 2001
Credentials:
user: "admin"
password: "admin"
mclag:
enabled: true
peer: "L2"
keepalive_vlan: 10
Links:
- link: "L1_Ethernet48 | S1_Ethernet0"
staticLink: true
properties:
- link: "L1_Ethernet52 | S2_Ethernet0"
staticLink: true
properties:
- link: "L1_Ethernet56 | L2_Ethernet56"
staticLink: true
properties:
mode: "MC-LAG"
- link: "L1_Ethernet0 | H1_Ethernet0"
staticLink: true
properties:
mode: "L2-Trunk"
vlan: 201
mc_po_group: 201
- link: "L1_Ethernet4 | H2_Ethernet0"
staticLink: true
properties:
mode: "L2-Trunk"
vlan: 202
mc_po_group: 202
- switchId: 2
switchName: "Leaf-2"
ipAddress: "100.100.10.14"
ASN: 2001
Credentials:
user: "admin"
password: "admin"
mclag:
enabled: true
peer: "L1"
keepalive_vlan: 10
Links:
- link: "L2_Ethernet48 | S1_Ethernet4"
staticLink: true
properties:
- link: "L2_Ethernet52 | S2_Ethernet4"
staticLink: true
properties:
- link: "L2_Ethernet56 | L1_Ethernet56"
staticLink: true
properties:
mode: "MC-LAG"
- link: "L2_Ethernet0 | H1_Ethernet1"
staticLink: true
properties:
mode: "L2-Trunk"
vlan: 201
mc_po_group: 201
- link: "L2_Ethernet4 | H2_Ethernet1"
staticLink: true
properties:
mode: "L2-Trunk"
vlan: 202
mc_po_group: 202
- switchId: 3
switchName: "Leaf-3"
ipAddress: "100.100.10.15"
ASN: 2001
Credentials:
user: "admin"
password: "admin"
mclag:
enabled: true
peer: "L4"
keepalive_vlan: 10
Links:
- link: "L3_Ethernet48 | S1_Ethernet8"
staticLink: true
properties:
- link: "L3_Ethernet52 | S2_Ethernet8"
staticLink: true
properties:
- link: "L3_Ethernet56 | L4_Ethernet56"
staticLink: true
properties:
mode: "MC-LAG"
- link: "L3_Ethernet0 | H3_Ethernet0"
staticLink: true
properties:
mode: "L2-Trunk"
vlan: 203
mc_po_group: 203
- link: "L3_Ethernet4 | H4_Ethernet0"
staticLink: true
properties:
mode: "L2-Trunk"
vlan: 204
mc_po_group: 204
- switchId: 4
switchName: "Leaf-4"
ipAddress: "100.100.10.16"
ASN: 2001
Credentials:
user: "admin"
password: "admin"
mclag:
enabled: true
peer: "L3"
keepalive_vlan: 10
Links:
- link: "L4_Ethernet48 | S1_Ethernet12"
staticLink: true
properties:
- link: "L4_Ethernet52 | S2_Ethernet12"
staticLink: true
properties:
- link: "L4_Ethernet56 | L3_Ethernet56"
staticLink: true
properties:
mode: "MC-LAG"
- link: "L4_Ethernet0 | H3_Ethernet1"
staticLink: true
properties:
mode: "L2-Trunk"
vlan: 203
mc_po_group: 203
- link: "L4_Ethernet4 | H4_Ethernet1"
staticLink: true
properties:
mode: "L2-Trunk"
vlan: 204
mc_po_group: 204
Tor: []
BGP:
BGP_U: false
ND_RA: 30
PhysicalIfCfg:
FEC: "Off"
MTU: 9000
AdminStatus: "Up"
ASN:
SSpine: "10000-20000"
Spine: "21000-50000"
Leaf: "51000-60000"
Tor: "61000-70000"
IPv4Pool:
Loopback: "10.10.10.0/24"
LeafSpine:
LeafTor:
Host:
IPv6Pool:
LeafSpine: 1000::0/64
LeafTor: 2000::0/64
Host:
NTP:
server: "100.100.10.10"
timezone: "Asia/Kolkata"
SYSLOG:
server: "100.100.10.10"
SNMP:
trapserver: "100.100.10.10"
Parameters:
vlan: "200-205"
vni: "20000-20005"
anycast_gateway: "4000::0/64"
anycast_mac: "00:11:22:33:44:55"
hosts_per_vlan: 10
routing_symmetric: false
sag: trueInventory:
SSpines: 0
Spines: 2
Leafs: 4
Tors: 0
Connectivity:
SSpine: []
Spine:
- switchId: 1
switchName: "Spine-1"
ipAddress: "100.100.10.11"
ASN: 2001
Credentials:
user: "admin"
password: "admin"
mclag:
Links:
- link: "S1_Ethernet0 | L1_Ethernet48"
staticLink: true
properties:
- link: "S1_Ethernet4 | L2_Ethernet48"
staticLink: true
properties:
- link: "S1_Ethernet8 | L3_Ethernet48"
staticLink: true
properties:
- link: "S1_Ethernet12 | L4_Ethernet48"
staticLink: true
properties:
- switchId: 2
switchName: "Spine-2"
ipAddress: "100.100.10.12"
ASN: 2002
Credentials:
user: "admin"
password: "admin"
mclag:
Links:
- link: "S2_Ethernet0 | L1_Ethernet52"
staticLink: true
properties:
- link: "S2_Ethernet4 | L2_Ethernet52"
staticLink: true
properties:
- link: "S2_Ethernet8 | L3_Ethernet52"
staticLink: true
properties:
- link: "S2_Ethernet12 | L4_Ethernet52"
staticLink: true
properties:
Leaf:
- switchId: 1
switchName: "Leaf-1"
ipAddress: "100.100.10.13"
ASN: 1001
Credentials:
user: "admin"
password: "admin"
mclag:
enabled: true
peer: "L2"
keepalive_vlan: 10
Links:
- link: "L1_Ethernet48 | S1_Ethernet0"
staticLink: true
properties:
- link: "L1_Ethernet52 | S2_Ethernet0"
staticLink: true
properties:
- link: "L1_Ethernet56 | L2_Ethernet56"
staticLink: true
properties:
mode: "MC-LAG"
- link: "L1_Ethernet0 | H1_Ethernet0"
staticLink: true
properties:
mode: "L2-Trunk"
vlan: 201
mc_po_group: 201
- link: "L1_Ethernet4 | H2_Ethernet0"
staticLink: true
properties:
mode: "L2-Trunk"
vlan: 202
mc_po_group: 202
- switchId: 2
switchName: "Leaf-2"
ipAddress: "100.100.10.14"
ASN: 1002
Credentials:
user: "admin"
password: "admin"
mclag:
enabled: true
peer: "L1"
keepalive_vlan: 10
Links:
- link: "L2_Ethernet48 | S1_Ethernet4"
staticLink: true
properties:
- link: "L2_Ethernet52 | S2_Ethernet4"
staticLink: true
properties:
- link: "L2_Ethernet56 | L1_Ethernet56"
staticLink: true
properties:
mode: "MC-LAG"
- link: "L2_Ethernet0 | H1_Ethernet1"
staticLink: true
properties:
mode: "L2-Trunk"
vlan: 201
mc_po_group: 201
- link: "L2_Ethernet4 | H2_Ethernet1"
staticLink: true
properties:
mode: "L2-Trunk"
vlan: 202
mc_po_group: 202
- switchId: 3
switchName: "Leaf-3"
ipAddress: "100.100.10.15"
ASN: 1003
Credentials:
user: "admin"
password: "admin"
mclag:
enabled: true
peer: "L4"
keepalive_vlan: 10
Links:
- link: "L3_Ethernet48 | S1_Ethernet8"
staticLink: true
properties:
- link: "L3_Ethernet52 | S2_Ethernet8"
staticLink: true
properties:
- link: "L3_Ethernet56 | L4_Ethernet56"
staticLink: true
properties:
mode: "MC-LAG"
- link: "L3_Ethernet0 | H3_Ethernet0"
staticLink: true
properties:
mode: "L2-Trunk"
vlan: 203
mc_po_group: 203
- link: "L3_Ethernet4 | H4_Ethernet0"
staticLink: true
properties:
mode: "L2-Trunk"
vlan: 204
mc_po_group: 204
- switchId: 4
switchName: "Leaf-4"
ipAddress: "100.100.10.16"
ASN: 1004
Credentials:
user: "admin"
password: "admin"
mclag:
enabled: true
peer: "L3"
keepalive_vlan: 10
Links:
- link: "L4_Ethernet48 | S1_Ethernet12"
staticLink: true
properties:
- link: "L4_Ethernet52 | S2_Ethernet12"
staticLink: true
properties:
- link: "L4_Ethernet56 | L3_Ethernet56"
staticLink: true
properties:
mode: "MC-LAG"
- link: "L4_Ethernet0 | H3_Ethernet1"
staticLink: true
properties:
mode: "L2-Trunk"
vlan: 203
mc_po_group: 203
- link: "L4_Ethernet4 | H4_Ethernet1"
staticLink: true
properties:
mode: "L2-Trunk"
vlan: 204
mc_po_group: 204
Tor: []
BGP:
BGP_U: false
ND_RA: 30
PhysicalIfCfg:
FEC: "Off"
MTU: 9000
AdminStatus: "Up"
ASN:
SSpine: "10000-20000"
Spine: "21000-50000"
Leaf: "51000-60000"
Tor: "61000-70000"
IPv4Pool:
Loopback: "10.10.10.0/24"
LeafSpine:
LeafTor:
Host:
IPv6Pool:
LeafSpine: 1000::0/64
LeafTor: 2000::0/64
Host:
NTP:
server: "100.100.10.10"
timezone: "Asia/Kolkata"
SYSLOG:
server: "100.100.10.10"
SNMP:
trapserver: "100.100.10.10"
Parameters:
vlan: "200-205"
vni: "20000-20005"
anycast_gateway: "4000::0/64"
anycast_mac: "00:11:22:33:44:55"
hosts_per_vlan: 10
routing_symmetric: false
sag: trueInventory:
SSpines: 0
Spines: 2
Leafs: 4
Tors: 0
Connectivity:
SSpine: []
Spine:
- switchId: 1
switchName: "Spine-1"
ipAddress: "100.100.10.11"
ASN: 2001
Credentials:
user: "admin"
password: "admin"
mclag:
Links:
- link: "S1_Ethernet0 | L1_Ethernet48"
staticLink: true
properties:
- link: "S1_Ethernet4 | L2_Ethernet48"
staticLink: true
properties:
- link: "S1_Ethernet8 | L3_Ethernet48"
staticLink: true
properties:
- link: "S1_Ethernet12 | L4_Ethernet48"
staticLink: true
properties:
- switchId: 2
switchName: "Spine-2"
ipAddress: "100.100.10.12"
ASN: 2002
Credentials:
user: "admin"
password: "admin"
mclag:
Links:
- link: "S2_Ethernet0 | L1_Ethernet52"
staticLink: true
properties:
- link: "S2_Ethernet4 | L2_Ethernet52"
staticLink: true
properties:
- link: "S2_Ethernet8 | L3_Ethernet52"
staticLink: true
properties:
- link: "S2_Ethernet12 | L4_Ethernet52"
staticLink: true
properties:
Leaf:
- switchId: 1
switchName: "Leaf-1"
ipAddress: "100.100.10.13"
ASN: 1001
Credentials:
user: "admin"
password: "admin"
mclag:
enabled: true
peer: "L2"
keepalive_vlan: 10
Links:
- link: "L1_Ethernet48 | S1_Ethernet0"
staticLink: true
properties:
- link: "L1_Ethernet52 | S2_Ethernet0"
staticLink: true
properties:
- link: "L1_Ethernet56 | L2_Ethernet56"
staticLink: true
properties:
mode: "MC-LAG"
- link: "L1_Ethernet0 | H1_Ethernet0"
staticLink: true
properties:
mode: "L2-Trunk"
vlan: 201
mc_po_group: 201
- link: "L1_Ethernet4 | H2_Ethernet0"
staticLink: true
properties:
mode: "L2-Trunk"
vlan: 202
mc_po_group: 202
- switchId: 2
switchName: "Leaf-2"
ipAddress: "100.100.10.14"
ASN: 1001
Credentials:
user: "admin"
password: "admin"
mclag:
enabled: true
peer: "L1"
keepalive_vlan: 10
Links:
- link: "L2_Ethernet48 | S1_Ethernet4"
staticLink: true
properties:
- link: "L2_Ethernet52 | S2_Ethernet4"
staticLink: true
properties:
- link: "L2_Ethernet56 | L1_Ethernet56"
staticLink: true
properties:
mode: "MC-LAG"
- link: "L2_Ethernet0 | H1_Ethernet1"
staticLink: true
properties:
mode: "L2-Trunk"
vlan: 201
mc_po_group: 201
- link: "L2_Ethernet4 | H2_Ethernet1"
staticLink: true
properties:
mode: "L2-Trunk"
vlan: 202
mc_po_group: 202
- switchId: 3
switchName: "Leaf-3"
ipAddress: "100.100.10.15"
ASN: 1002
Credentials:
user: "admin"
password: "admin"
mclag:
enabled: true
peer: "L4"
keepalive_vlan: 10
Links:
- link: "L3_Ethernet48 | S1_Ethernet8"
staticLink: true
properties:
- link: "L3_Ethernet52 | S2_Ethernet8"
staticLink: true
properties:
- link: "L3_Ethernet56 | L4_Ethernet56"
staticLink: true
properties:
mode: "MC-LAG"
- link: "L3_Ethernet0 | H3_Ethernet0"
staticLink: true
properties:
mode: "L2-Trunk"
vlan: 203
mc_po_group: 203
- link: "L3_Ethernet4 | H4_Ethernet0"
staticLink: true
properties:
mode: "L2-Trunk"
vlan: 204
mc_po_group: 204
- switchId: 4
switchName: "Leaf-4"
ipAddress: "100.100.10.16"
ASN: 1002
Credentials:
user: "admin"
password: "admin"
mclag:
enabled: true
peer: "L3"
keepalive_vlan: 10
Links:
- link: "L4_Ethernet48 | S1_Ethernet12"
staticLink: true
properties:
- link: "L4_Ethernet52 | S2_Ethernet12"
staticLink: true
properties:
- link: "L4_Ethernet56 | L3_Ethernet56"
staticLink: true
properties:
mode: "MC-LAG"
- link: "L4_Ethernet0 | H3_Ethernet1"
staticLink: true
properties:
mode: "L2-Trunk"
vlan: 203
mc_po_group: 203
- link: "L4_Ethernet4 | H4_Ethernet1"
staticLink: true
properties:
mode: "L2-Trunk"
vlan: 204
mc_po_group: 204
Tor: []
BGP:
BGP_U: false
ND_RA: 30
PhysicalIfCfg:
FEC: "Off"
MTU: 9000
AdminStatus: "Up"
ASN:
SSpine: "10000-20000"
Spine: "21000-50000"
Leaf: "51000-60000"
Tor: "61000-70000"
IPv4Pool:
Loopback: "10.10.10.0/24"
LeafSpine: "40.0.0.0/24"
LeafTor: "39.0.0.0/24"
Host: "49.0.0.0/24"
IPv6Pool:
LeafSpine:
LeafTor:
Host:
NTP:
server: "100.100.10.10"
timezone: "Asia/Kolkata"
SYSLOG:
server: "100.100.10.10"
SNMP:
trapserver: "100.100.10.10"
Parameters:
vlan: "200-205"
vni: "20000-20005"
anycast_gateway: "100.10.0.0/23"
anycast_mac: "00:11:22:33:44:55"
hosts_per_vlan: 10
routing_symmetric: false
sag: trueInventory:
SSpines: 0
Spines: 2
Leafs: 4
Tors: 0
Connectivity:
SSpine: []
Spine:
- switchId: 1
switchName: "Spine-1"
ipAddress: "100.100.10.11"
ASN: 2001
Credentials:
user: "admin"
password: "admin"
mclag:
Links:
- link: "S1_Ethernet0 | L1_Ethernet48"
staticLink: true
properties:
- link: "S1_Ethernet4 | L2_Ethernet48"
staticLink: true
properties:
- link: "S1_Ethernet8 | L3_Ethernet48"
staticLink: true
properties:
- link: "S1_Ethernet12 | L4_Ethernet48"
staticLink: true
properties:
- switchId: 2
switchName: "Spine-2"
ipAddress: "100.100.10.12"
ASN: 2001
Credentials:
user: "admin"
password: "admin"
mclag:
Links:
- link: "S2_Ethernet0 | L1_Ethernet52"
staticLink: true
properties:
- link: "S2_Ethernet4 | L2_Ethernet52"
staticLink: true
properties:
- link: "S2_Ethernet8 | L3_Ethernet52"
staticLink: true
properties:
- link: "S2_Ethernet12 | L4_Ethernet52"
staticLink: true
properties:
Leaf:
- switchId: 1
switchName: "Leaf-1"
ipAddress: "100.100.10.13"
ASN: 2001
Credentials:
user: "admin"
password: "admin"
mclag:
enabled: true
peer: "L2"
keepalive_vlan: 10
Links:
- link: "L1_Ethernet48 | S1_Ethernet0"
staticLink: true
properties:
- link: "L1_Ethernet52 | S2_Ethernet0"
staticLink: true
properties:
- link: "L1_Ethernet56 | L2_Ethernet56"
staticLink: true
properties:
mode: "MC-LAG"
- link: "L1_Ethernet0 | H1_Ethernet0"
staticLink: true
properties:
mode: "L2-Trunk"
vlan: 201
mc_po_group: 201
- link: "L1_Ethernet4 | H2_Ethernet0"
staticLink: true
properties:
mode: "L2-Trunk"
vlan: 202
mc_po_group: 202
- switchId: 2
switchName: "Leaf-2"
ipAddress: "100.100.10.14"
ASN: 2001
Credentials:
user: "admin"
password: "admin"
mclag:
enabled: true
peer: "L1"
keepalive_vlan: 10
Links:
- link: "L2_Ethernet48 | S1_Ethernet4"
staticLink: true
properties:
- link: "L2_Ethernet52 | S2_Ethernet4"
staticLink: true
properties:
- link: "L2_Ethernet56 | L1_Ethernet56"
staticLink: true
properties:
mode: "MC-LAG"
- link: "L2_Ethernet0 | H1_Ethernet1"
staticLink: true
properties:
mode: "L2-Trunk"
vlan: 201
mc_po_group: 201
- link: "L2_Ethernet4 | H2_Ethernet1"
staticLink: true
properties:
mode: "L2-Trunk"
vlan: 202
mc_po_group: 202
- switchId: 3
switchName: "Leaf-3"
ipAddress: "100.100.10.15"
ASN: 2001
Credentials:
user: "admin"
password: "admin"
mclag:
enabled: true
peer: "L4"
keepalive_vlan: 10
Links:
- link: "L3_Ethernet48 | S1_Ethernet8"
staticLink: true
properties:
- link: "L3_Ethernet52 | S2_Ethernet8"
staticLink: true
properties:
- link: "L3_Ethernet56 | L4_Ethernet56"
staticLink: true
properties:
mode: "MC-LAG"
- link: "L3_Ethernet0 | H3_Ethernet0"
staticLink: true
properties:
mode: "L2-Trunk"
vlan: 203
mc_po_group: 203
- link: "L3_Ethernet4 | H4_Ethernet0"
staticLink: true
properties:
mode: "L2-Trunk"
vlan: 204
mc_po_group: 204
- switchId: 4
switchName: "Leaf-4"
ipAddress: "100.100.10.16"
ASN: 2001
Credentials:
user: "admin"
password: "admin"
mclag:
enabled: true
peer: "L3"
keepalive_vlan: 10
Links:
- link: "L4_Ethernet48 | S1_Ethernet12"
staticLink: true
properties:
- link: "L4_Ethernet52 | S2_Ethernet12"
staticLink: true
properties:
- link: "L4_Ethernet56 | L3_Ethernet56"
staticLink: true
properties:
mode: "MC-LAG"
- link: "L4_Ethernet0 | H3_Ethernet1"
staticLink: true
properties:
mode: "L2-Trunk"
vlan: 203
mc_po_group: 203
- link: "L4_Ethernet4 | H4_Ethernet1"
staticLink: true
properties:
mode: "L2-Trunk"
vlan: 204
mc_po_group: 204
Tor: []
BGP:
BGP_U: true
ND_RA: 30
PhysicalIfCfg:
FEC: "Off"
MTU: 9000
AdminStatus: "Up"
ASN:
SSpine: "10000-20000"
Spine: "21000-50000"
Leaf: "51000-60000"
Tor: "61000-70000"
IPv4Pool:
Loopback: "10.10.10.0/24"
LeafSpine:
LeafTor:
Host:
IPv6Pool:
LeafSpine: 1000::0/64
LeafTor: 2000::0/64
Host:
NTP:
server: "100.100.10.10"
timezone: "Asia/Kolkata"
SYSLOG:
server: "100.100.10.10"
SNMP:
trapserver: "100.100.10.10"
Parameters:
vlan: "200-205"
vni: "20000-20005"
anycast_gateway: "4000::0/64"
anycast_mac: "00:11:22:33:44:55"
hosts_per_vlan: 10
routing_symmetric: false
sag: false


IPv4Pool:
Loopback: 19.168.10.0/24
LeafSpine: 20.168.10.0/24
LeafTor: 30.168.10.0/24
Host: 49.0.0.0/24IPv6Pool:
LeafSpine: #Define IPv6 Pool
LeafTor: #Define IPv6 Pool
Host: #Define IPv6 Poolelif [ "$CONFIG_TYPE" == "split" ]; then
#echo "no service integrated-vtysh-config" > /etc/frr/vtysh.conf
echo "service integrated-vtysh-config" > /etc/frr/vtysh.conf
#rm -f /etc/frr/frr.confroot@Leaf-1:/home/admin# docker commit bgp
sha256:c67656393b902cf7bf514094a219eb75f5bf45340023848be51e26632344caa3sudo config save -ysudo cp /etc/sonic/config_db.json /host/backup_config_db.jsonsudo config reload /host/backup_config_db_json -y
sudo config save -ysudo cp /etc/sonic/config_db.json /host/backup_config_db.jsonsudo config reload /host/backup_config_db_json -yInventory:
SSpines: 2 #Define the count of devices in the SuperSpine role
Spines: 2 #Define the count of devices in the Spine role
Leafs: 2 #Define the count of devices in the Leaf role
Tors: 1 #Define the count of devices in the Tor roleConnectivity:
SSpine: [] #A role that does not have any device, presented as []
Spine: #Delcare all details, the device needs to update.
- switchId: 1 #Every device we define for a given Role should have an ID that is unique to that Role.
switchName: EC01 #Use the hostname of the switch
ipAddress: 10.4.4.61 #Management IP address of the device to connect
ASN: 1001 #BGP Local AS number
Credentials: #User needs to enter device credentials
user: admin
password: YourPaSsWoRd
mclag: #used to create multichassis link aggregation
enabled: True #used to activate mclag property
peer: L2 #Neighbor Device ID (Leaf Switch 2), Peer can be Spine or Leaf device
keepalive_vlan: 10 #Vlan to use for Keepalive messages
isoverl3: true #for L2 MCLAG use false, For L3 MCLAG use true
Links: #The links between all the devices we manage
#SS indicates SuperSpine Role
#S indicates Spine Role
#L indicates Leaf Role
#T indicates Tor Role
#H indicates Host port
#The next number is device's unique ID from the same respective Role
#Then interface name and number
- link: S1_Ethernet96 | L1_Ethernet96
#S1_Ethernet96 : Spine Role, Switch ID 1 with Interface Ethernet 96
is connected to
#L1_Ethernet96 : Leaf Role, Switch ID 1 with Interface Ethernet 96
staticLink: True #True indicates the status is up
properties: #This indicates the use of link properties
mode:
#L2-Trunk #Used as Layer-2 Trunk
#vlan: 200 #Vlan used for mclag
#mc_po_group: 200 #Po number for mclag
#vrf: 1 #VRF to be used for mclag, vrf is mendate in symmetric IRB
#L2-Access #Used as Layer-2 Access
#vlan: 200 #Vlan used for mclag
#L3-V4 #Only with Host peer
#mc_po_group: 201 #Po number to be used
#L3-V6 #Only with Host peer
#mc_po_group: 201 #Po number to be used
#MC-LAG #Only when we need MC-LAG between links
#MC-LAG-BGP #BGP Neighbourship between MC-Lag Peers using Peer LinkBGP:
#BGP_U If set to False, this configures regular BGP peering.
#BGP_U If set to True, this configures BGP unnumbered peering
#ND_RA is reserved for future development
BGP_U: False
ND_RA: 30 PhysicalIfCfg:
FEC: On #Possible values are On or Off
MTU: 8000 #MTU value a user wants to change
AdminStatus: Up #Set the status UP ASN:
SSpine: 10000-20000
Spine: 21000-50000
Leaf: 51000-60000
Tor: 61000-70000NTP:
server: 128.138.141.172
timezone: Asia/KolkataSYSLOG:
server: 10.1.1.11
SNMP:
trapserver: 10.1.1.11Parameters:
vlan: 200-205
vni: 20000-20005
anycast_gateway: 100.10.0.0/23
anycast_mac: 00:11:22:33:44:55
hosts_per_vlan: 10
routing_symmetric: True # True / False to indicate its symmetric routing or asymmetric routing
irb_vlan: 300-305 # irb vlan is separate input and should not overlap with vxlan vni
irb_vni: 30000-30005 # irb vni is separate input and should not overlap with vxlan vni
sag: False # True for Anycast Gateway otherwise False root@Leaf-1:/# vi /usr/bin/docker_init.shelif [ "$CONFIG_TYPE" == "split" ]; then
#echo "no service integrated-vtysh-config" > /etc/frr/vtysh.conf
rm -f /etc/frr/frr.confelif [ "$CONFIG_TYPE" == "split" ]; then
#echo "no service integrated-vtysh-config" > /etc/frr/vtysh.conf
echo "service integrated-vtysh-config" > /etc/frr/vtysh.conf
rm -f /etc/frr/frr.confsudo config interface speed Ethernet0 10000


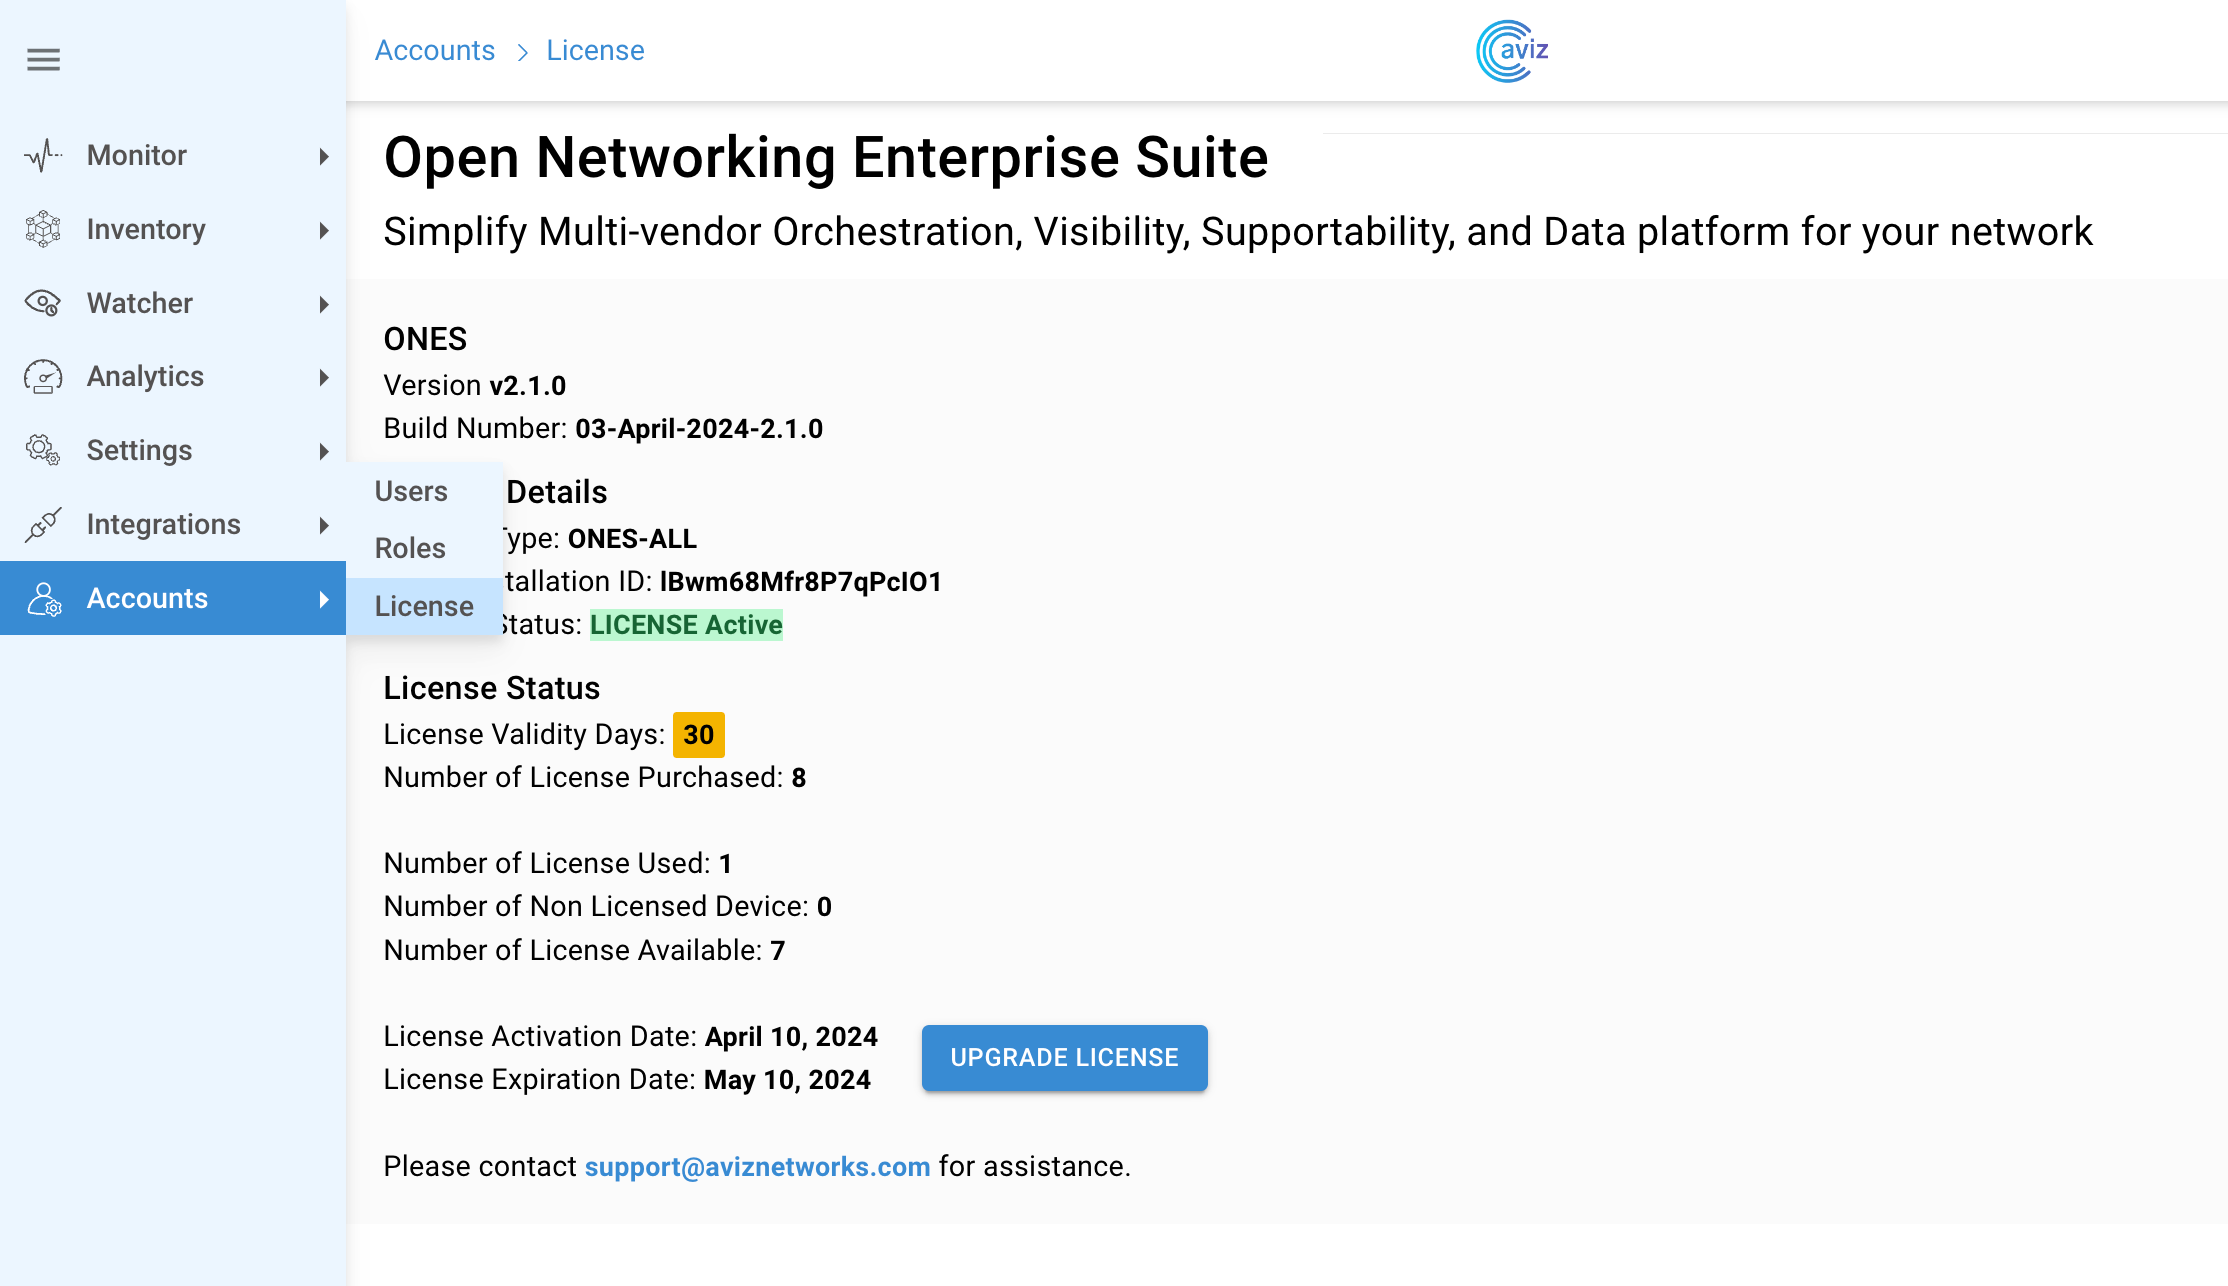


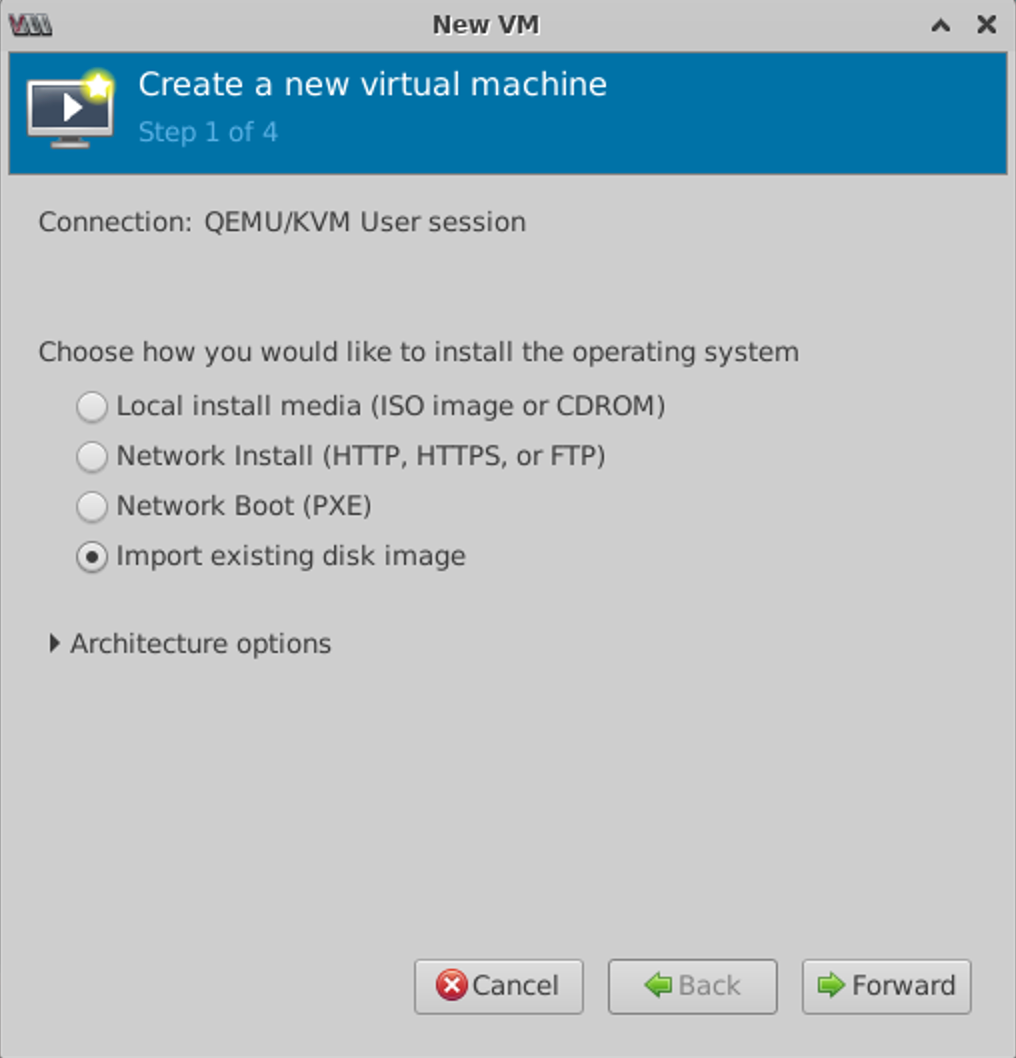


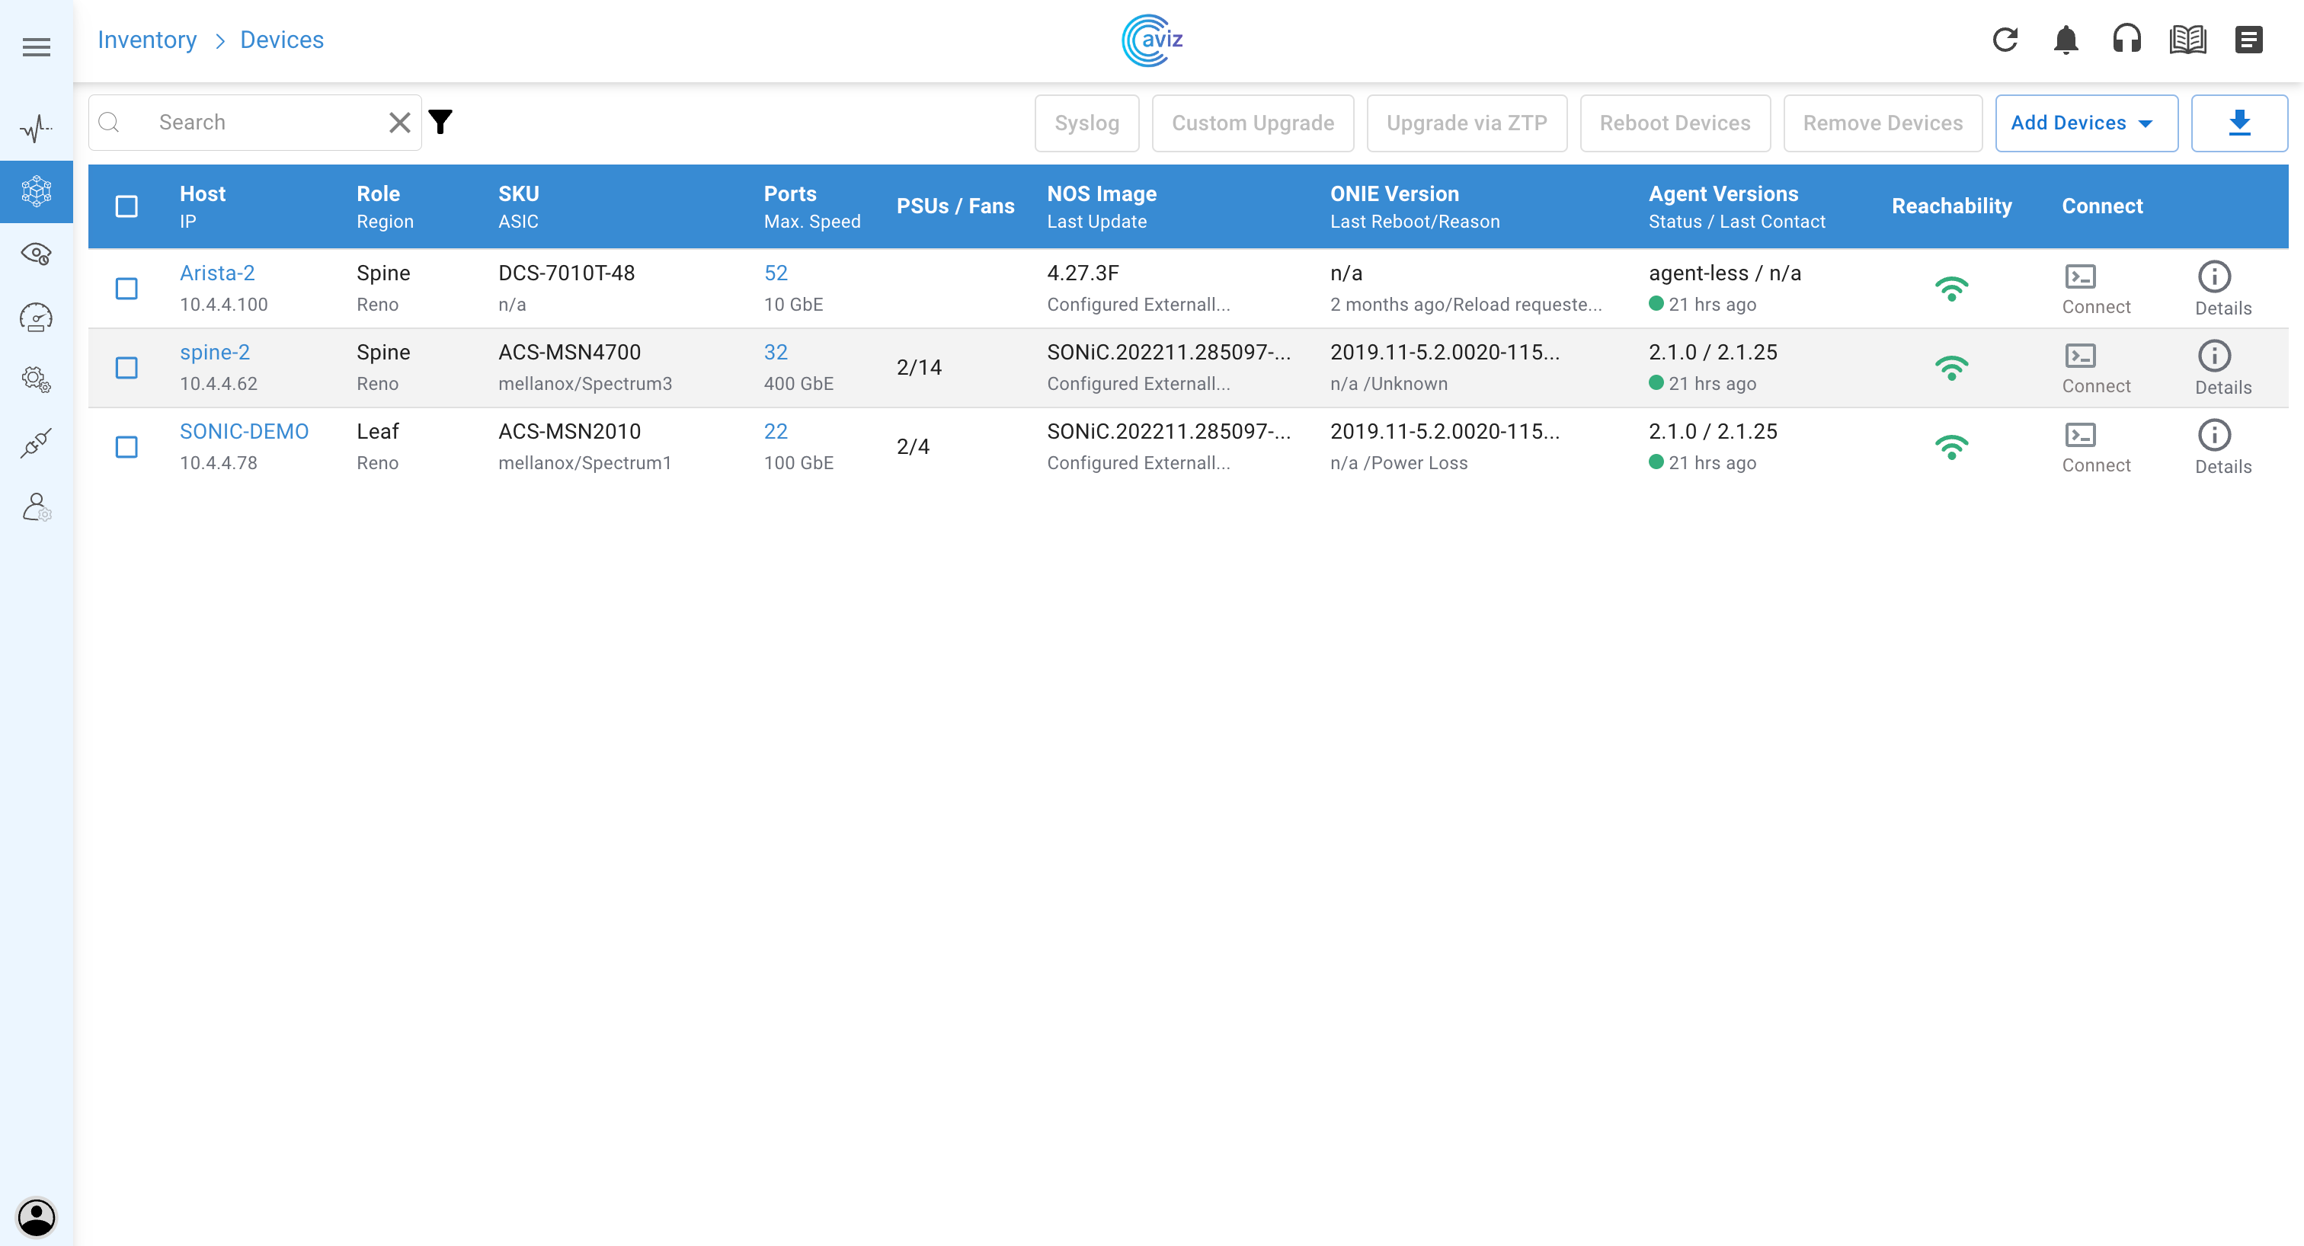


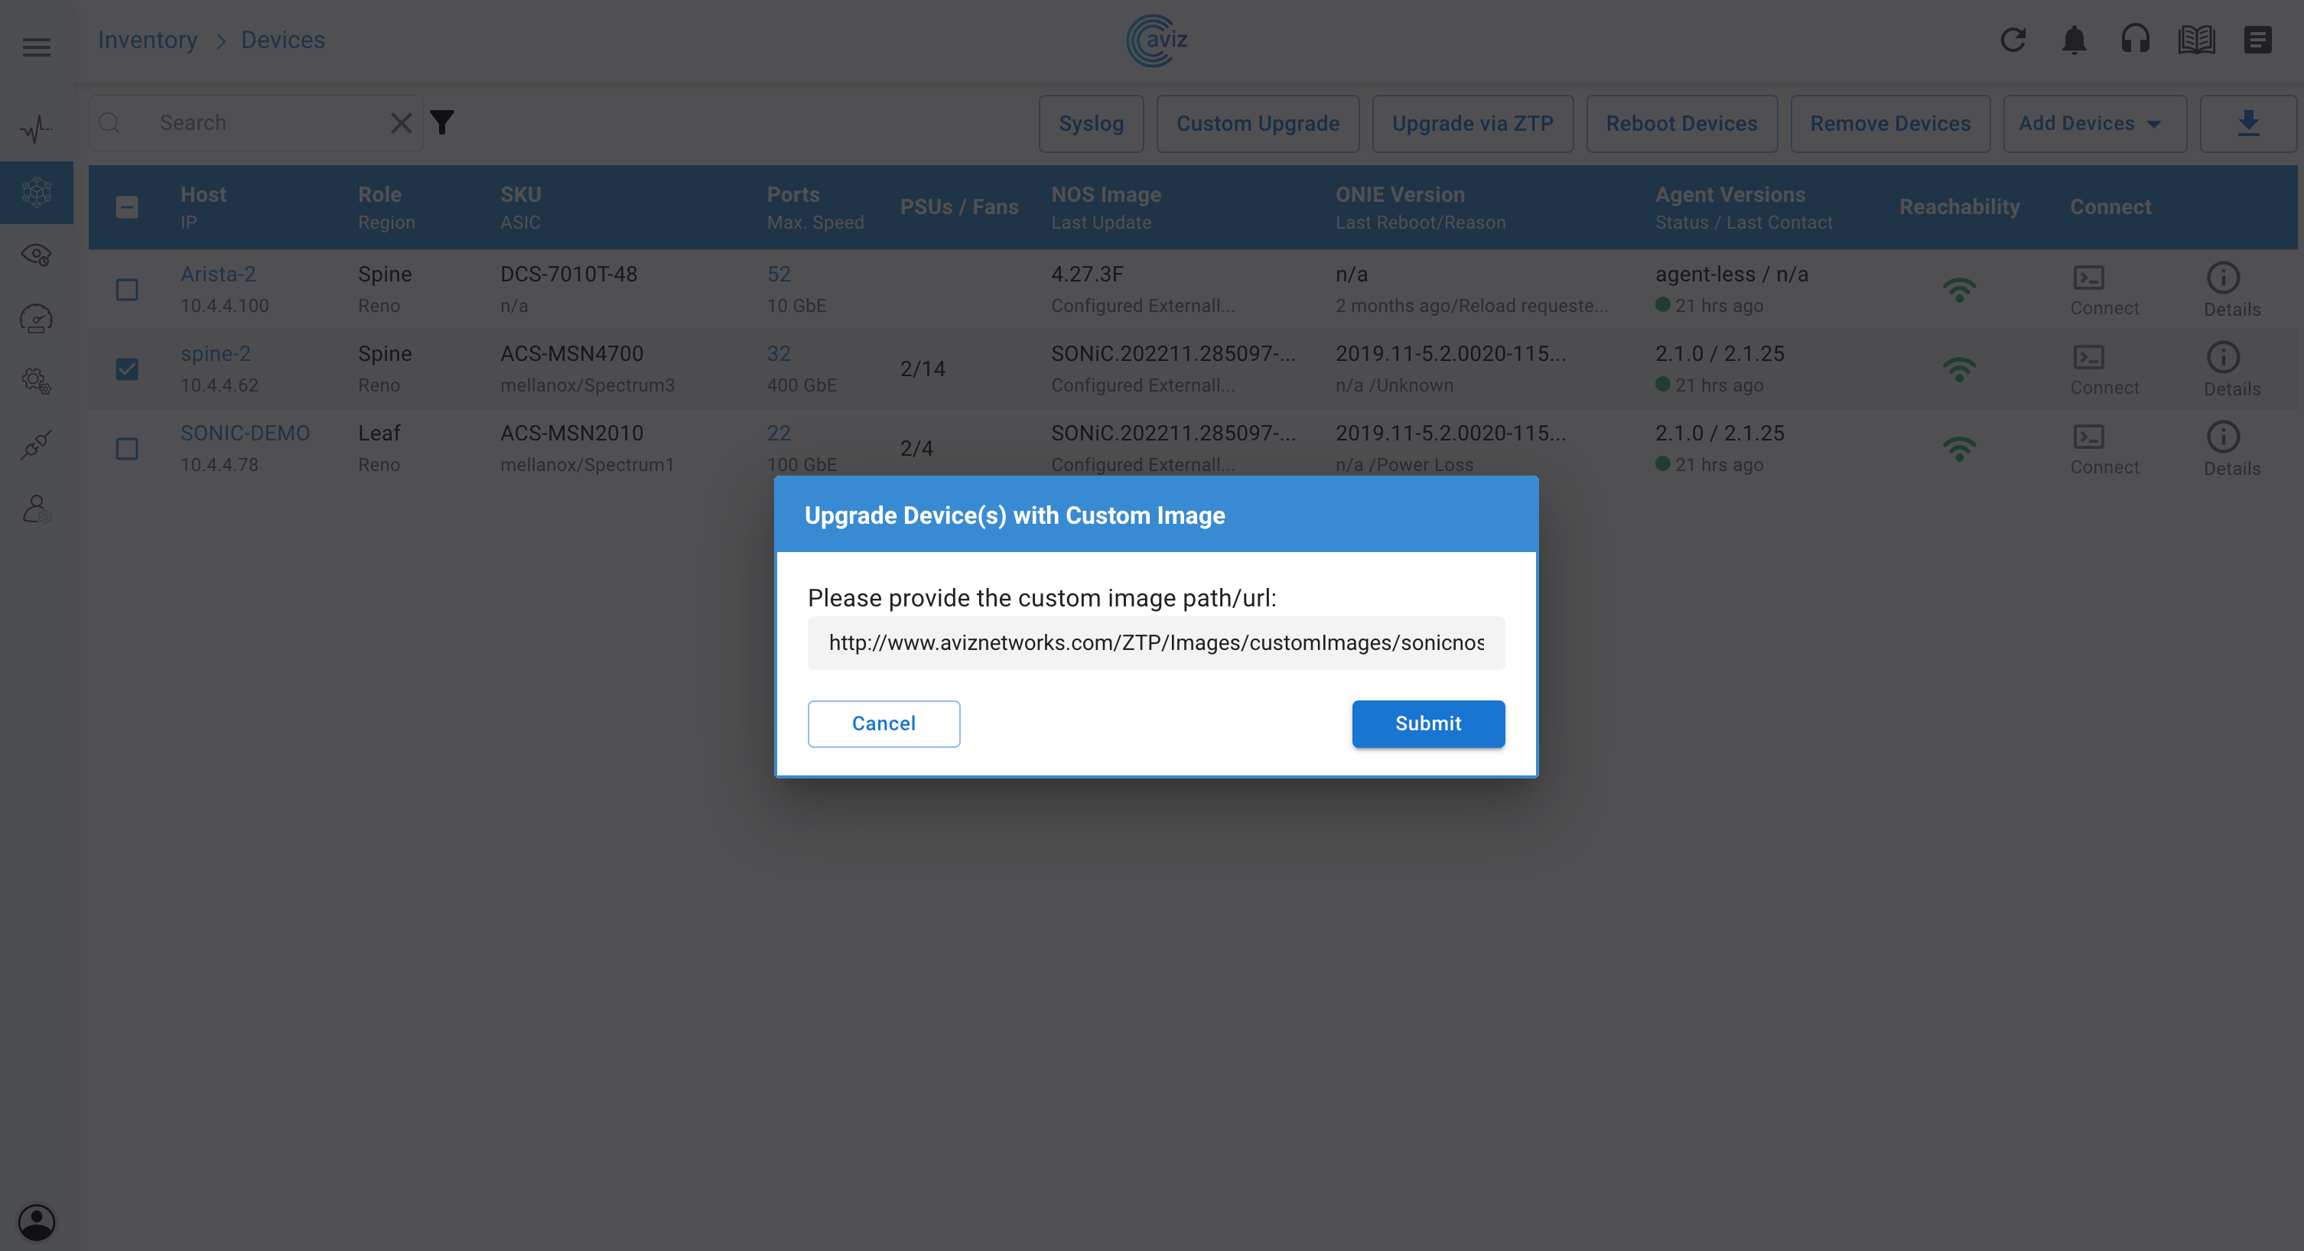


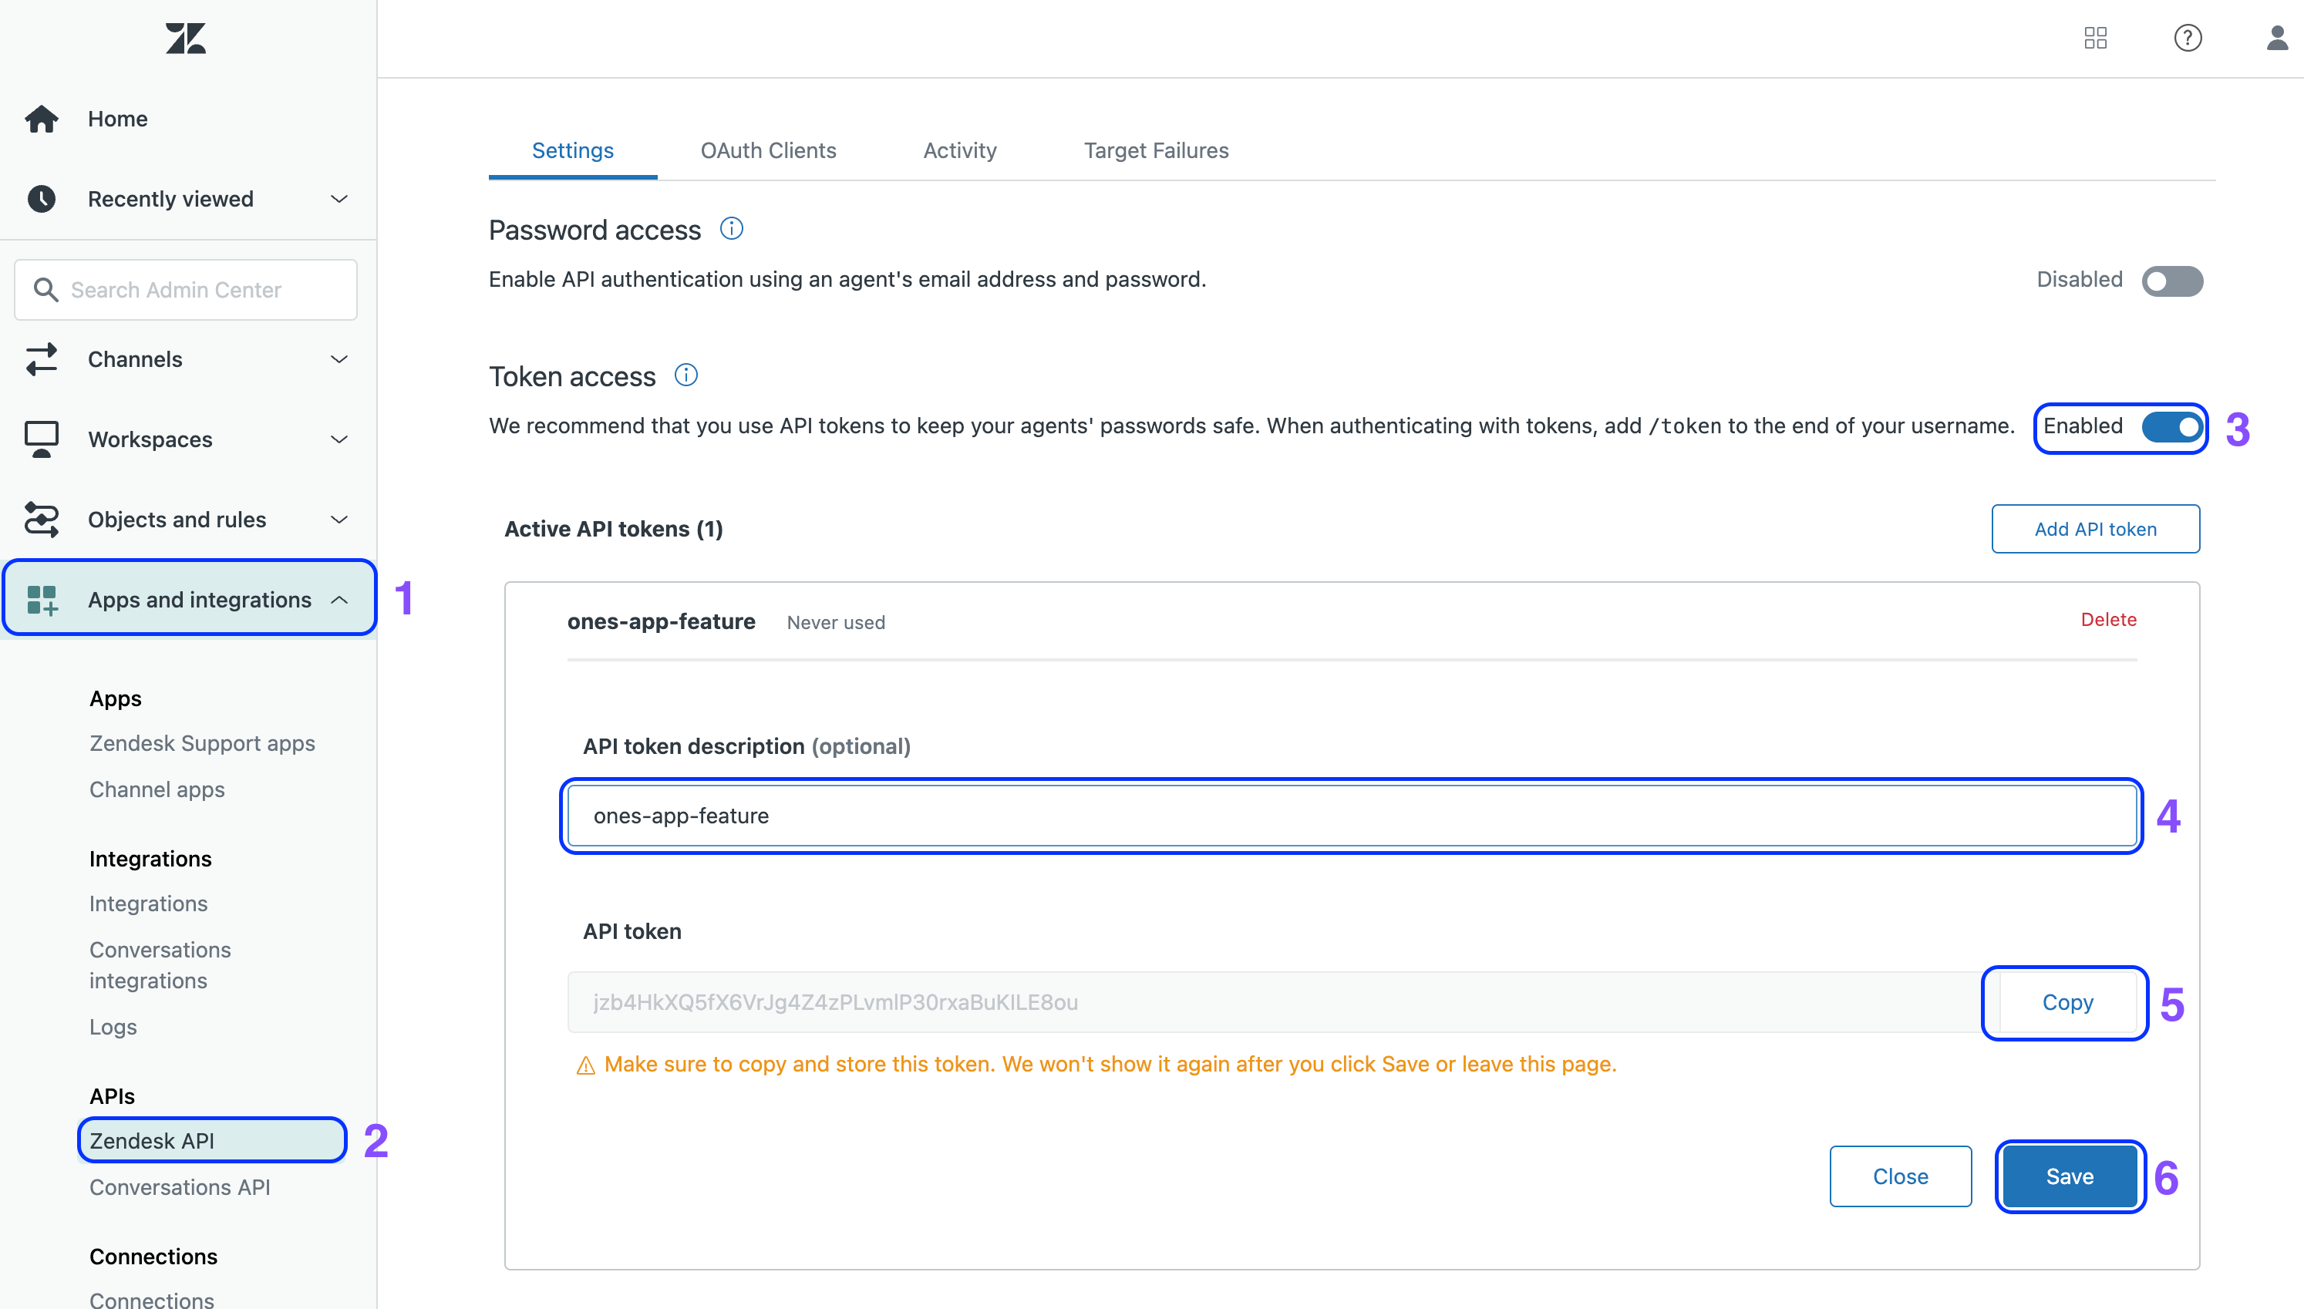


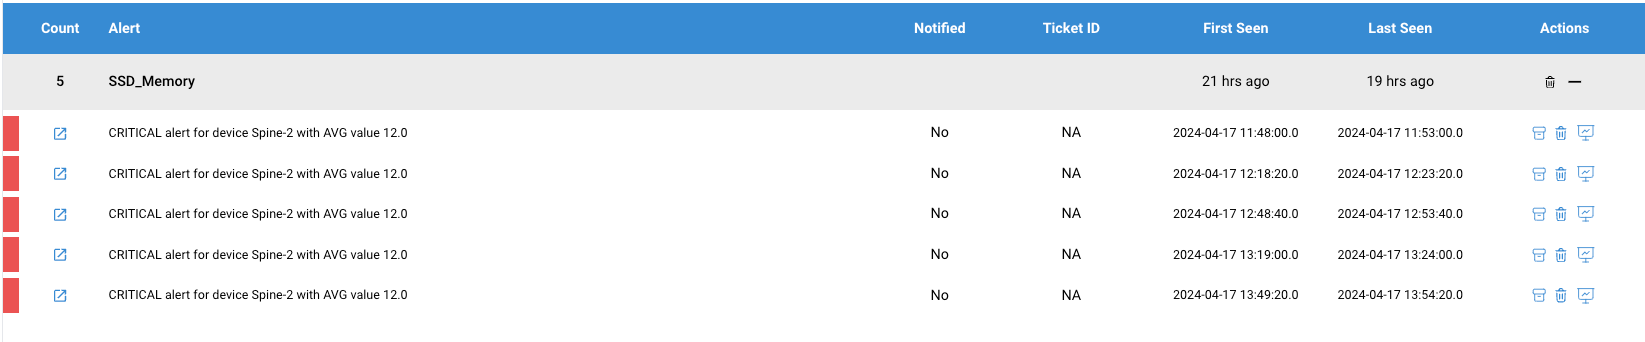


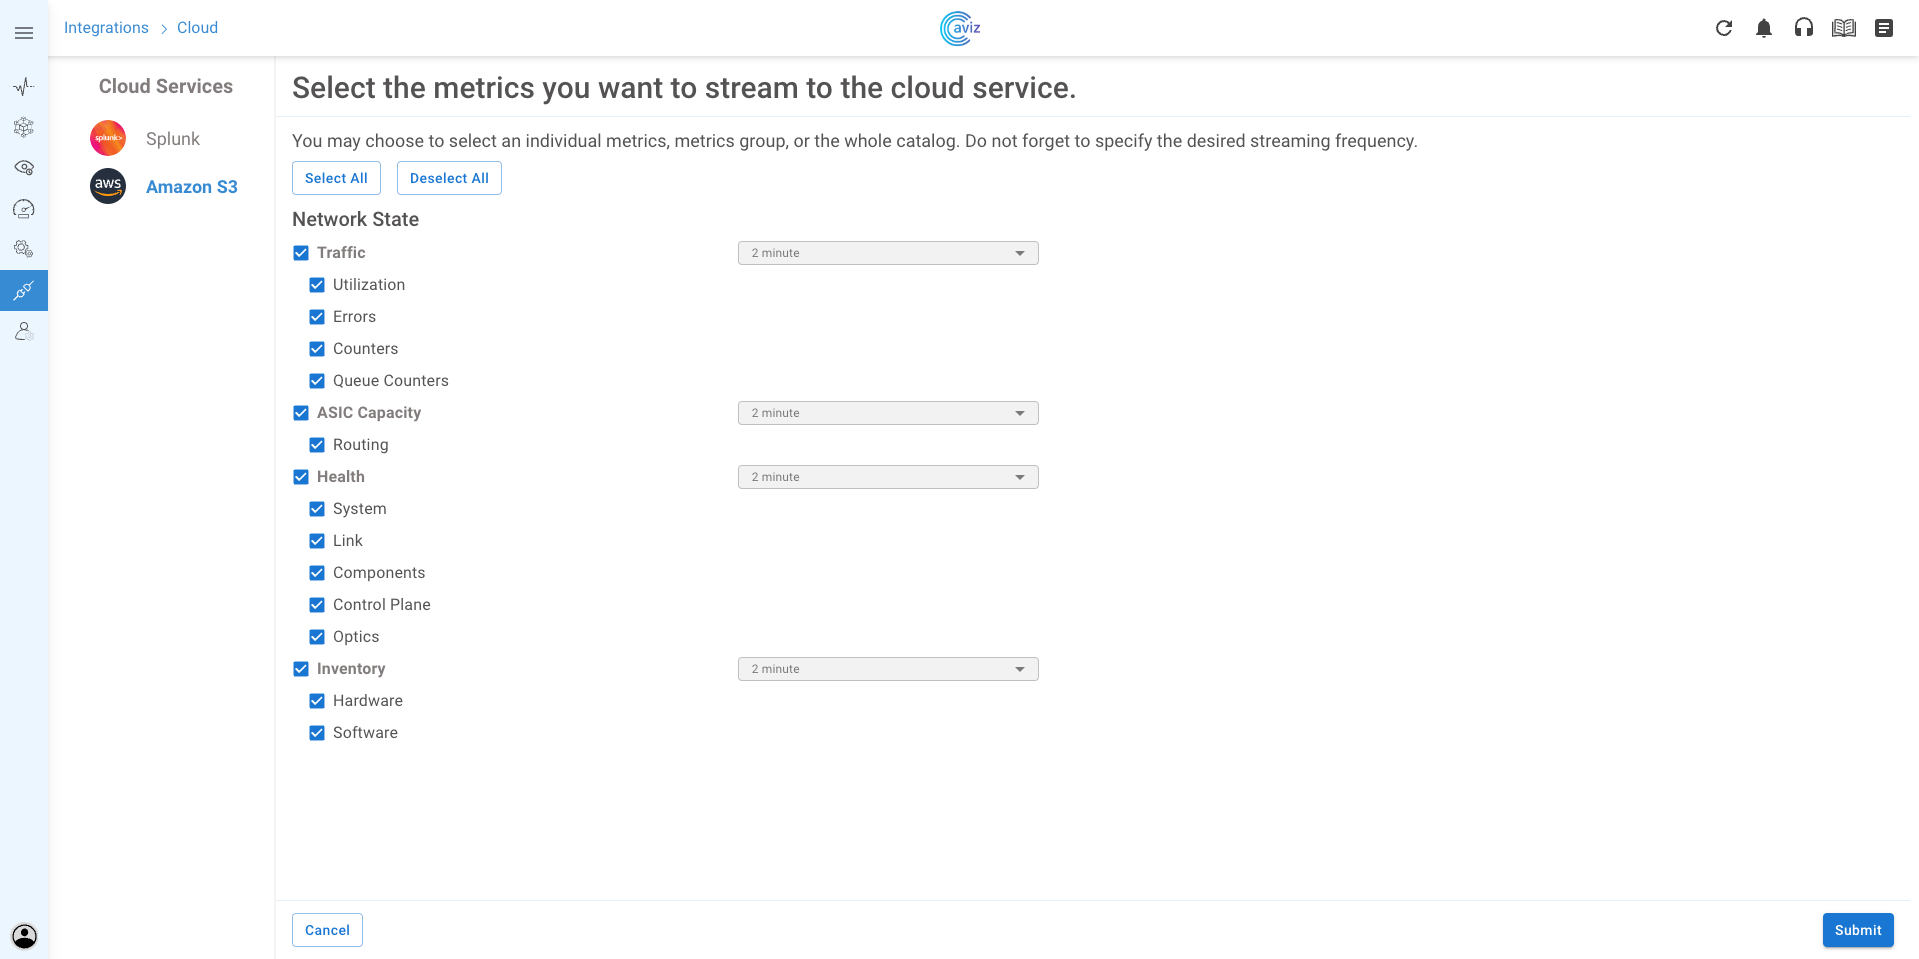


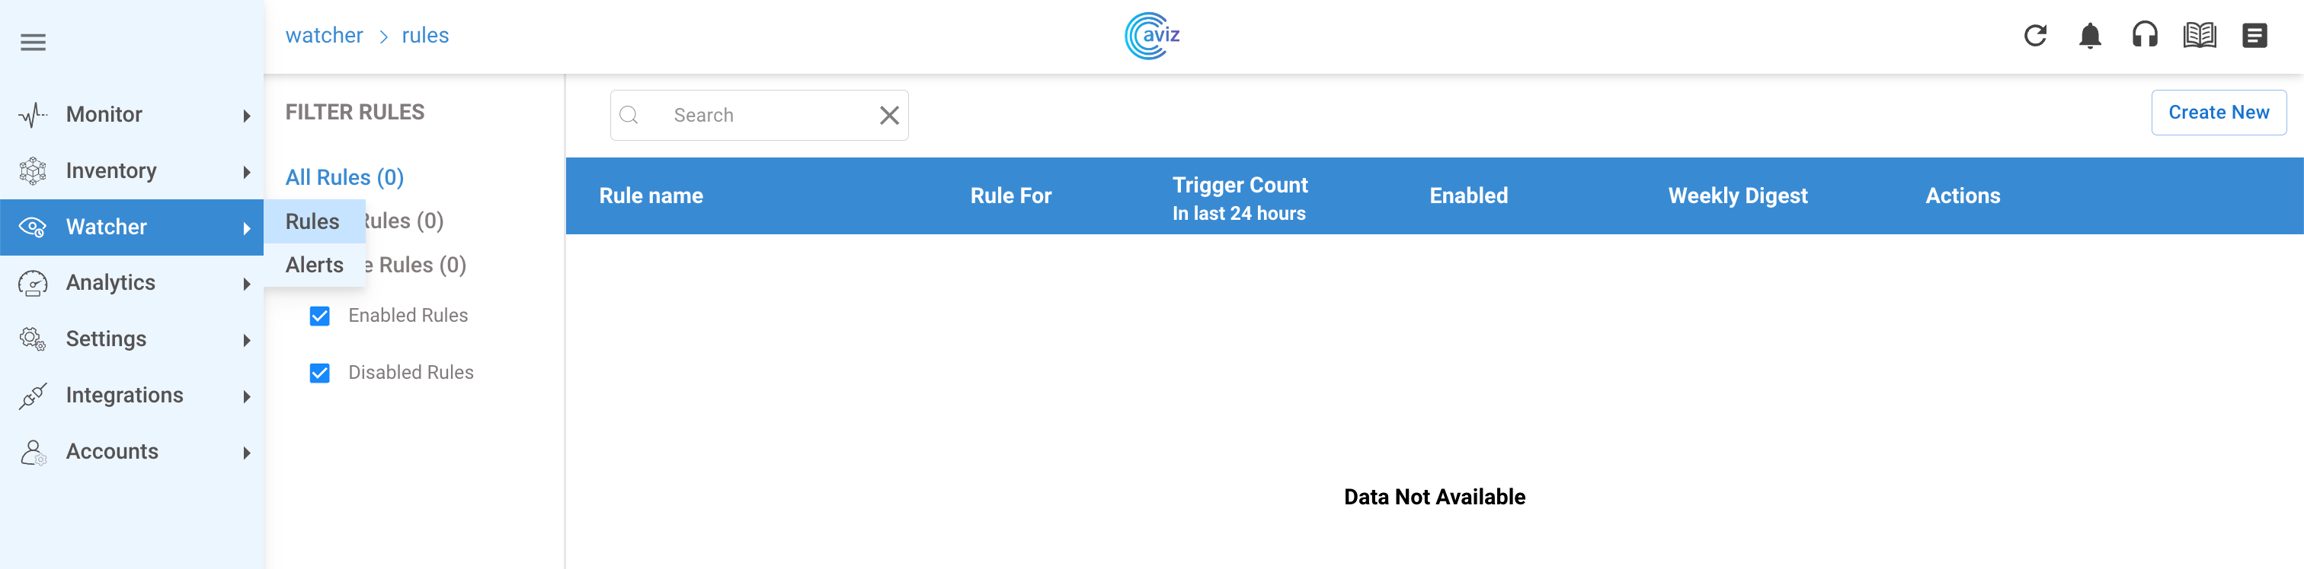


Inventory:
SSpines: 0
Spines: 2
Leafs: 4
Tors: 0
Connectivity:
SSpine: []
Spine:
- switchId: 1
switchName: "Spine-1"
ipAddress: "100.100.10.11"
ASN: 2001
Credentials:
user: "admin"
password: "admin"
mclag:
Links:
- link: "S1_Ethernet0 | L1_Ethernet48"
staticLink: true
properties:
- link: "S1_Ethernet4 | L2_Ethernet48"
staticLink: true
properties:
- link: "S1_Ethernet8 | L3_Ethernet48"
staticLink: true
properties:
- link: "S1_Ethernet12 | L4_Ethernet48"
staticLink: true
properties:
- switchId: 2
switchName: "Spine-2"
ipAddress: "100.100.10.12"
ASN: 2001
Credentials:
user: "admin"
password: "admin"
mclag:
Links:
- link: "S2_Ethernet0 | L1_Ethernet52"
staticLink: true
properties:
- link: "S2_Ethernet4 | L2_Ethernet52"
staticLink: true
properties:
- link: "S2_Ethernet8 | L3_Ethernet52"
staticLink: true
properties:
- link: "S2_Ethernet12 | L4_Ethernet52"
staticLink: true
properties:
Leaf:
- switchId: 1
switchName: "Leaf-1"
ipAddress: "100.100.10.13"
ASN: 2001
Credentials:
user: "admin"
password: "admin"
mclag:
enabled: true
peer: "L2"
keepalive_vlan: 10
isoverl3: false
Links:
- link: "L1_Ethernet48 | S1_Ethernet0"
staticLink: true
properties:
- link: "L1_Ethernet52 | S2_Ethernet0"
staticLink: true
properties:
- link: "L1_Ethernet64 | L2_Ethernet64"
staticLink: true
properties:
mode: "MC-LAG-BGP"
- link: "L1_Ethernet56 | L2_Ethernet56"
staticLink: true
properties:
mode: "MC-LAG-BGP"
- link: "L1_Ethernet0 | H1_Ethernet0"
staticLink: true
properties:
mode: "L2-Trunk"
vlan: 201
mc_po_group: 201
- link: "L1_Ethernet4 | H2_Ethernet0"
staticLink: true
properties:
mode: "L2-Trunk"
vlan: 202
mc_po_group: 202
- switchId: 2
switchName: "Leaf-2"
ipAddress: "100.100.10.14"
ASN: 2001
Credentials:
user: "admin"
password: "admin"
mclag:
enabled: true
peer: "L1"
keepalive_vlan: 10
isoverl3: false
Links:
- link: "L2_Ethernet48 | S1_Ethernet4"
staticLink: true
properties:
- link: "L2_Ethernet52 | S2_Ethernet4"
staticLink: true
properties:
- link: "L2_Ethernet56 | L1_Ethernet56"
staticLink: true
properties:
mode: "MC-LAG-BGP"
- link: "L2_Ethernet64 | L1_Ethernet64"
staticLink: true
properties:
mode: "MC-LAG-BGP"
- link: "L2_Ethernet0 | H1_Ethernet1"
staticLink: true
properties:
mode: "L2-Trunk"
vlan: 201
mc_po_group: 201
- link: "L2_Ethernet4 | H2_Ethernet1"
staticLink: true
properties:
mode: "L2-Trunk"
vlan: 202
mc_po_group: 202
- switchId: 3
switchName: "Leaf-3"
ipAddress: "100.100.10.15"
ASN: 2001
Credentials:
user: "admin"
password: "admin"
mclag:
enabled: true
peer: "L4"
keepalive_vlan: 10
isoverl3: false
Links:
- link: "L3_Ethernet48 | S1_Ethernet8"
staticLink: true
properties:
- link: "L3_Ethernet52 | S2_Ethernet8"
staticLink: true
properties:
- link: "L3_Ethernet56 | L4_Ethernet56"
staticLink: true
properties:
mode: "MC-LAG-BGP"
- link: "L3_Ethernet60 | L4_Ethernet60"
staticLink: true
properties:
mode: "MC-LAG-BGP"
- link: "L3_Ethernet0 | H3_Ethernet0"
staticLink: true
properties:
mode: "L2-Trunk"
vlan: 203
mc_po_group: 203
- link: "L3_Ethernet4 | H4_Ethernet0"
staticLink: true
properties:
mode: "L2-Trunk"
vlan: 204
mc_po_group: 204
- switchId: 4
switchName: "Leaf-4"
ipAddress: "100.100.10.16"
ASN: 2001
Credentials:
user: "admin"
password: "admin"
mclag:
enabled: true
peer: "L3"
keepalive_vlan: 10
isoverl3: false
Links:
- link: "L4_Ethernet48 | S1_Ethernet12"
staticLink: true
properties:
- link: "L4_Ethernet52 | S2_Ethernet12"
staticLink: true
properties:
- link: "L4_Ethernet56 | L3_Ethernet56"
staticLink: true
properties:
mode: "MC-LAG-BGP"
- link: "L4_Ethernet60 | L3_Ethernet60"
staticLink: true
properties:
mode: "MC-LAG-BGP"
- link: "L4_Ethernet0 | H3_Ethernet1"
staticLink: true
properties:
mode: "L2-Trunk"
vlan: 203
mc_po_group: 203
- link: "L4_Ethernet4 | H4_Ethernet1"
staticLink: true
properties:
mode: "L2-Trunk"
vlan: 204
mc_po_group: 204
Tor: []
BGP:
BGP_U: false
ND_RA: 30
PhysicalIfCfg:
FEC: "Off"
MTU: 9000
AdminStatus: "Up"
ASN:
SSpine: "10000-20000"
Spine: "21000-50000"
Leaf: "51000-60000"
Tor: "61000-70000"
IPv4Pool:
Loopback: "10.10.10.0/24"
LeafSpine: "40.0.0.0/24"
LeafTor: "39.0.0.0/24"
Host: "49.0.0.0/24"
IPv6Pool:
LeafSpine:
LeafTor:
Host:
NTP:
server: "100.100.10.10"
timezone: "Asia/Kolkata"
SYSLOG:
server: "100.100.10.10"
SNMP:
trapserver: "100.100.10.10"
Parameters:
vlan: "200-205"
vni: "20000-20005"
anycast_gateway: "100.10.0.0/23"
anycast_mac: "00:11:22:33:44:55"
hosts_per_vlan: 10
routing_symmetric: false
sag: true Inventory:
SSpines: 0
Spines: 2
Leafs: 4
Tors: 0
Connectivity:
SSpine: []
Spine:
- switchId: 1
switchName: "Spine-1"
ipAddress: "100.100.10.11"
ASN: 2001
Credentials:
user: "admin"
password: "admin"
mclag:
Links:
- link: "S1_Ethernet0 | L1_Ethernet48"
staticLink: true
properties:
- link: "S1_Ethernet4 | L2_Ethernet48"
staticLink: true
properties:
- link: "S1_Ethernet8 | L3_Ethernet48"
staticLink: true
properties:
- link: "S1_Ethernet12 | L4_Ethernet48"
staticLink: true
properties:
- switchId: 2
switchName: "Spine-2"
ipAddress: "100.100.10.12"
ASN: 2002
Credentials:
user: "admin"
password: "admin"
mclag:
Links:
- link: "S2_Ethernet0 | L1_Ethernet52"
staticLink: true
properties:
- link: "S2_Ethernet4 | L2_Ethernet52"
staticLink: true
properties:
- link: "S2_Ethernet8 | L3_Ethernet52"
staticLink: true
properties:
- link: "S2_Ethernet12 | L4_Ethernet52"
staticLink: true
properties:
Leaf:
- switchId: 1
switchName: "Leaf-1"
ipAddress: "100.100.10.13"
ASN: 1001
Credentials:
user: "admin"
password: "admin"
mclag:
enabled: true
peer: "L2"
keepalive_vlan: 10
Links:
- link: "L1_Ethernet48 | S1_Ethernet0"
staticLink: true
properties:
- link: "L1_Ethernet52 | S2_Ethernet0"
staticLink: true
properties:
- link: "L1_Ethernet56 | L2_Ethernet56"
staticLink: true
properties:
mode: "MC-LAG"
- link: "L1_Ethernet0 | H1_Ethernet0"
staticLink: true
properties:
mode: "L2-Trunk"
vlan: 201
mc_po_group: 201
- link: "L1_Ethernet4 | H2_Ethernet0"
staticLink: true
properties:
mode: "L2-Trunk"
vlan: 202
mc_po_group: 202
- switchId: 2
switchName: "Leaf-2"
ipAddress: "100.100.10.14"
ASN: 1001
Credentials:
user: "admin"
password: "admin"
mclag:
enabled: true
peer: "L1"
keepalive_vlan: 10
Links:
- link: "L2_Ethernet48 | S1_Ethernet4"
staticLink: true
properties:
- link: "L2_Ethernet52 | S2_Ethernet4"
staticLink: true
properties:
- link: "L2_Ethernet56 | L1_Ethernet56"
staticLink: true
properties:
mode: "MC-LAG"
- link: "L2_Ethernet0 | H1_Ethernet1"
staticLink: true
properties:
mode: "L2-Trunk"
vlan: 201
mc_po_group: 201
- link: "L2_Ethernet4 | H2_Ethernet1"
staticLink: true
properties:
mode: "L2-Trunk"
vlan: 202
mc_po_group: 202
- switchId: 3
switchName: "Leaf-3"
ipAddress: "100.100.10.15"
ASN: 1002
Credentials:
user: "admin"
password: "admin"
mclag:
enabled: true
peer: "L4"
keepalive_vlan: 10
Links:
- link: "L3_Ethernet48 | S1_Ethernet8"
staticLink: true
properties:
- link: "L3_Ethernet52 | S2_Ethernet8"
staticLink: true
properties:
- link: "L3_Ethernet56 | L4_Ethernet56"
staticLink: true
properties:
mode: "MC-LAG"
- link: "L3_Ethernet0 | H3_Ethernet0"
staticLink: true
properties:
mode: "L2-Trunk"
vlan: 203
mc_po_group: 203
- link: "L3_Ethernet4 | H4_Ethernet0"
staticLink: true
properties:
mode: "L2-Trunk"
vlan: 204
mc_po_group: 204
- switchId: 4
switchName: "Leaf-4"
ipAddress: "100.100.10.16"
ASN: 1002
Credentials:
user: "admin"
password: "admin"
mclag:
enabled: true
peer: "L3"
keepalive_vlan: 10
Links:
- link: "L4_Ethernet48 | S1_Ethernet12"
staticLink: true
properties:
- link: "L4_Ethernet52 | S2_Ethernet12"
staticLink: true
properties:
- link: "L4_Ethernet56 | L3_Ethernet56"
staticLink: true
properties:
mode: "MC-LAG"
- link: "L4_Ethernet0 | H3_Ethernet1"
staticLink: true
properties:
mode: "L2-Trunk"
vlan: 203
mc_po_group: 203
- link: "L4_Ethernet4 | H4_Ethernet1"
staticLink: true
properties:
mode: "L2-Trunk"
vlan: 204
mc_po_group: 204
Tor: []
BGP:
BGP_U: false
ND_RA: 30
PhysicalIfCfg:
FEC: "Off"
MTU: 9000
AdminStatus: "Up"
ASN:
SSpine: "10000-20000"
Spine: "21000-50000"
Leaf: "51000-60000"
Tor: "61000-70000"
IPv4Pool:
Loopback: "10.10.10.0/24"
LeafSpine: "40.0.0.0/24"
LeafTor: "39.0.0.0/24"
Host: "49.0.0.0/24"
IPv6Pool:
LeafSpine:
LeafTor:
Host:
NTP:
server: "100.100.10.10"
timezone: "Asia/Kolkata"
SYSLOG:
server: "100.100.10.10"
SNMP:
trapserver: "100.100.10.10"
Parameters:
vlan: "200-205"
vni: "60000-60005"
anycast_gateway: "100.10.0.0/23"
anycast_mac: "00:11:22:33:44:55"
hosts_per_vlan: 10
routing_symmetric: false
sag: false
Inventory:
SSpines: 0
Spines: 2
Leafs: 4
Tors: 0
Connectivity:
SSpine: []
Spine:
- switchId: 1
switchName: "Spine-1"
ipAddress: "100.100.10.11"
ASN: 2001
Credentials:
user: "admin"
password: "admin"
mclag:
Links:
- link: "S1_Ethernet0 | L1_Ethernet48"
staticLink: true
properties:
- link: "S1_Ethernet4 | L2_Ethernet48"
staticLink: true
properties:
- link: "S1_Ethernet8 | L3_Ethernet48"
staticLink: true
properties:
- link: "S1_Ethernet12 | L4_Ethernet48"
staticLink: true
properties:
- switchId: 2
switchName: "Spine-2"
ipAddress: "100.100.10.12"
ASN: 2002
Credentials:
user: "admin"
password: "admin"
mclag:
Links:
- link: "S2_Ethernet0 | L1_Ethernet52"
staticLink: true
properties:
- link: "S2_Ethernet4 | L2_Ethernet52"
staticLink: true
properties:
- link: "S2_Ethernet8 | L3_Ethernet52"
staticLink: true
properties:
- link: "S2_Ethernet12 | L4_Ethernet52"
staticLink: true
properties:
Leaf:
- switchId: 1
switchName: "Leaf-1"
ipAddress: "100.100.10.13"
ASN: 1001
Credentials:
user: "admin"
password: "admin"
mclag:
Links:
- link: "L1_Ethernet48 | S1_Ethernet0"
staticLink: true
properties:
- link: "L1_Ethernet52 | S2_Ethernet0"
staticLink: true
properties:
- link: "L1_Ethernet0 | H1_Ethernet0"
staticLink: true
properties:
mode: "L2-Trunk"
vlan: 201
- switchId: 2
switchName: "Leaf-2"
ipAddress: "100.100.10.14"
ASN: 1002
Credentials:
user: "admin"
password: "admin"
mclag:
Links:
- link: "L2_Ethernet48 | S1_Ethernet4"
staticLink: true
properties:
- link: "L2_Ethernet52 | S2_Ethernet4"
staticLink: true
properties:
- link: "L2_Ethernet4 | H2_Ethernet1"
staticLink: true
properties:
mode: "L2-Trunk"
vlan: 202
- switchId: 3
switchName: "Leaf-3"
ipAddress: "100.100.10.15"
ASN: 1003
Credentials:
user: "admin"
password: "admin"
mclag:
Links:
- link: "L3_Ethernet48 | S1_Ethernet8"
staticLink: true
properties:
- link: "L3_Ethernet52 | S2_Ethernet8"
staticLink: true
properties:
- link: "L3_Ethernet0 | H3_Ethernet0"
staticLink: true
properties:
mode: "L2-Trunk"
vlan: 203
- switchId: 4
switchName: "Leaf-4"
ipAddress: "100.100.10.16"
ASN: 1004
Credentials:
user: "admin"
password: "admin"
mclag:
Links:
- link: "L4_Ethernet48 | S1_Ethernet12"
staticLink: true
properties:
- link: "L4_Ethernet52 | S2_Ethernet12"
staticLink: true
properties:
- link: "L4_Ethernet4 | H4_Ethernet1"
staticLink: true
properties:
mode: "L2-Trunk"
vlan: 204
Tor: []
BGP:
BGP_U: false
ND_RA: 30
PhysicalIfCfg:
FEC: "Off"
MTU: 9000
AdminStatus: "Up"
ASN:
SSpine: "10000-20000"
Spine: "21000-50000"
Leaf: "51000-60000"
Tor: "61000-70000"
IPv4Pool:
Loopback: "10.10.10.0/24"
LeafSpine: "40.0.0.0/24"
LeafTor: "39.0.0.0/24"
Host: "49.0.0.0/24"
IPv6Pool:
LeafSpine:
LeafTor:
Host:
NTP:
server: "100.100.10.10"
timezone: "Asia/Kolkata"
SYSLOG:
server: "100.100.10.10"
SNMP:
trapserver: "100.100.10.10"
Parameters:
vlan: "200-205"
vni: "20000-20005"
anycast_gateway: "100.10.0.0/23"
anycast_mac: "00:11:22:33:44:55"
hosts_per_vlan: 10
routing_symmetric: false
sag: trueInventory:
SSpines: 0
Spines: 2
Leafs: 4
Tors: 0
Connectivity:
SSpine: []
Spine:
- switchId: 1
switchName: "Spine-1"
ipAddress: "100.100.10.11"
ASN: 2001
Credentials:
user: "admin"
password: "admin"
mclag:
Links:
- link: "S1_Ethernet0 | L1_Ethernet48"
staticLink: true
properties:
- link: "S1_Ethernet4 | L2_Ethernet48"
staticLink: true
properties:
- link: "S1_Ethernet8 | L3_Ethernet48"
staticLink: true
properties:
- link: "S1_Ethernet12 | L4_Ethernet48"
staticLink: true
properties:
- switchId: 2
switchName: "Spine-2"
ipAddress: "100.100.10.12"
ASN: 2002
Credentials:
user: "admin"
password: "admin"
mclag:
Links:
- link: "S2_Ethernet0 | L1_Ethernet52"
staticLink: true
properties:
- link: "S2_Ethernet4 | L2_Ethernet52"
staticLink: true
properties:
- link: "S2_Ethernet8 | L3_Ethernet52"
staticLink: true
properties:
- link: "S2_Ethernet12 | L4_Ethernet52"
staticLink: true
properties:
Leaf:
- switchId: 1
switchName: "Leaf-1"
ipAddress: "100.100.10.13"
ASN: 1001
Credentials:
user: "admin"
password: "admin"
mclag:
Links:
- link: "L1_Ethernet48 | S1_Ethernet0"
staticLink: true
properties:
- link: "L1_Ethernet52 | S2_Ethernet0"
staticLink: true
properties:
- link: "L1_Ethernet0 | H1_Ethernet0"
staticLink: true
properties:
mode: "L2-Trunk"
vlan: 201
- switchId: 2
switchName: "Leaf-2"
ipAddress: "100.100.10.14"
ASN: 1002
Credentials:
user: "admin"
password: "admin"
mclag:
Links:
- link: "L2_Ethernet48 | S1_Ethernet4"
staticLink: true
properties:
- link: "L2_Ethernet52 | S2_Ethernet4"
staticLink: true
properties:
- link: "L2_Ethernet4 | H2_Ethernet1"
staticLink: true
properties:
mode: "L2-Trunk"
vlan: 202
- switchId: 3
switchName: "Leaf-3"
ipAddress: "100.100.10.15"
ASN: 1003
Credentials:
user: "admin"
password: "admin"
mclag:
Links:
- link: "L3_Ethernet48 | S1_Ethernet8"
staticLink: true
properties:
- link: "L3_Ethernet52 | S2_Ethernet8"
staticLink: true
properties:
- link: "L3_Ethernet0 | H3_Ethernet0"
staticLink: true
properties:
mode: "L2-Trunk"
vlan: 203
- switchId: 4
switchName: "Leaf-4"
ipAddress: "100.100.10.16"
ASN: 1004
Credentials:
user: "admin"
password: "admin"
mclag:
Links:
- link: "L4_Ethernet48 | S1_Ethernet12"
staticLink: true
properties:
- link: "L4_Ethernet52 | S2_Ethernet12"
staticLink: true
properties:
- link: "L4_Ethernet4 | H4_Ethernet1"
staticLink: true
properties:
mode: "L2-Trunk"
vlan: 204
Tor: []
BGP:
BGP_U: false
ND_RA: 30
PhysicalIfCfg:
FEC: "Off"
MTU: 9000
AdminStatus: "Up"
ASN:
SSpine: "10000-20000"
Spine: "21000-50000"
Leaf: "51000-60000"
Tor: "61000-70000"
IPv4Pool:
Loopback: "10.10.10.0/24"
LeafSpine: "40.0.0.0/24"
LeafTor: "39.0.0.0/24"
Host: "49.0.0.0/24"
IPv6Pool:
LeafSpine:
LeafTor:
Host:
NTP:
server: "100.100.10.10"
timezone: "Asia/Kolkata"
SYSLOG:
server: "100.100.10.10"
SNMP:
trapserver: "100.100.10.10"
Parameters:
vlan: "200-205"
vni: "20000-20005"
anycast_gateway: "100.10.0.0/23"
anycast_mac: "00:11:22:33:44:55"
hosts_per_vlan: 10
routing_symmetric: false
sag: FalseInventory:
SSpines: 0
Spines: 2
Leafs: 4
Tors: 0
Connectivity:
SSpine: []
Spine:
- switchId: 1
switchName: "Spine-1"
ipAddress: "100.100.10.11"
ASN: 2001
Credentials:
user: "admin"
password: "admin"
mclag:
Links:
- link: "S1_Ethernet0 | L1_Ethernet48"
staticLink: true
properties:
- link: "S1_Ethernet4 | L2_Ethernet48"
staticLink: true
properties:
- link: "S1_Ethernet8 | L3_Ethernet48"
staticLink: true
properties:
- link: "S1_Ethernet12 | L4_Ethernet48"
staticLink: true
properties:
- switchId: 2
switchName: "Spine-2"
ipAddress: "100.100.10.12"
ASN: 2001
Credentials:
user: "admin"
password: "admin"
mclag:
Links:
- link: "S2_Ethernet0 | L1_Ethernet52"
staticLink: true
properties:
- link: "S2_Ethernet4 | L2_Ethernet52"
staticLink: true
properties:
- link: "S2_Ethernet8 | L3_Ethernet52"
staticLink: true
properties:
- link: "S2_Ethernet12 | L4_Ethernet52"
staticLink: true
properties:
Leaf:
- switchId: 1
switchName: "Leaf-1"
ipAddress: "100.100.10.13"
ASN: 2001
Credentials:
user: "admin"
password: "admin"
mclag:
Links:
- link: "L1_Ethernet48 | S1_Ethernet0"
staticLink: true
properties:
- link: "L1_Ethernet52 | S2_Ethernet0"
staticLink: true
properties:
- link: "L1_Ethernet0 | H1_Ethernet0"
staticLink: true
properties:
mode: "L2-Trunk"
vlan: 201
mh_enabled: true
mh_po_group: 201
- link: "L1_Ethernet4 | H2_Ethernet0"
staticLink: true
properties:
mode: "L2-Trunk"
vlan: 202
mh_enabled: true
mh_po_group: 202
- switchId: 2
switchName: "Leaf-2"
ipAddress: "100.100.10.14"
ASN: 2001
Credentials:
user: "admin"
password: "admin"
mclag:
Links:
- link: "L2_Ethernet48 | S1_Ethernet4"
staticLink: true
properties:
- link: "L2_Ethernet52 | S2_Ethernet4"
staticLink: true
properties:
- link: "L2_Ethernet0 | H1_Ethernet1"
staticLink: true
properties:
mode: "L2-Trunk"
vlan: 201
mh_enabled: true
mh_po_group: 201
- link: "L2_Ethernet4 | H2_Ethernet1"
staticLink: true
properties:
mode: "L2-Trunk"
vlan: 202
mh_enabled: true
mh_po_group: 202
- switchId: 3
switchName: "Leaf-3"
ipAddress: "100.100.10.15"
ASN: 2001
Credentials:
user: "admin"
password: "admin"
mclag:
Links:
- link: "L3_Ethernet48 | S1_Ethernet8"
staticLink: true
properties:
- link: "L3_Ethernet52 | S2_Ethernet8"
staticLink: true
properties:
- link: "L3_Ethernet0 | H3_Ethernet0"
staticLink: true
properties:
mode: "L2-Trunk"
vlan: 203
mh_enabled: true
mh_po_group: 203
- link: "L3_Ethernet4 | H4_Ethernet0"
staticLink: true
properties:
mode: "L2-Trunk"
vlan: 204
mh_enabled: true
mh_po_group: 204
- switchId: 4
switchName: "Leaf-4"
ipAddress: "100.100.10.16"
ASN: 2001
Credentials:
user: "admin"
password: "admin"
mclag:
Links:
- link: "L4_Ethernet48 | S1_Ethernet12"
staticLink: true
properties:
- link: "L4_Ethernet52 | S2_Ethernet12"
staticLink: true
properties:
- link: "L4_Ethernet0 | H3_Ethernet1"
staticLink: true
properties:
mode: "L2-Trunk"
vlan: 203
mh_enabled: true
mh_po_group: 203
- link: "L4_Ethernet4 | H4_Ethernet1"
staticLink: true
properties:
mode: "L2-Trunk"
vlan: 204
mh_enabled: true
mh_po_group: 204
Tor: []
BGP:
BGP_U: false
ND_RA: 30
PhysicalIfCfg:
FEC: "Off"
MTU: 9000
AdminStatus: "Up"
ASN:
SSpine: "10000-20000"
Spine: "21000-50000"
Leaf: "51000-60000"
Tor: "61000-70000"
IPv4Pool:
Loopback: "10.10.10.0/24"
LeafSpine: "40.0.0.0/24"
LeafTor: "39.0.0.0/24"
Host: "49.0.0.0/24"
IPv6Pool:
LeafSpine:
LeafTor:
Host:
NTP:
server: "100.100.10.10"
timezone: "Asia/Kolkata"
SYSLOG:
server: "100.100.10.10"
SNMP:
trapserver: "100.100.10.10"
Parameters:
vlan: "200-205"
vni: "20000-20005"
anycast_gateway: "100.10.0.0/23"
anycast_mac: "00:11:22:33:44:55"
hosts_per_vlan: 10
routing_symmetric: false
sag: trueInventory:
SSpines: 0
Spines: 2
Leafs: 4
Tors: 0
Connectivity:
SSpine: []
Spine:
- switchId: 1
switchName: "Spine-1"
ipAddress: "100.100.10.11"
ASN: 2001
Credentials:
user: "admin"
password: "admin"
mclag:
Links:
- link: "S1_Ethernet0 | L1_Ethernet48"
staticLink: true
properties:
- link: "S1_Ethernet4 | L2_Ethernet48"
staticLink: true
properties:
- link: "S1_Ethernet8 | L3_Ethernet48"
staticLink: true
properties:
- link: "S1_Ethernet12 | L4_Ethernet48"
staticLink: true
properties:
- switchId: 2
switchName: "Spine-2"
ipAddress: "100.100.10.12"
ASN: 2002
Credentials:
user: "admin"
password: "admin"
mclag:
Links:
- link: "S2_Ethernet0 | L1_Ethernet52"
staticLink: true
properties:
- link: "S2_Ethernet4 | L2_Ethernet52"
staticLink: true
properties:
- link: "S2_Ethernet8 | L3_Ethernet52"
staticLink: true
properties:
- link: "S2_Ethernet12 | L4_Ethernet52"
staticLink: true
properties:
Leaf:
- switchId: 1
switchName: "Leaf-1"
ipAddress: "100.100.10.13"
ASN: 1001
Credentials:
user: "admin"
password: "admin"
mclag:
Links:
- link: "L1_Ethernet48 | S1_Ethernet0"
staticLink: true
properties:
- link: "L1_Ethernet52 | S2_Ethernet0"
staticLink: true
properties:
- link: "L1_Ethernet0 | H1_Ethernet0"
staticLink: true
properties:
mode: "L2-Trunk"
vlan: 201
mh_enabled: true
mh_po_group: 201
- link: "L1_Ethernet4 | H2_Ethernet0"
staticLink: true
properties:
mode: "L2-Trunk"
vlan: 202
mh_enabled: true
mh_po_group: 202
- switchId: 2
switchName: "Leaf-2"
ipAddress: "100.100.10.14"
ASN: 1002
Credentials:
user: "admin"
password: "admin"
mclag:
Links:
- link: "L2_Ethernet48 | S1_Ethernet4"
staticLink: true
properties:
- link: "L2_Ethernet52 | S2_Ethernet4"
staticLink: true
properties:
- link: "L2_Ethernet0 | H1_Ethernet1"
staticLink: true
properties:
mode: "L2-Trunk"
vlan: 201
mh_enabled: true
mh_po_group: 201
- link: "L2_Ethernet4 | H2_Ethernet1"
staticLink: true
properties:
mode: "L2-Trunk"
vlan: 202
mh_enabled: true
mh_po_group: 202
- switchId: 3
switchName: "Leaf-3"
ipAddress: "100.100.10.15"
ASN: 1003
Credentials:
user: "admin"
password: "admin"
mclag:
Links:
- link: "L3_Ethernet48 | S1_Ethernet8"
staticLink: true
properties:
- link: "L3_Ethernet52 | S2_Ethernet8"
staticLink: true
properties:
- link: "L3_Ethernet0 | H3_Ethernet0"
staticLink: true
properties:
mode: "L2-Trunk"
vlan: 203
mh_enabled: true
mh_po_group: 203
- link: "L3_Ethernet4 | H4_Ethernet0"
staticLink: true
properties:
mode: "L2-Trunk"
vlan: 204
mh_enabled: true
mh_po_group: 204
- switchId: 4
switchName: "Leaf-4"
ipAddress: "100.100.10.16"
ASN: 1004
Credentials:
user: "admin"
password: "admin"
mclag:
Links:
- link: "L4_Ethernet48 | S1_Ethernet12"
staticLink: true
properties:
- link: "L4_Ethernet52 | S2_Ethernet12"
staticLink: true
properties:
- link: "L4_Ethernet0 | H3_Ethernet1"
staticLink: true
properties:
mode: "L2-Trunk"
vlan: 203
mh_enabled: true
mh_po_group: 203
- link: "L4_Ethernet4 | H4_Ethernet1"
staticLink: true
properties:
mode: "L2-Trunk"
vlan: 204
mh_enabled: true
mh_po_group: 204
Tor: []
BGP:
BGP_U: false
ND_RA: 30
PhysicalIfCfg:
FEC: "Off"
MTU: 9000
AdminStatus: "Up"
ASN:
SSpine: "10000-20000"
Spine: "21000-50000"
Leaf: "51000-60000"
Tor: "61000-70000"
IPv4Pool:
Loopback: "10.10.10.0/24"
LeafSpine:
LeafTor:
Host:
IPv6Pool:
LeafSpine: 1000::0/64
LeafTor: 2000::0/64
Host:
NTP:
server: "100.100.10.10"
timezone: "Asia/Kolkata"
SYSLOG:
server: "100.100.10.10"
SNMP:
trapserver: "100.100.10.10"
Parameters:
vlan: "200-205"
vni: "20000-20005"
anycast_gateway: "4000::0/64"
anycast_mac: "00:11:22:33:44:55"
hosts_per_vlan: 10
routing_symmetric: false
sag: trueInventory:
SSpines: 0
Spines: 2
Leafs: 4
Tors: 0
Connectivity:
SSpine: []
Spine:
- switchId: 1
switchName: "Spine-1"
ipAddress: "100.100.10.11"
ASN: 2001
Credentials:
user: "admin"
password: "admin"
mclag:
Links:
- link: "S1_Ethernet0 | L1_Ethernet48"
staticLink: true
properties:
- link: "S1_Ethernet4 | L2_Ethernet48"
staticLink: true
properties:
- link: "S1_Ethernet8 | L3_Ethernet48"
staticLink: true
properties:
- link: "S1_Ethernet12 | L4_Ethernet48"
staticLink: true
properties:
- switchId: 2
switchName: "Spine-2"
ipAddress: "100.100.10.12"
ASN: 2001
Credentials:
user: "admin"
password: "admin"
mclag:
Links:
- link: "S2_Ethernet0 | L1_Ethernet52"
staticLink: true
properties:
- link: "S2_Ethernet4 | L2_Ethernet52"
staticLink: true
properties:
- link: "S2_Ethernet8 | L3_Ethernet52"
staticLink: true
properties:
- link: "S2_Ethernet12 | L4_Ethernet52"
staticLink: true
properties:
Leaf:
- switchId: 1
switchName: "Leaf-1"
ipAddress: "100.100.10.13"
ASN: 2001
Credentials:
user: "admin"
password: "admin"
mclag:
Links:
- link: "L1_Ethernet48 | S1_Ethernet0"
staticLink: true
properties:
- link: "L1_Ethernet52 | S2_Ethernet0"
staticLink: true
properties:
- link: "L1_Ethernet0 | H1_Ethernet0"
staticLink: true
properties:
mode: "L2-Trunk"
vlan: 201
mh_enabled: true
mh_po_group: 201
- link: "L1_Ethernet4 | H2_Ethernet0"
staticLink: true
properties:
mode: "L2-Trunk"
vlan: 202
mh_enabled: true
mh_po_group: 202
- switchId: 2
switchName: "Leaf-2"
ipAddress: "100.100.10.14"
ASN: 2001
Credentials:
user: "admin"
password: "admin"
mclag:
Links:
- link: "L2_Ethernet48 | S1_Ethernet4"
staticLink: true
properties:
- link: "L2_Ethernet52 | S2_Ethernet4"
staticLink: true
properties:
- link: "L2_Ethernet0 | H1_Ethernet1"
staticLink: true
properties:
mode: "L2-Trunk"
vlan: 201
mh_enabled: true
mh_po_group: 201
- link: "L2_Ethernet4 | H2_Ethernet1"
staticLink: true
properties:
mode: "L2-Trunk"
vlan: 202
mh_enabled: true
mh_po_group: 202
- switchId: 3
switchName: "Leaf-3"
ipAddress: "100.100.10.15"
ASN: 2001
Credentials:
user: "admin"
password: "admin"
mclag:
Links:
- link: "L3_Ethernet48 | S1_Ethernet8"
staticLink: true
properties:
- link: "L3_Ethernet52 | S2_Ethernet8"
staticLink: true
properties:
- link: "L3_Ethernet0 | H3_Ethernet0"
staticLink: true
properties:
mode: "L2-Trunk"
vlan: 203
mh_enabled: true
mh_po_group: 203
- link: "L3_Ethernet4 | H4_Ethernet0"
staticLink: true
properties:
mode: "L2-Trunk"
vlan: 204
mh_enabled: true
mh_po_group: 204
- switchId: 4
switchName: "Leaf-4"
ipAddress: "100.100.10.16"
ASN: 2001
Credentials:
user: "admin"
password: "admin"
mclag:
Links:
- link: "L4_Ethernet48 | S1_Ethernet12"
staticLink: true
properties:
- link: "L4_Ethernet52 | S2_Ethernet12"
staticLink: true
properties:
- link: "L4_Ethernet0 | H3_Ethernet1"
staticLink: true
properties:
mode: "L2-Trunk"
vlan: 203
mh_enabled: true
mh_po_group: 203
- link: "L4_Ethernet4 | H4_Ethernet1"
staticLink: true
properties:
mode: "L2-Trunk"
vlan: 204
mh_enabled: true
mh_po_group: 204
Tor: []
BGP:
BGP_U: false
ND_RA: 30
PhysicalIfCfg:
FEC: "Off"
MTU: 9000
AdminStatus: "Up"
ASN:
SSpine: "10000-20000"
Spine: "21000-50000"
Leaf: "51000-60000"
Tor: "61000-70000"
IPv4Pool:
Loopback: "10.10.10.0/24"
LeafSpine:
LeafTor:
Host:
IPv6Pool:
LeafSpine: 1000::0/64
LeafTor: 2000::0/64
Host:
NTP:
server: "100.100.10.10"
timezone: "Asia/Kolkata"
SYSLOG:
server: "100.100.10.10"
SNMP:
trapserver: "100.100.10.10"
Parameters:
vlan: "200-205"
vni: "20000-20005"
anycast_gateway: "4000::0/64"
anycast_mac: "00:11:22:33:44:55"
hosts_per_vlan: 10
routing_symmetric: false
sag: trueInventory:
SSpines: 0
Spines: 2
Leafs: 4
Tors: 0
Connectivity:
SSpine: []
Spine:
- switchId: 1
switchName: "Spine-1"
ipAddress: "100.100.10.11"
ASN: 2001
Credentials:
user: "admin"
password: "admin"
mclag:
Links:
- link: "S1_Ethernet0 | L1_Ethernet48"
staticLink: true
properties:
- link: "S1_Ethernet4 | L2_Ethernet48"
staticLink: true
properties:
- link: "S1_Ethernet8 | L3_Ethernet48"
staticLink: true
properties:
- link: "S1_Ethernet12 | L4_Ethernet48"
staticLink: true
properties:
- switchId: 2
switchName: "Spine-2"
ipAddress: "100.100.10.12"
ASN: 2002
Credentials:
user: "admin"
password: "admin"
mclag:
Links:
- link: "S2_Ethernet0 | L1_Ethernet52"
staticLink: true
properties:
- link: "S2_Ethernet4 | L2_Ethernet52"
staticLink: true
properties:
- link: "S2_Ethernet8 | L3_Ethernet52"
staticLink: true
properties:
- link: "S2_Ethernet12 | L4_Ethernet52"
staticLink: true
properties:
Leaf:
- switchId: 1
switchName: "Leaf-1"
ipAddress: "100.100.10.13"
ASN: 1001
Credentials:
user: "admin"
password: "admin"
mclag:
Links:
- link: "L1_Ethernet48 | S1_Ethernet0"
staticLink: true
properties:
- link: "L1_Ethernet52 | S2_Ethernet0"
staticLink: true
properties:
- link: "L1_Ethernet0 | H1_Ethernet0"
staticLink: true
properties:
mode: "L2-Trunk"
vlan: 201
mh_enabled: true
mh_po_group: 201
- link: "L1_Ethernet4 | H2_Ethernet0"
staticLink: true
properties:
mode: "L2-Trunk"
vlan: 202
mh_enabled: true
mh_po_group: 202
- switchId: 2
switchName: "Leaf-2"
ipAddress: "100.100.10.14"
ASN: 1002
Credentials:
user: "admin"
password: "admin"
mclag:
Links:
- link: "L2_Ethernet48 | S1_Ethernet4"
staticLink: true
properties:
- link: "L2_Ethernet52 | S2_Ethernet4"
staticLink: true
properties:
- link: "L2_Ethernet0 | H1_Ethernet1"
staticLink: true
properties:
mode: "L2-Trunk"
vlan: 201
mh_enabled: true
mh_po_group: 201
- link: "L2_Ethernet4 | H2_Ethernet1"
staticLink: true
properties:
mode: "L2-Trunk"
vlan: 202
mh_enabled: true
mh_po_group: 202
- switchId: 3
switchName: "Leaf-3"
ipAddress: "100.100.10.15"
ASN: 1003
Credentials:
user: "admin"
password: "admin"
mclag:
Links:
- link: "L3_Ethernet48 | S1_Ethernet8"
staticLink: true
properties:
- link: "L3_Ethernet52 | S2_Ethernet8"
staticLink: true
properties:
- link: "L3_Ethernet0 | H3_Ethernet0"
staticLink: true
properties:
mode: "L2-Trunk"
vlan: 203
mh_enabled: true
mh_po_group: 203
- link: "L3_Ethernet4 | H4_Ethernet0"
staticLink: true
properties:
mode: "L2-Trunk"
vlan: 204
mh_enabled: true
mh_po_group: 204
- switchId: 4
switchName: "Leaf-4"
ipAddress: "100.100.10.16"
ASN: 1004
Credentials:
user: "admin"
password: "admin"
mclag:
Links:
- link: "L4_Ethernet48 | S1_Ethernet12"
staticLink: true
properties:
- link: "L4_Ethernet52 | S2_Ethernet12"
staticLink: true
properties:
- link: "L4_Ethernet0 | H3_Ethernet1"
staticLink: true
properties:
mode: "L2-Trunk"
vlan: 203
mh_enabled: true
mh_po_group: 203
- link: "L4_Ethernet4 | H4_Ethernet1"
staticLink: true
properties:
mode: "L2-Trunk"
vlan: 204
mh_enabled: true
mh_po_group: 204
Tor: []
BGP:
BGP_U: false
ND_RA: 30
PhysicalIfCfg:
FEC: "Off"
MTU: 9000
AdminStatus: "Up"
ASN:
SSpine: "10000-20000"
Spine: "21000-50000"
Leaf: "51000-60000"
Tor: "61000-70000"
IPv4Pool:
Loopback: "10.10.10.0/24"
LeafSpine: "40.0.0.0/24"
LeafTor: "39.0.0.0/24"
Host: "49.0.0.0/24"
IPv6Pool:
LeafSpine:
LeafTor:
Host:
NTP:
server: "100.100.10.10"
timezone: "Asia/Kolkata"
SYSLOG:
server: "100.100.10.10"
SNMP:
trapserver: "100.100.10.10"
Parameters:
vlan: "200-205"
vni: "20000-20005"
anycast_gateway: "100.10.0.0/23"
anycast_mac: "00:11:22:33:44:55"
hosts_per_vlan: 10
routing_symmetric: false
sag: trueInventory:
SSpines: 0
Spines: 2
Leafs: 4
Tors: 0
Connectivity:
SSpine: []
Spine:
- switchId: 1
switchName: "Spine-1"
ipAddress: "100.100.10.11"
ASN: 1001
Credentials:
user: "admin"
password: "admin"
mclag: null
Links:
- link: "S1_Ethernet0 | L1_Ethernet48"
staticLink: true
properties: null
- link: "S1_Ethernet4 | L2_Ethernet48"
staticLink: true
properties: null
- link: "S1_Ethernet8 | L3_Ethernet48"
staticLink: true
properties: null
- link: "S1_Ethernet12 | L4_Ethernet48"
staticLink: true
properties: null
- switchId: 2
switchName: "Spine-2"
ipAddress: "100.100.10.12"
ASN: 1002
Credentials:
user: "admin"
password: "admin"
mclag: null
Links:
- link: "S2_Ethernet0 | L1_Ethernet52"
staticLink: true
properties: null
- link: "S2_Ethernet4 | L2_Ethernet52"
staticLink: true
properties: null
- link: "S2_Ethernet8 | L3_Ethernet52"
staticLink: true
properties: null
- link: "S2_Ethernet12 | L4_Ethernet52"
staticLink: true
properties: null
Leaf:
- switchId: 1
switchName: "Leaf-1"
ipAddress: "100.100.10.13"
ASN: 2001
Credentials:
user: "admin"
password: "admin"
mclag:
enabled: true
peer: "L2"
keepalive_vlan: 10
Links:
- link: "L1_Ethernet48 | S1_Ethernet0"
staticLink: true
properties: null
- link: "L1_Ethernet52 | S2_Ethernet0"
staticLink: true
properties: null
- link: "L1_Ethernet56 | L2_Ethernet56"
staticLink: true
properties:
mode: "MC-LAG"
- link: "L1_Ethernet0 | H1_Ethernet0"
staticLink: true
properties:
mode: "L2-Access"
vlan: 200
mc_po_group: 200
- link: "L1_Ethernet4 | H2_Ethernet0"
staticLink: true
properties:
mode: "L2-Access"
vlan: 201
mc_po_group: 201
- switchId: 2
switchName: "Leaf-2"
ipAddress: "100.100.10.14"
ASN: 2001
Credentials:
user: "admin"
password: "admin"
mclag:
enabled: true
peer: "L1"
keepalive_vlan: 10
Links:
- link: "L2_Ethernet48 | S1_Ethernet4"
staticLink: true
properties: null
- link: "L2_Ethernet52 | S2_Ethernet4"
staticLink: true
properties: null
- link: "L2_Ethernet56 | L1_Ethernet56"
staticLink: true
properties:
mode: "MC-LAG"
- link: "L2_Ethernet0 | H1_Ethernet1"
staticLink: true
properties:
mode: "L2-Access"
vlan: 200
mc_po_group: 200
- link: "L2_Ethernet4 | H2_Ethernet1"
staticLink: true
properties:
mode: "L2-Access"
vlan: 201
mc_po_group: 201
- switchId: 3
switchName: "Leaf-3"
ipAddress: "100.100.10.15"
ASN: 2002
Credentials:
user: "admin"
password: "admin"
mclag:
enabled: true
peer: "L4"
keepalive_vlan: 10
Links:
- link: "L3_Ethernet48 | S1_Ethernet8"
staticLink: true
properties: null
- link: "L3_Ethernet52 | S2_Ethernet8"
staticLink: true
properties: null
- link: "L3_Ethernet56 | L4_Ethernet56"
staticLink: true
properties:
mode: "MC-LAG"
- link: "L3_Ethernet0 | H3_Ethernet0"
staticLink: true
properties:
mode: "L2-Access"
vlan: 200
mc_po_group: 200
- link: "L3_Ethernet4 | H4_Ethernet0"
staticLink: true
properties:
mode: "L2-Access"
vlan: 201
mc_po_group: 201
- switchId: 4
switchName: "Leaf-4"
ipAddress: "100.100.10.16"
ASN: 2002
Credentials:
user: "admin"
password: "admin"
mclag:
enabled: true
peer: "L3"
keepalive_vlan: 10
Links:
- link: "L4_Ethernet48 | S1_Ethernet12"
staticLink: true
properties: null
- link: "L4_Ethernet52 | S2_Ethernet12"
staticLink: true
properties: null
- link: "L4_Ethernet56 | L3_Ethernet56"
staticLink: true
properties:
mode: "MC-LAG"
- link: "L4_Ethernet0 | H3_Ethernet1"
staticLink: true
properties:
mode: "L2-Access"
vlan: 200
mc_po_group: 200
- link: "L4_Ethernet4 | H4_Ethernet1"
staticLink: true
properties:
mode: "L2-Access"
vlan: 201
mc_po_group: 201
Tor: []
BGP:
BGP_U: false
ND_RA: 30
PhysicalIfCfg:
FEC: "Off"
MTU: 9000
AdminStatus: "Up"
ASN:
SSpine: "10000-20000"
Spine: "21000-50000"
Leaf: "51000-60000"
Tor: "61000-70000"
IPv4Pool:
Loopback: "10.10.10.0/24"
LeafSpine:
LeafTor:
Host:
IPv6Pool:
LeafSpine: 1000::0/124
LeafTor: 2000::0/124
Host: null
NTP:
server: "100.100.10.10"
timezone: "Asia/Kolkata"
SYSLOG:
server: "100.100.10.10"
SNMP:
trapserver: "100.100.10.10"
Parameters:
vlan: "200-205"
anycast_gateway: "4000::0/64"
hosts_per_vlan: 10Inventory:
SSpines: 0
Spines: 2
Leafs: 4
Tors: 0
Connectivity:
SSpine: []
Spine:
- switchId: 1
switchName: "Spine-1"
ipAddress: "100.100.10.11"
ASN: 2001
Credentials:
user: "admin"
password: "admin"
mclag:
Links:
- link: "S1_Ethernet0 | L1_Ethernet48"
staticLink: true
properties:
- link: "S1_Ethernet4 | L2_Ethernet48"
staticLink: true
properties:
- link: "S1_Ethernet8 | L3_Ethernet48"
staticLink: true
properties:
- link: "S1_Ethernet12 | L4_Ethernet48"
staticLink: true
properties:
- switchId: 2
switchName: "Spine-2"
ipAddress: "100.100.10.12"
ASN: 2002
Credentials:
user: "admin"
password: "admin"
mclag:
Links:
- link: "S2_Ethernet0 | L1_Ethernet52"
staticLink: true
properties:
- link: "S2_Ethernet4 | L2_Ethernet52"
staticLink: true
properties:
- link: "S2_Ethernet8 | L3_Ethernet52"
staticLink: true
properties:
- link: "S2_Ethernet12 | L4_Ethernet52"
staticLink: true
properties:
Leaf:
- switchId: 1
switchName: "Leaf-1"
ipAddress: "100.100.10.13"
ASN: 1001
Credentials:
user: "admin"
password: "admin"
mclag:
Links:
- link: "L1_Ethernet48 | S1_Ethernet0"
staticLink: true
properties:
- link: "L1_Ethernet52 | S2_Ethernet0"
staticLink: true
properties:
- link: "L1_Ethernet0 | H1_Ethernet0"
staticLink: true
properties:
mode: "L2-Trunk"
vlan: 200
mh_enabled: true
mh_po_group: 200
vrf: 1
- link: "L1_Ethernet4 | H2_Ethernet0"
staticLink: true
properties:
mode: "L2-Trunk"
vlan: 201
mh_enabled: true
mh_po_group: 201
vrf: 1
- switchId: 2
switchName: "Leaf-2"
ipAddress: "100.100.10.14"
ASN: 1002
Credentials:
user: "admin"
password: "admin"
mclag:
Links:
- link: "L2_Ethernet48 | S1_Ethernet4"
staticLink: true
properties:
- link: "L2_Ethernet52 | S2_Ethernet4"
staticLink: true
properties:
- link: "L2_Ethernet0 | H1_Ethernet1"
staticLink: true
properties:
mode: "L2-Trunk"
vlan: 200
mh_enabled: true
mh_po_group: 200
vrf: 1
- link: "L2_Ethernet4 | H2_Ethernet1"
staticLink: true
properties:
mode: "L2-Trunk"
vlan: 201
mh_enabled: true
mh_po_group: 201
vrf: 1
- switchId: 3
switchName: "Leaf-3"
ipAddress: "100.100.10.15"
ASN: 1003
Credentials:
user: "admin"
password: "admin"
mclag:
Links:
- link: "L3_Ethernet48 | S1_Ethernet8"
staticLink: true
properties:
- link: "L3_Ethernet52 | S2_Ethernet8"
staticLink: true
properties:
- link: "L3_Ethernet0 | H3_Ethernet0"
staticLink: true
properties:
mode: "L2-Trunk"
vlan: 200
mh_enabled: true
mh_po_group: 200
vrf: 1
- link: "L3_Ethernet4 | H4_Ethernet0"
staticLink: true
properties:
mode: "L2-Trunk"
vlan: 201
mh_enabled: true
mh_po_group: 201
vrf: 1
- switchId: 4
switchName: "Leaf-4"
ipAddress: "100.100.10.16"
ASN: 1004
Credentials:
user: "admin"
password: "admin"
mclag:
Links:
- link: "L4_Ethernet48 | S1_Ethernet12"
staticLink: true
properties:
- link: "L4_Ethernet52 | S2_Ethernet12"
staticLink: true
properties:
- link: "L4_Ethernet0 | H3_Ethernet1"
staticLink: true
properties:
mode: "L2-Trunk"
vlan: 200
mh_enabled: true
mh_po_group: 200
vrf: 1
- link: "L4_Ethernet4 | H4_Ethernet1"
staticLink: true
properties:
mode: "L2-Trunk"
vlan: 201
mh_enabled: true
mh_po_group: 201
vrf: 1
Tor: []
BGP:
BGP_U: false
ND_RA: 30
PhysicalIfCfg:
FEC: "Off"
MTU: 9000
AdminStatus: "Up"
ASN:
SSpine: "10000-20000"
Spine: "21000-50000"
Leaf: "51000-60000"
Tor: "61000-70000"
IPv4Pool:
Loopback: "10.10.10.0/24"
LeafSpine: "40.0.0.0/24"
LeafTor: "39.0.0.0/24"
Host: "49.0.0.0/24"
IPv6Pool:
LeafSpine:
LeafTor:
Host:
NTP:
server: "100.100.10.10"
timezone: "Asia/Kolkata"
SYSLOG:
server: "100.100.10.10"
SNMP:
trapserver: "100.100.10.10"
Parameters:
vlan: "200-205"
vni: "20000-20005"
anycast_gateway: "100.10.0.0/23"
anycast_mac: "00:11:22:33:44:55"
hosts_per_vlan: 10
routing_symmetric: true
irb_vlan: "300-305"
irb_vni: "30000-30005"
sag: trueInventory:
SSpines: 0
Spines: 2
Leafs: 4
Tors: 0
Connectivity:
SSpine: []
Spine:
- switchId: 1
switchName: "Spine-1"
ipAddress: "100.100.10.11"
ASN: 1001
Credentials:
user: "admin"
password: "admin"
mclag: null
Links:
- link: "S1_Ethernet0 | L1_Ethernet48"
staticLink: true
properties: null
- link: "S1_Ethernet4 | L2_Ethernet48"
staticLink: true
properties: null
- link: "S1_Ethernet8 | L3_Ethernet48"
staticLink: true
properties: null
- link: "S1_Ethernet12 | L4_Ethernet48"
staticLink: true
properties: null
- switchId: 2
switchName: "Spine-2"
ipAddress: "100.100.10.12"
ASN: 1001
Credentials:
user: "admin"
password: "admin"
mclag: null
Links:
- link: "S2_Ethernet0 | L1_Ethernet52"
staticLink: true
properties: null
- link: "S2_Ethernet4 | L2_Ethernet52"
staticLink: true
properties: null
- link: "S2_Ethernet8 | L3_Ethernet52"
staticLink: true
properties: null
- link: "S2_Ethernet12 | L4_Ethernet52"
staticLink: true
properties: null
Leaf:
- switchId: 1
switchName: "Leaf-1"
ipAddress: "100.100.10.13"
ASN: 1001
Credentials:
user: "admin"
password: "admin"
mclag:
enabled: true
peer: "L2"
keepalive_vlan: 10
Links:
- link: "L1_Ethernet48 | S1_Ethernet0"
staticLink: true
properties: null
- link: "L1_Ethernet52 | S2_Ethernet0"
staticLink: true
properties: null
- link: "L1_Ethernet56 | L2_Ethernet56"
staticLink: true
properties:
mode: "MC-LAG"
- link: "L1_Ethernet0 | H1_Ethernet0"
staticLink: true
properties:
mode: "L2-Access"
vlan: 200
mc_po_group: 200
- link: "L1_Ethernet4 | H2_Ethernet0"
staticLink: true
properties:
mode: "L2-Access"
vlan: 201
mc_po_group: 201
- switchId: 2
switchName: "Leaf-2"
ipAddress: "100.100.10.14"
ASN: 1001
Credentials:
user: "admin"
password: "admin"
mclag:
enabled: true
peer: "L1"
keepalive_vlan: 10
Links:
- link: "L2_Ethernet48 | S1_Ethernet4"
staticLink: true
properties: null
- link: "L2_Ethernet52 | S2_Ethernet4"
staticLink: true
properties: null
- link: "L2_Ethernet56 | L1_Ethernet56"
staticLink: true
properties:
mode: "MC-LAG"
- link: "L2_Ethernet0 | H1_Ethernet1"
staticLink: true
properties:
mode: "L2-Access"
vlan: 200
mc_po_group: 200
- link: "L2_Ethernet4 | H2_Ethernet1"
staticLink: true
properties:
mode: "L2-Access"
vlan: 201
mc_po_group: 201
- switchId: 3
switchName: "Leaf-3"
ipAddress: "100.100.10.15"
ASN: 1001
Credentials:
user: "admin"
password: "admin"
mclag:
enabled: true
peer: "L4"
keepalive_vlan: 10
Links:
- link: "L3_Ethernet48 | S1_Ethernet8"
staticLink: true
properties: null
- link: "L3_Ethernet52 | S2_Ethernet8"
staticLink: true
properties: null
- link: "L3_Ethernet56 | L4_Ethernet56"
staticLink: true
properties:
mode: "MC-LAG"
- link: "L3_Ethernet0 | H3_Ethernet0"
staticLink: true
properties:
mode: "L2-Access"
vlan: 200
mc_po_group: 200
- link: "L3_Ethernet4 | H4_Ethernet0"
staticLink: true
properties:
mode: "L2-Access"
vlan: 201
mc_po_group: 201
- switchId: 4
switchName: "Leaf-4"
ipAddress: "100.100.10.16"
ASN: 1001
Credentials:
user: "admin"
password: "admin"
mclag:
enabled: true
peer: "L3"
keepalive_vlan: 10
Links:
- link: "L4_Ethernet48 | S1_Ethernet12"
staticLink: true
properties: null
- link: "L4_Ethernet52 | S2_Ethernet12"
staticLink: true
properties: null
- link: "L4_Ethernet56 | L3_Ethernet56"
staticLink: true
properties:
mode: "MC-LAG"
- link: "L4_Ethernet0 | H3_Ethernet1"
staticLink: true
properties:
mode: "L2-Access"
vlan: 200
mc_po_group: 200
- link: "L4_Ethernet4 | H4_Ethernet1"
staticLink: true
properties:
mode: "L2-Access"
vlan: 201
mc_po_group: 201
Tor: []
BGP:
BGP_U: true
ND_RA: 30
PhysicalIfCfg:
FEC: "Off"
MTU: 9000
AdminStatus: "Up"
ASN:
SSpine: "10000-20000"
Spine: "21000-50000"
Leaf: "51000-60000"
Tor: "61000-70000"
IPv4Pool:
Loopback: "10.10.10.0/24"
LeafSpine:
LeafTor:
Host:
IPv6Pool:
LeafSpine: 1000::0/124
LeafTor: 2000::0/124
Host: null
NTP:
server: "100.100.10.10"
timezone: "Asia/Kolkata"
SYSLOG:
server: "100.100.10.10"
SNMP:
trapserver: "100.100.10.10"
Parameters:
vlan: "200-205"
anycast_gateway: "100.10.0.0/23"
hosts_per_vlan: 10Inventory:
SSpines: 0
Spines: 2
Leafs: 4
Tors: 0
Connectivity:
SSpine: []
Spine:
- switchId: 1
switchName: "Spine-1"
ipAddress: "100.100.10.11"
ASN: 2001
Credentials:
user: "admin"
password: "admin"
mclag:
Links:
- link: "S1_Ethernet0 | L1_Ethernet48"
staticLink: true
properties:
- link: "S1_Ethernet4 | L2_Ethernet48"
staticLink: true
properties:
- link: "S1_Ethernet8 | L3_Ethernet48"
staticLink: true
properties:
- link: "S1_Ethernet12 | L4_Ethernet48"
staticLink: true
properties:
- switchId: 2
switchName: "Spine-2"
ipAddress: "100.100.10.12"
ASN: 2002
Credentials:
user: "admin"
password: "admin"
mclag:
Links:
- link: "S2_Ethernet0 | L1_Ethernet52"
staticLink: true
properties:
- link: "S2_Ethernet4 | L2_Ethernet52"
staticLink: true
properties:
- link: "S2_Ethernet8 | L3_Ethernet52"
staticLink: true
properties:
- link: "S2_Ethernet12 | L4_Ethernet52"
staticLink: true
properties:
Leaf:
- switchId: 1
switchName: "Leaf-1"
ipAddress: "100.100.10.13"
ASN: 1001
Credentials:
user: "admin"
password: "admin"
mclag:
Links:
- link: "L1_Ethernet48 | S1_Ethernet0"
staticLink: true
properties:
- link: "L1_Ethernet52 | S2_Ethernet0"
staticLink: true
properties:
- link: "L1_Ethernet0 | H1_Ethernet0"
staticLink: true
properties:
mode: "L2-Trunk"
vlan: 801
mh_enabled: true
mh_po_group: 801
- link: "L1_Ethernet4 | H2_Ethernet0"
staticLink: true
properties:
mode: "L2-Trunk"
vlan: 802
mh_enabled: true
mh_po_group: 802
- switchId: 2
switchName: "Leaf-2"
ipAddress: "100.100.10.14"
ASN: 1002
Credentials:
user: "admin"
password: "admin"
mclag:
Links:
- link: "L2_Ethernet48 | S1_Ethernet4"
staticLink: true
properties:
- link: "L2_Ethernet52 | S2_Ethernet4"
staticLink: true
properties:
- link: "L2_Ethernet0 | H1_Ethernet1"
staticLink: true
properties:
mode: "L2-Trunk"
vlan: 801
mh_enabled: true
mh_po_group: 801
- link: "L2_Ethernet4 | H2_Ethernet1"
staticLink: true
properties:
mode: "L2-Trunk"
vlan: 802
mh_enabled: true
mh_po_group: 802
- switchId: 3
switchName: "Leaf-3"
ipAddress: "100.100.10.15"
ASN: 1003
Credentials:
user: "admin"
password: "admin"
mclag:
Links:
- link: "L3_Ethernet48 | S1_Ethernet8"
staticLink: true
properties:
- link: "L3_Ethernet52 | S2_Ethernet8"
staticLink: true
properties:
- link: "L3_Ethernet0 | H3_Ethernet0"
staticLink: true
properties:
mode: "L2-Trunk"
vlan: 803
mh_enabled: true
mh_po_group: 803
- link: "L3_Ethernet4 | H4_Ethernet0"
staticLink: true
properties:
mode: "L2-Trunk"
vlan: 804
mh_enabled: true
mh_po_group: 804
- switchId: 4
switchName: "Leaf-4"
ipAddress: "100.100.10.16"
ASN: 1004
Credentials:
user: "admin"
password: "admin"
mclag:
Links:
- link: "L4_Ethernet48 | S1_Ethernet12"
staticLink: true
properties:
- link: "L4_Ethernet52 | S2_Ethernet12"
staticLink: true
properties:
- link: "L4_Ethernet0 | H3_Ethernet1"
staticLink: true
properties:
mode: "L2-Trunk"
vlan: 803
mh_enabled: true
mh_po_group: 803
- link: "L4_Ethernet4 | H4_Ethernet1"
staticLink: true
properties:
mode: "L2-Trunk"
vlan: 804
mh_enabled: true
mh_po_group: 804
Tor: []
BGP:
BGP_U: true
ND_RA: 30
PhysicalIfCfg:
FEC: "Off"
MTU: 9000
AdminStatus: "Up"
ASN:
SSpine: "10000-20000"
Spine: "21000-50000"
Leaf: "51000-60000"
Tor: "61000-70000"
IPv4Pool:
Loopback: "10.10.10.0/24"
LeafSpine:
LeafTor:
Host:
IPv6Pool:
LeafSpine: 1000::0/64
LeafTor: 2000::0/64
Host:
NTP:
server: "100.100.10.10"
timezone: "Asia/Kolkata"
SYSLOG:
server: "100.100.10.10"
SNMP:
trapserver: "100.100.10.10"
Parameters:
vlan: "800-805"
vni: "20000-20005"
anycast_gateway: "4000::0/64"
anycast_mac: "00:11:22:33:44:55"
hosts_per_vlan: 10
routing_symmetric: false
sag: trueInventory:
SSpines: 0
Spines: 2
Leafs: 4
Tors: 0
Connectivity:
SSpine: []
Spine:
- switchId: 1
switchName: "Spine-1"
ipAddress: "100.100.10.11"
ASN: 1001
Credentials:
user: "admin"
password: "admin"
mclag: null
Links:
- link: "S1_Ethernet0 | L1_Ethernet48"
staticLink: true
properties: null
- link: "S1_Ethernet4 | L2_Ethernet48"
staticLink: true
properties: null
- link: "S1_Ethernet8 | L3_Ethernet48"
staticLink: true
properties: null
- link: "S1_Ethernet12 | L4_Ethernet48"
staticLink: true
properties: null
- switchId: 2
switchName: "Spine-2"
ipAddress: "100.100.10.12"
ASN: 1002
Credentials:
user: "admin"
password: "admin"
mclag: null
Links:
- link: "S2_Ethernet0 | L1_Ethernet52"
staticLink: true
properties: null
- link: "S2_Ethernet4 | L2_Ethernet52"
staticLink: true
properties: null
- link: "S2_Ethernet8 | L3_Ethernet52"
staticLink: true
properties: null
- link: "S2_Ethernet12 | L4_Ethernet52"
staticLink: true
properties: null
Leaf:
- switchId: 1
switchName: "Leaf-1"
ipAddress: "100.100.10.13"
ASN: 2001
Credentials:
user: "admin"
password: "admin"
mclag:
enabled: true
peer: "L2"
keepalive_vlan: 10
Links:
- link: "L1_Ethernet48 | S1_Ethernet0"
staticLink: true
properties: null
- link: "L1_Ethernet52 | S2_Ethernet0"
staticLink: true
properties: null
- link: "L1_Ethernet56 | L2_Ethernet56"
staticLink: true
properties:
mode: "MC-LAG"
- link: "L1_Ethernet0 | H1_Ethernet0"
staticLink: true
properties:
mode: "L2-Access"
vlan: 200
mc_po_group: 200
- link: "L1_Ethernet4 | H2_Ethernet0"
staticLink: true
properties:
mode: "L2-Access"
vlan: 201
mc_po_group: 201
- switchId: 2
switchName: "Leaf-2"
ipAddress: "100.100.10.14"
ASN: 2001
Credentials:
user: "admin"
password: "admin"
mclag:
enabled: true
peer: "L1"
keepalive_vlan: 10
Links:
- link: "L2_Ethernet48 | S1_Ethernet4"
staticLink: true
properties: null
- link: "L2_Ethernet52 | S2_Ethernet4"
staticLink: true
properties: null
- link: "L2_Ethernet56 | L1_Ethernet56"
staticLink: true
properties:
mode: "MC-LAG"
- link: "L2_Ethernet0 | H1_Ethernet1"
staticLink: true
properties:
mode: "L2-Access"
vlan: 200
mc_po_group: 200
- link: "L2_Ethernet4 | H2_Ethernet1"
staticLink: true
properties:
mode: "L2-Access"
vlan: 201
mc_po_group: 201
- switchId: 3
switchName: "Leaf-3"
ipAddress: "100.100.10.15"
ASN: 2002
Credentials:
user: "admin"
password: "admin"
mclag:
enabled: true
peer: "L4"
keepalive_vlan: 10
Links:
- link: "L3_Ethernet48 | S1_Ethernet8"
staticLink: true
properties: null
- link: "L3_Ethernet52 | S2_Ethernet8"
staticLink: true
properties: null
- link: "L3_Ethernet56 | L4_Ethernet56"
staticLink: true
properties:
mode: "MC-LAG"
- link: "L3_Ethernet0 | H3_Ethernet0"
staticLink: true
properties:
mode: "L2-Access"
vlan: 200
mc_po_group: 200
- link: "L3_Ethernet4 | H4_Ethernet0"
staticLink: true
properties:
mode: "L2-Access"
vlan: 201
mc_po_group: 201
- switchId: 4
switchName: "Leaf-4"
ipAddress: "100.100.10.16"
ASN: 2002
Credentials:
user: "admin"
password: "admin"
mclag:
enabled: true
peer: "L3"
keepalive_vlan: 10
Links:
- link: "L4_Ethernet48 | S1_Ethernet12"
staticLink: true
properties: null
- link: "L4_Ethernet52 | S2_Ethernet12"
staticLink: true
properties: null
- link: "L4_Ethernet56 | L3_Ethernet56"
staticLink: true
properties:
mode: "MC-LAG"
- link: "L4_Ethernet0 | H3_Ethernet1"
staticLink: true
properties:
mode: "L2-Access"
vlan: 200
mc_po_group: 200
- link: "L4_Ethernet4 | H4_Ethernet1"
staticLink: true
properties:
mode: "L2-Access"
vlan: 201
mc_po_group: 201
Tor: []
BGP:
BGP_U: false
ND_RA: 30
PhysicalIfCfg:
FEC: "Off"
MTU: 9000
AdminStatus: "Up"
ASN:
SSpine: "10000-20000"
Spine: "21000-50000"
Leaf: "51000-60000"
Tor: "61000-70000"
IPv4Pool:
Loopback: "10.10.10.0/24"
LeafSpine: "40.0.0.0/24"
LeafTor: "39.0.0.0/24"
Host: "49.0.0.0/24"
IPv6Pool:
LeafSpine: null
LeafTor: null
Host: null
NTP:
server: "100.100.10.10"
timezone: "Asia/Kolkata"
SYSLOG:
server: "100.100.10.10"
SNMP:
trapserver: "100.100.10.10"
Parameters:
vlan: "200-205"
anycast_gateway: "100.10.0.0/23"
hosts_per_vlan: 10


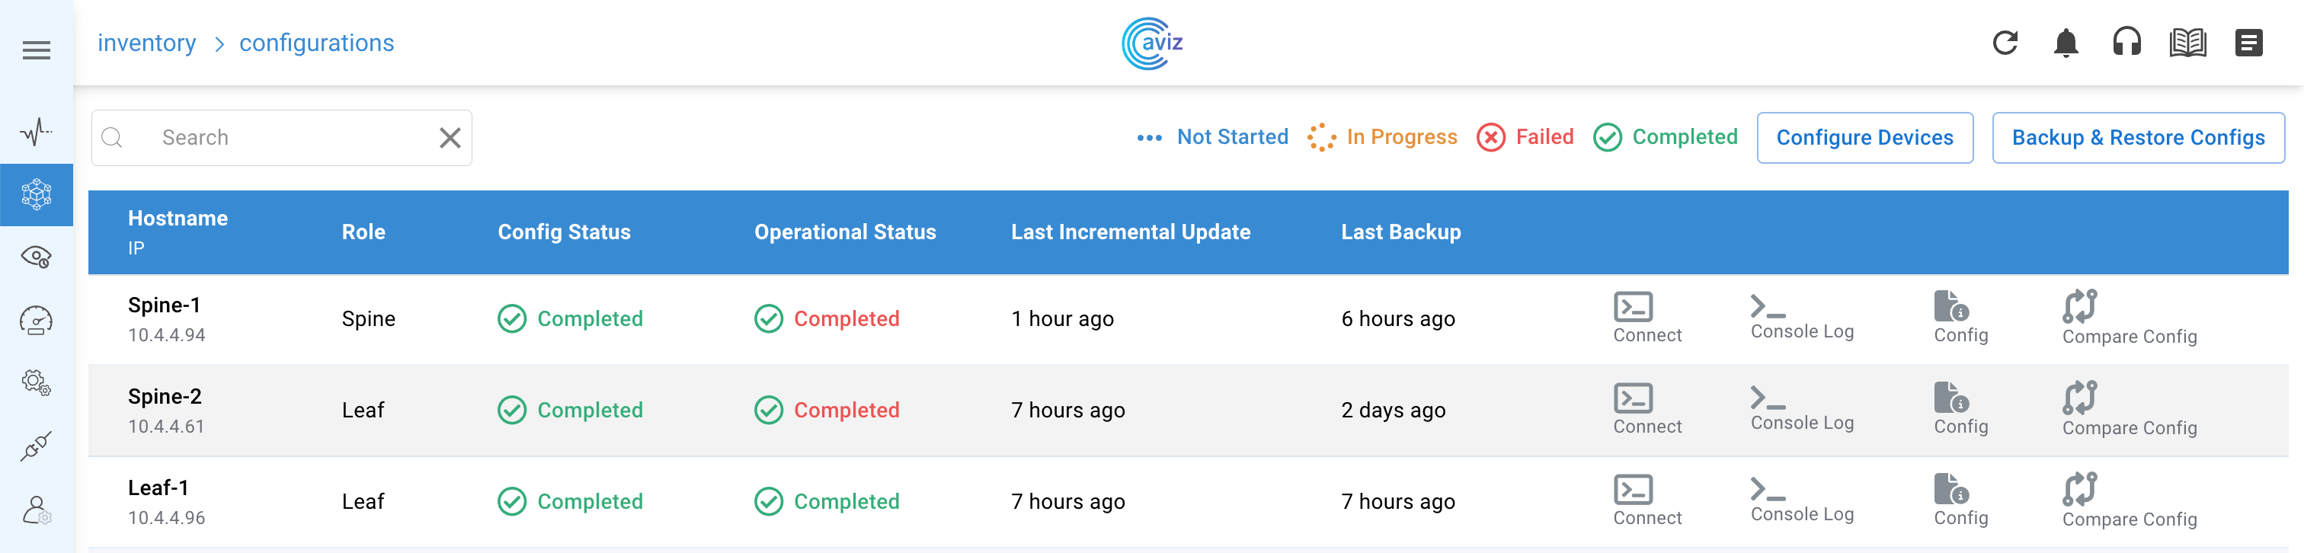


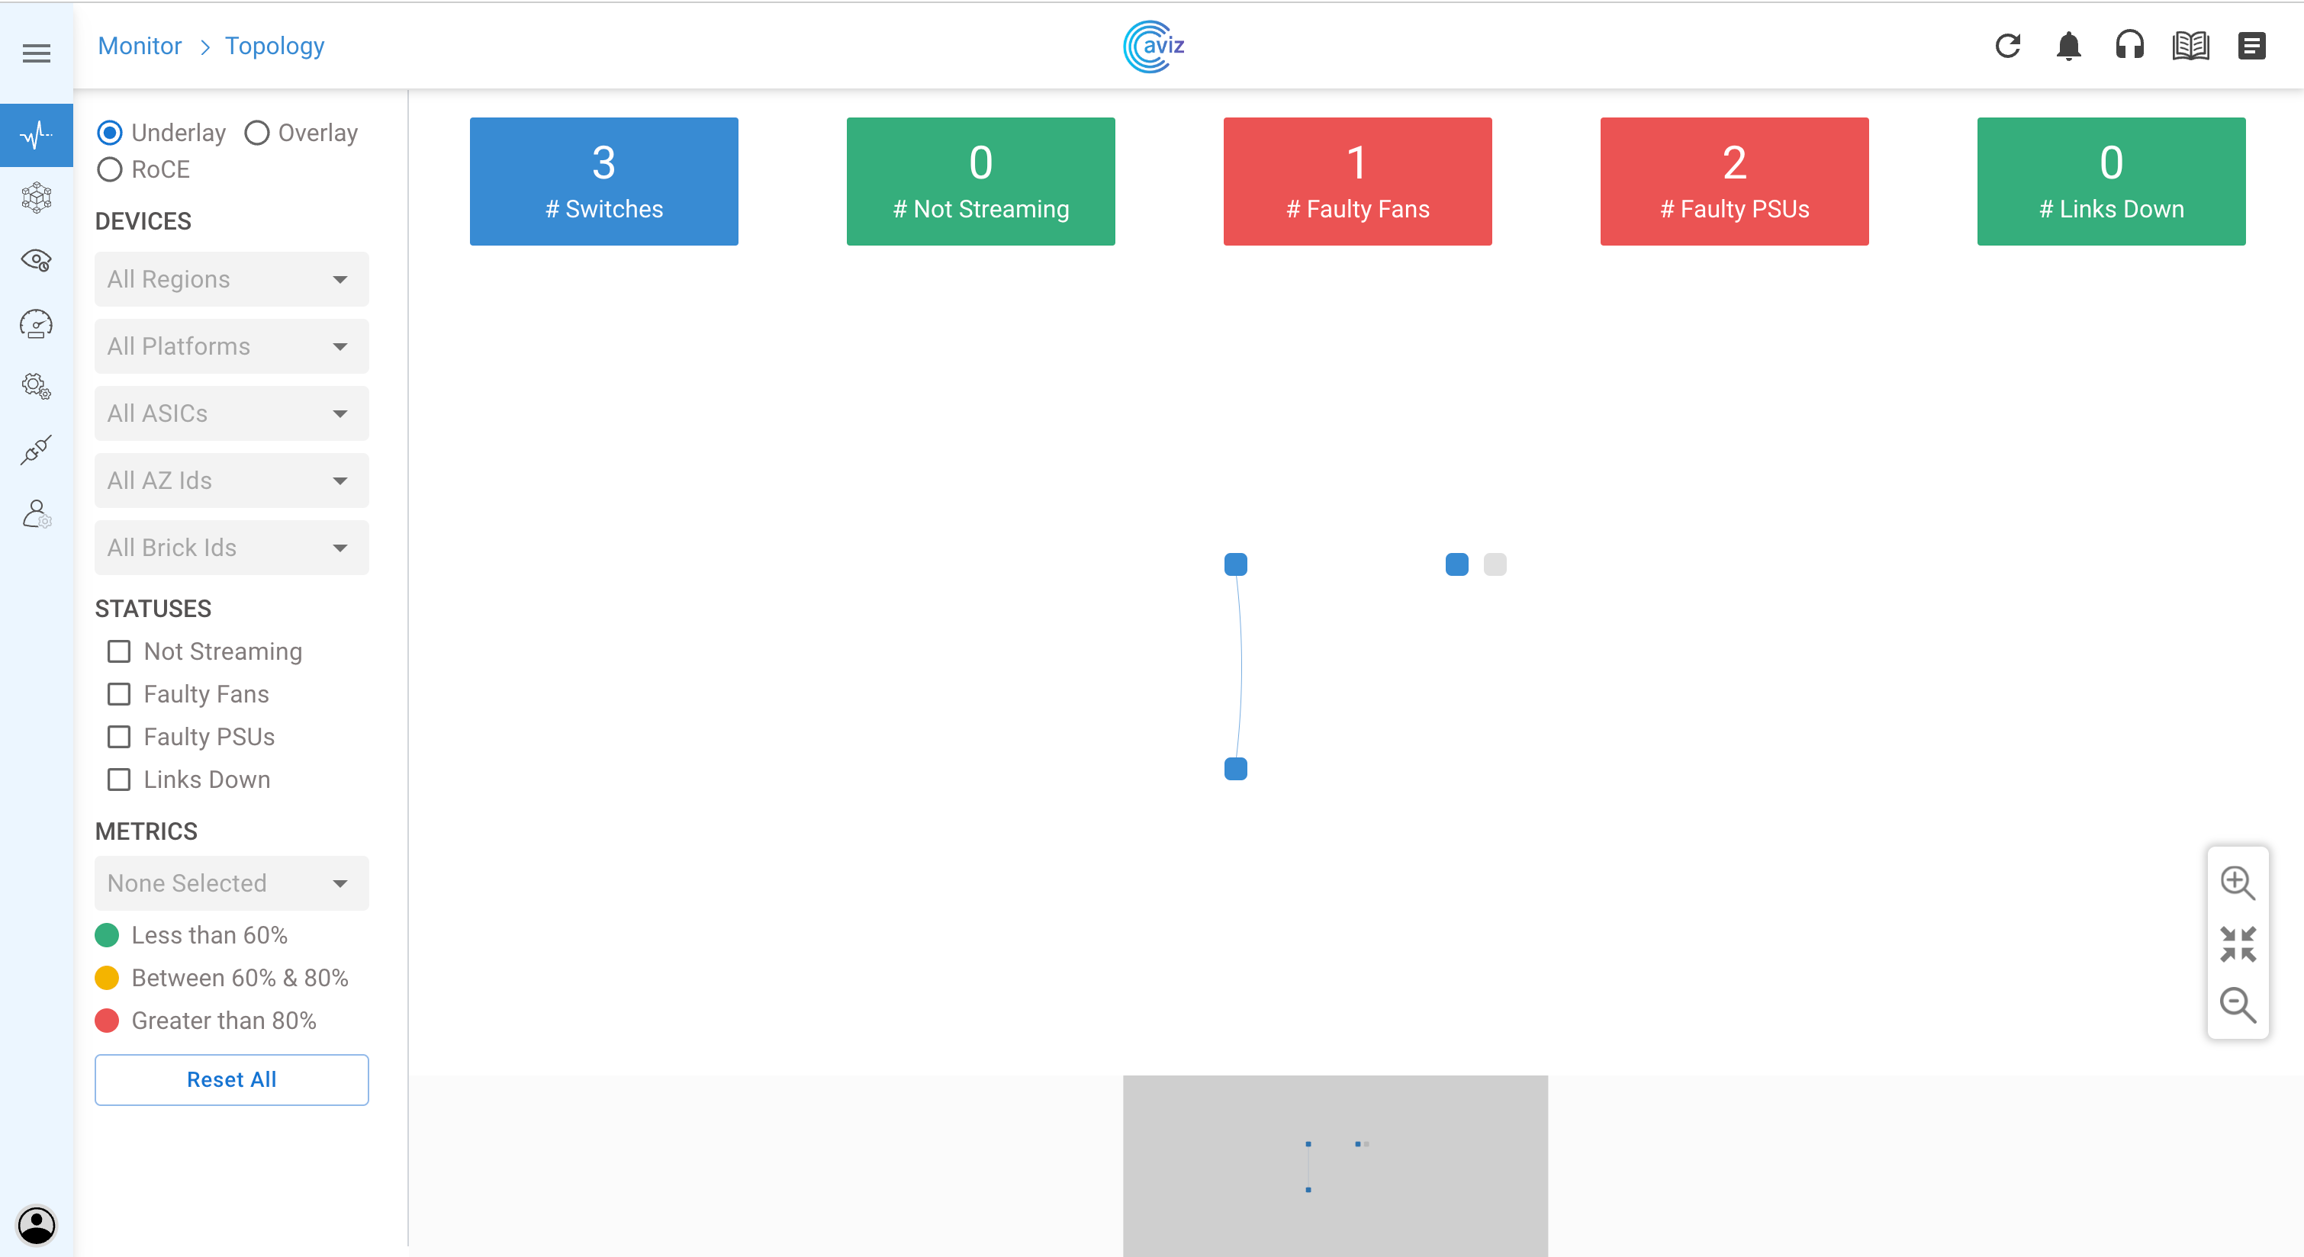


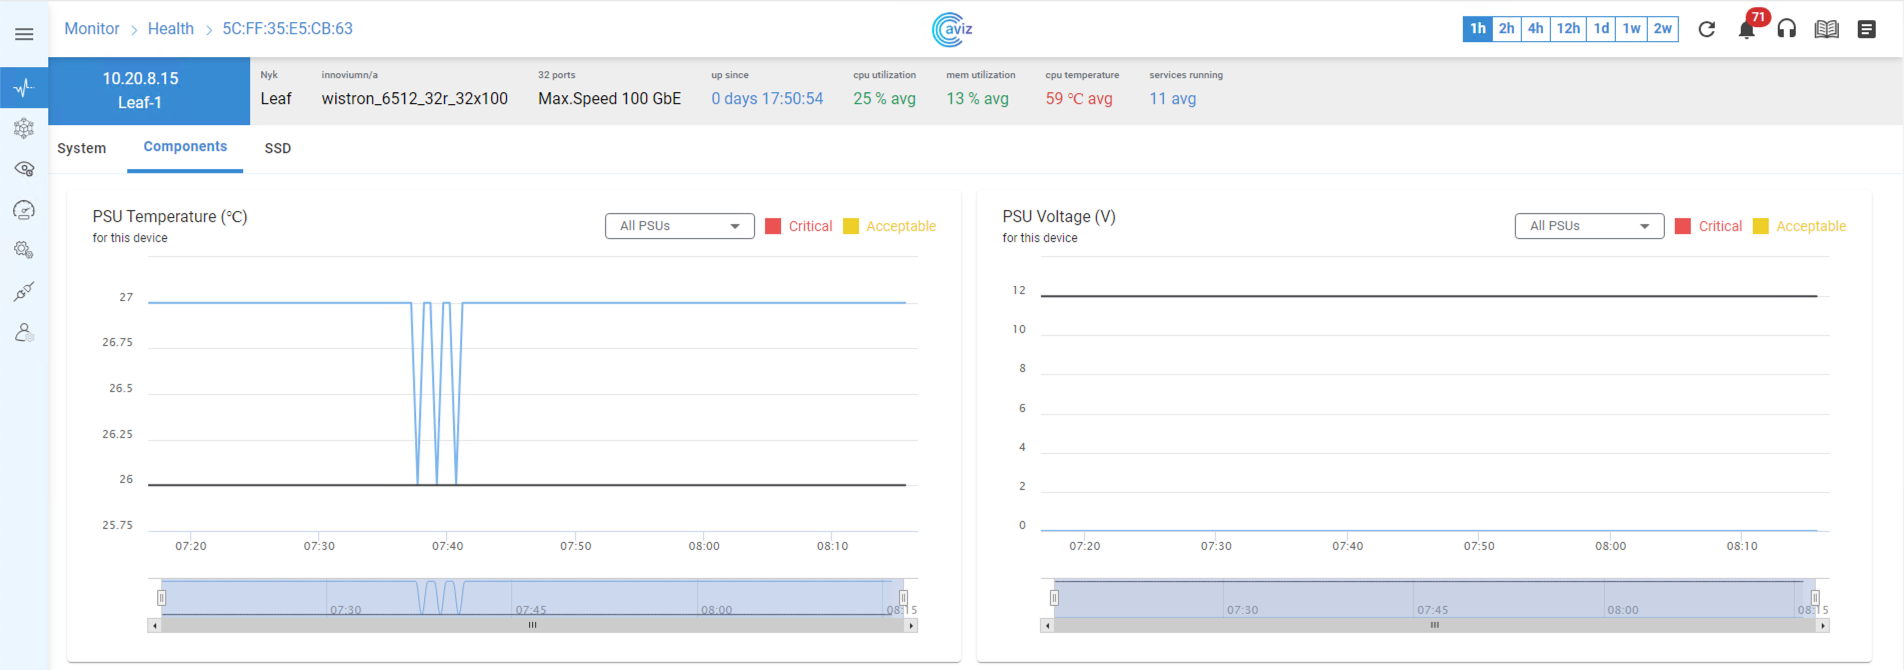


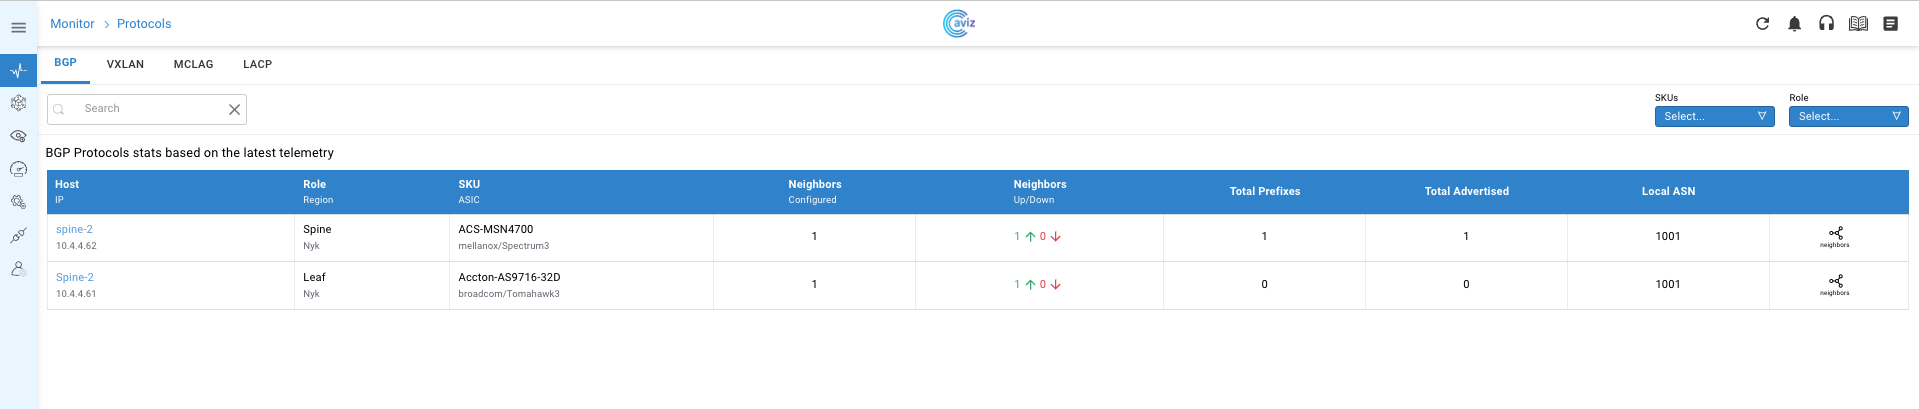


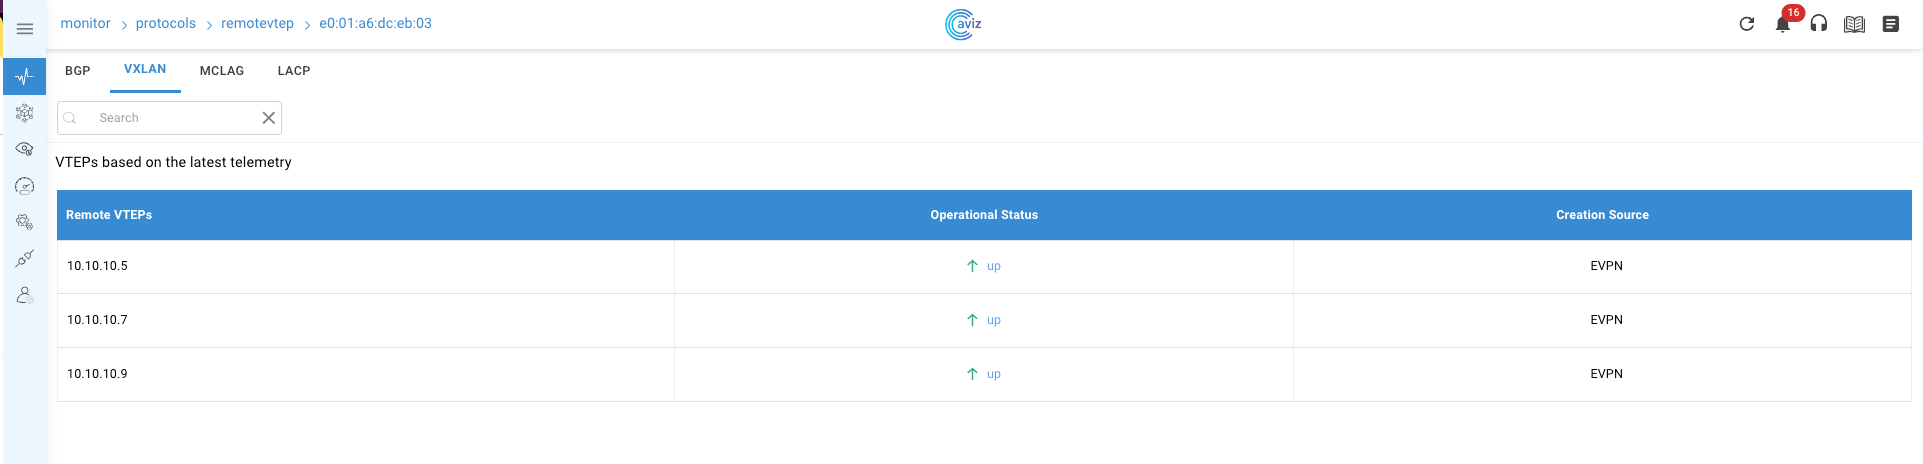


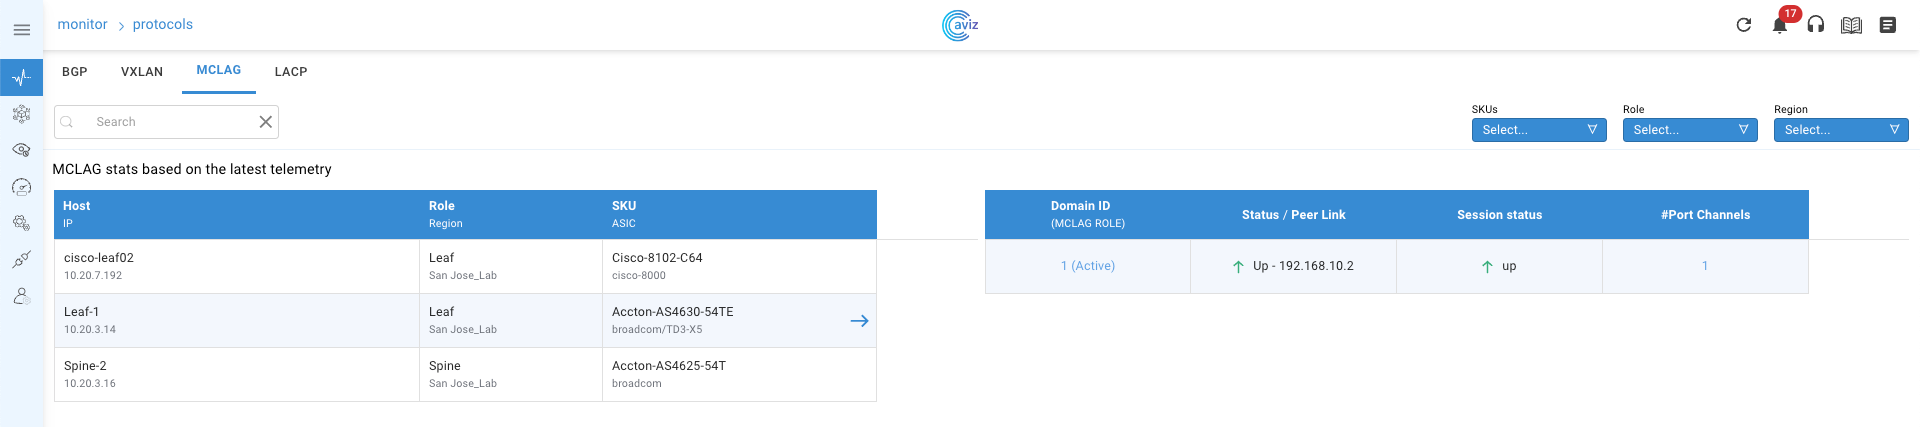

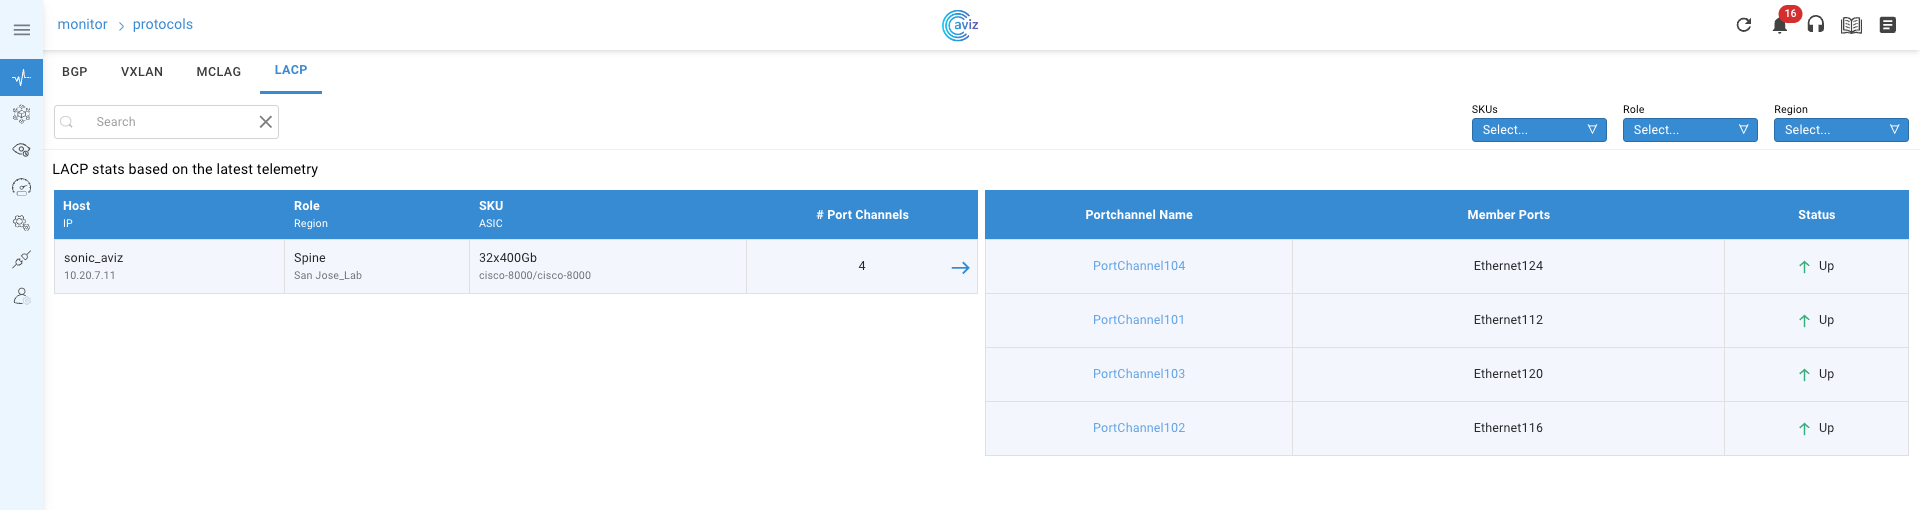

Inventory:
SSpines: 0
Spines: 2
Leafs: 4
Tors: 0
Connectivity:
SSpine: []
Spine:
- switchId: 1
switchName: "Spine-1"
ipAddress: "100.100.10.11"
ASN: 1001
Credentials:
user: "admin"
password: "admin"
mclag: null
Links:
- link: "S1_Ethernet0 | L1_Ethernet48"
staticLink: true
properties: null
- link: "S1_Ethernet4 | L2_Ethernet48"
staticLink: true
properties: null
- link: "S1_Ethernet8 | L3_Ethernet48"
staticLink: true
properties: null
- link: "S1_Ethernet12 | L4_Ethernet48"
staticLink: true
properties: null
- switchId: 2
switchName: "Spine-2"
ipAddress: "100.100.10.12"
ASN: 1002
Credentials:
user: "admin"
password: "admin"
mclag: null
Links:
- link: "S2_Ethernet0 | L1_Ethernet52"
staticLink: true
properties: null
- link: "S2_Ethernet4 | L2_Ethernet52"
staticLink: true
properties: null
- link: "S2_Ethernet8 | L3_Ethernet52"
staticLink: true
properties: null
- link: "S2_Ethernet12 | L4_Ethernet52"
staticLink: true
properties: null
Leaf:
- switchId: 1
switchName: "Leaf-1"
ipAddress: "100.100.10.13"
ASN: 2001
Credentials:
user: "admin"
password: "admin"
mclag:
enabled: true
peer: "L2"
keepalive_vlan: 10
isoverl3: true
Links:
- link: "L1_Ethernet48 | S1_Ethernet0"
staticLink: true
properties: null
- link: "L1_Ethernet52 | S2_Ethernet0"
staticLink: true
properties: null
- link: "L1_Ethernet64 | L2_Ethernet64"
staticLink: true
properties: null
- link: "L1_Ethernet56 | L2_Ethernet56"
staticLink: true
properties:
mode: "MC-LAG"
- link: "L1_Ethernet0 | H1_Ethernet0"
staticLink: true
properties:
mode: "L3-V4"
mc_po_group: 200
- link: "L1_Ethernet4 | H2_Ethernet0"
staticLink: true
properties:
mode: "L3-V4"
mc_po_group: 201
- switchId: 2
switchName: "Leaf-2"
ipAddress: "100.100.10.14"
ASN: 2001
Credentials:
user: "admin"
password: "admin"
mclag:
enabled: true
peer: "L1"
keepalive_vlan: 10
isoverl3: true
Links:
- link: "L2_Ethernet48 | S1_Ethernet4"
staticLink: true
properties: null
- link: "L2_Ethernet52 | S2_Ethernet4"
staticLink: true
properties: null
- link: "L2_Ethernet64 | L1_Ethernet64"
staticLink: true
properties: null
- link: "L2_Ethernet56 | L1_Ethernet56"
staticLink: true
properties:
mode: "MC-LAG"
- link: "L2_Ethernet0 | H1_Ethernet1"
staticLink: true
properties:
mode: "L3-V4"
mc_po_group: 200
- link: "L2_Ethernet4 | H2_Ethernet1"
staticLink: true
properties:
mode: "L3-V4"
mc_po_group: 201
- switchId: 3
switchName: "Leaf-3"
ipAddress: "100.100.10.15"
ASN: 2002
Credentials:
user: "admin"
password: "admin"
mclag:
enabled: true
peer: "L4"
keepalive_vlan: 10
isoverl3: true
Links:
- link: "L3_Ethernet48 | S1_Ethernet8"
staticLink: true
properties: null
- link: "L3_Ethernet52 | S2_Ethernet8"
staticLink: true
properties: null
- link: "L3_Ethernet60 | L4_Ethernet60"
staticLink: true
properties: null
- link: "L3_Ethernet56 | L4_Ethernet56"
staticLink: true
properties:
mode: "MC-LAG"
- link: "L3_Ethernet0 | H3_Ethernet0"
staticLink: true
properties:
mode: "L3-V4"
mc_po_group: 200
- link: "L3_Ethernet4 | H4_Ethernet0"
staticLink: true
properties:
mode: "L3-V4"
mc_po_group: 201
- switchId: 4
switchName: "Leaf-4"
ipAddress: "100.100.10.16"
ASN: 2002
Credentials:
user: "admin"
password: "admin"
mclag:
enabled: true
peer: "L3"
keepalive_vlan: 10
isoverl3: true
Links:
- link: "L4_Ethernet48 | S1_Ethernet12"
staticLink: true
properties: null
- link: "L4_Ethernet52 | S2_Ethernet12"
staticLink: true
properties: null
- link: "L4_Ethernet60 | L3_Ethernet60"
staticLink: true
properties: null
- link: "L4_Ethernet56 | L3_Ethernet56"
staticLink: true
properties:
mode: "MC-LAG"
- link: "L4_Ethernet0 | H3_Ethernet1"
staticLink: true
properties:
mode: "L3-V4"
mc_po_group: 200
- link: "L4_Ethernet4 | H4_Ethernet1"
staticLink: true
properties:
mode: "L3-V4"
mc_po_group: 201
Tor: []
BGP:
BGP_U: false
ND_RA: 30
PhysicalIfCfg:
FEC: "Off"
MTU: 9000
AdminStatus: "Up"
ASN:
SSpine: "10000-20000"
Spine: "21000-50000"
Leaf: "51000-60000"
Tor: "61000-70000"
IPv4Pool:
Loopback: "10.10.10.0/24"
LeafSpine: "40.0.0.0/24"
LeafTor: "39.0.0.0/24"
Host: "49.0.0.0/24"
IPv6Pool:
LeafSpine: null
LeafTor: null
Host: null
NTP:
server: "100.100.10.10"
timezone: "Asia/Kolkata"
SYSLOG:
server: "100.100.10.10"
SNMP:
trapserver: "100.100.10.10"
Parameters:
hosts_per_l3_subnet: 10Inventory:
SSpines: 0
Spines: 2
Leafs: 4
Tors: 0
Connectivity:
SSpine: []
Spine:
- switchId: 1
switchName: "Spine-1"
ipAddress: "100.100.10.11"
ASN: 1001
Credentials:
user: "admin"
password: "admin"
mclag: null
Links:
- link: "S1_Ethernet0 | L1_Ethernet48"
staticLink: true
properties: null
- link: "S1_Ethernet4 | L2_Ethernet48"
staticLink: true
properties: null
- link: "S1_Ethernet8 | L3_Ethernet48"
staticLink: true
properties: null
- link: "S1_Ethernet12 | L4_Ethernet48"
staticLink: true
properties: null
- switchId: 2
switchName: "Spine-2"
ipAddress: "100.100.10.12"
ASN: 1002
Credentials:
user: "admin"
password: "admin"
mclag: null
Links:
- link: "S2_Ethernet0 | L1_Ethernet52"
staticLink: true
properties: null
- link: "S2_Ethernet4 | L2_Ethernet52"
staticLink: true
properties: null
- link: "S2_Ethernet8 | L3_Ethernet52"
staticLink: true
properties: null
- link: "S2_Ethernet12 | L4_Ethernet52"
staticLink: true
properties: null
Leaf:
- switchId: 1
switchName: "Leaf-1"
ipAddress: "100.100.10.13"
ASN: 2001
Credentials:
user: "admin"
password: "admin"
mclag:
enabled: true
peer: "L2"
keepalive_vlan: 10
Links:
- link: "L1_Ethernet48 | S1_Ethernet0"
staticLink: true
properties: null
- link: "L1_Ethernet52 | S2_Ethernet0"
staticLink: true
properties: null
- link: "L1_Ethernet56 | L2_Ethernet56"
staticLink: true
properties:
mode: "MC-LAG"
- link: "L1_Ethernet0 | H1_Ethernet0"
staticLink: true
properties:
mode: "L2-Access"
vlan: 200
mc_po_group: 200
- link: "L1_Ethernet4 | H2_Ethernet0"
staticLink: true
properties:
mode: "L2-Access"
vlan: 201
mc_po_group: 201
- switchId: 2
switchName: "Leaf-2"
ipAddress: "100.100.10.14"
ASN: 2001
Credentials:
user: "admin"
password: "admin"
mclag:
enabled: true
peer: "L1"
keepalive_vlan: 10
Links:
- link: "L2_Ethernet48 | S1_Ethernet4"
staticLink: true
properties: null
- link: "L2_Ethernet52 | S2_Ethernet4"
staticLink: true
properties: null
- link: "L2_Ethernet56 | L1_Ethernet56"
staticLink: true
properties:
mode: "MC-LAG"
- link: "L2_Ethernet0 | H1_Ethernet1"
staticLink: true
properties:
mode: "L2-Access"
vlan: 200
mc_po_group: 200
- link: "L2_Ethernet4 | H2_Ethernet1"
staticLink: true
properties:
mode: "L2-Access"
vlan: 201
mc_po_group: 201
- switchId: 3
switchName: "Leaf-3"
ipAddress: "100.100.10.15"
ASN: 2002
Credentials:
user: "admin"
password: "admin"
mclag:
enabled: true
peer: "L4"
keepalive_vlan: 10
Links:
- link: "L3_Ethernet48 | S1_Ethernet8"
staticLink: true
properties: null
- link: "L3_Ethernet52 | S2_Ethernet8"
staticLink: true
properties: null
- link: "L3_Ethernet56 | L4_Ethernet56"
staticLink: true
properties:
mode: "MC-LAG"
- link: "L3_Ethernet0 | H3_Ethernet0"
staticLink: true
properties:
mode: "L2-Access"
vlan: 200
mc_po_group: 200
- link: "L3_Ethernet4 | H4_Ethernet0"
staticLink: true
properties:
mode: "L2-Access"
vlan: 201
mc_po_group: 201
- switchId: 4
switchName: "Leaf-4"
ipAddress: "100.100.10.16"
ASN: 2002
Credentials:
user: "admin"
password: "admin"
mclag:
enabled: true
peer: "L3"
keepalive_vlan: 10
Links:
- link: "L4_Ethernet48 | S1_Ethernet12"
staticLink: true
properties: null
- link: "L4_Ethernet52 | S2_Ethernet12"
staticLink: true
properties: null
- link: "L4_Ethernet56 | L3_Ethernet56"
staticLink: true
properties:
mode: "MC-LAG"
- link: "L4_Ethernet0 | H3_Ethernet1"
staticLink: true
properties:
mode: "L2-Access"
vlan: 200
mc_po_group: 200
- link: "L4_Ethernet4 | H4_Ethernet1"
staticLink: true
properties:
mode: "L2-Access"
vlan: 201
mc_po_group: 201
Tor: []
BGP:
BGP_U: false
ND_RA: 30
PhysicalIfCfg:
FEC: "Off"
MTU: 9000
AdminStatus: "Up"
ASN:
SSpine: "10000-20000"
Spine: "21000-50000"
Leaf: "51000-60000"
Tor: "61000-70000"
IPv4Pool:
Loopback: "10.10.10.0/24"
LeafSpine: "40.0.0.0/24"
LeafTor: "39.0.0.0/24"
Host: "49.0.0.0/24"
IPv6Pool:
LeafSpine: null
LeafTor: null
Host: null
NTP:
server: "100.100.10.10"
timezone: "Asia/Kolkata"
SYSLOG:
server: "100.100.10.10"
SNMP:
trapserver: "100.100.10.10"
Parameters:
vlan: "200-205"
anycast_gateway: "2000::0/64"
hosts_per_vlan: 10Inventory:
SSpines: 0
Spines: 2
Leafs: 4
Tors: 0
Connectivity:
SSpine: []
Spine:
- switchId: 1
switchName: "Spine-1"
ipAddress: "100.100.10.11"
ASN: 1001
Credentials:
user: "admin"
password: "admin"
mclag: null
Links:
- link: "S1_Ethernet0 | L1_Ethernet48"
staticLink: true
properties: null
- link: "S1_Ethernet4 | L2_Ethernet48"
staticLink: true
properties: null
- link: "S1_Ethernet8 | L3_Ethernet48"
staticLink: true
properties: null
- link: "S1_Ethernet12 | L4_Ethernet48"
staticLink: true
properties: null
- switchId: 2
switchName: "Spine-2"
ipAddress: "100.100.10.12"
ASN: 1001
Credentials:
user: "admin"
password: "admin"
mclag: null
Links:
- link: "S2_Ethernet0 | L1_Ethernet52"
staticLink: true
properties: null
- link: "S2_Ethernet4 | L2_Ethernet52"
staticLink: true
properties: null
- link: "S2_Ethernet8 | L3_Ethernet52"
staticLink: true
properties: null
- link: "S2_Ethernet12 | L4_Ethernet52"
staticLink: true
properties: null
Leaf:
- switchId: 1
switchName: "Leaf-1"
ipAddress: "100.100.10.13"
ASN: 1001
Credentials:
user: "admin"
password: "admin"
mclag:
enabled: true
peer: "L2"
keepalive_vlan: 10
Links:
- link: "L1_Ethernet48 | S1_Ethernet0"
staticLink: true
properties: null
- link: "L1_Ethernet52 | S2_Ethernet0"
staticLink: true
properties: null
- link: "L1_Ethernet56 | L2_Ethernet56"
staticLink: true
properties:
mode: "MC-LAG"
- link: "L1_Ethernet0 | H1_Ethernet0"
staticLink: true
properties:
mode: "L2-Access"
vlan: 200
mc_po_group: 200
- link: "L1_Ethernet4 | H2_Ethernet0"
staticLink: true
properties:
mode: "L2-Access"
vlan: 201
mc_po_group: 201
- switchId: 2
switchName: "Leaf-2"
ipAddress: "100.100.10.14"
ASN: 1001
Credentials:
user: "admin"
password: "admin"
mclag:
enabled: true
peer: "L1"
keepalive_vlan: 10
Links:
- link: "L2_Ethernet48 | S1_Ethernet4"
staticLink: true
properties: null
- link: "L2_Ethernet52 | S2_Ethernet4"
staticLink: true
properties: null
- link: "L2_Ethernet56 | L1_Ethernet56"
staticLink: true
properties:
mode: "MC-LAG"
- link: "L2_Ethernet0 | H1_Ethernet1"
staticLink: true
properties:
mode: "L2-Access"
vlan: 200
mc_po_group: 200
- link: "L2_Ethernet4 | H2_Ethernet1"
staticLink: true
properties:
mode: "L2-Access"
vlan: 201
mc_po_group: 201
- switchId: 3
switchName: "Leaf-3"
ipAddress: "100.100.10.15"
ASN: 1001
Credentials:
user: "admin"
password: "admin"
mclag:
enabled: true
peer: "L4"
keepalive_vlan: 10
Links:
- link: "L3_Ethernet48 | S1_Ethernet8"
staticLink: true
properties: null
- link: "L3_Ethernet52 | S2_Ethernet8"
staticLink: true
properties: null
- link: "L3_Ethernet56 | L4_Ethernet56"
staticLink: true
properties:
mode: "MC-LAG"
- link: "L3_Ethernet0 | H3_Ethernet0"
staticLink: true
properties:
mode: "L2-Access"
vlan: 200
mc_po_group: 200
- link: "L3_Ethernet4 | H4_Ethernet0"
staticLink: true
properties:
mode: "L2-Access"
vlan: 201
mc_po_group: 201
- switchId: 4
switchName: "Leaf-4"
ipAddress: "100.100.10.16"
ASN: 1001
Credentials:
user: "admin"
password: "admin"
mclag:
enabled: true
peer: "L3"
keepalive_vlan: 10
Links:
- link: "L4_Ethernet48 | S1_Ethernet12"
staticLink: true
properties: null
- link: "L4_Ethernet52 | S2_Ethernet12"
staticLink: true
properties: null
- link: "L4_Ethernet56 | L3_Ethernet56"
staticLink: true
properties:
mode: "MC-LAG"
- link: "L4_Ethernet0 | H3_Ethernet1"
staticLink: true
properties:
mode: "L2-Access"
vlan: 200
mc_po_group: 200
- link: "L4_Ethernet4 | H4_Ethernet1"
staticLink: true
properties:
mode: "L2-Access"
vlan: 201
mc_po_group: 201
Tor: []
BGP:
BGP_U: false
ND_RA: 30
PhysicalIfCfg:
FEC: "Off"
MTU: 9000
AdminStatus: "Up"
ASN:
SSpine: "10000-20000"
Spine: "21000-50000"
Leaf: "51000-60000"
Tor: "61000-70000"
IPv4Pool:
Loopback: "10.10.10.0/24"
LeafSpine:
LeafTor:
Host:
IPv6Pool:
LeafSpine: 1000::0/124
LeafTor: 2000::0/124
Host: null
NTP:
server: "100.100.10.10"
timezone: "Asia/Kolkata"
SYSLOG:
server: "100.100.10.10"
SNMP:
trapserver: "100.100.10.10"
Parameters:
vlan: "200-205"
anycast_gateway: "4000::0/64"
hosts_per_vlan: 10