There are three primary components of ONES Application
ONES Telemetry Collector(s) for Network Visibility
ONES Orchestrator for Fabric Configuration
ONES Supportability
ONES Supportability
AVIZ Support Overview
Network Assurance helps the NetOps team validate policy and security compliance checks before making a change in network configuration, an intelligent set of proactive and predictive techniques that validate the Network for readiness without error, conflicts, and disruptions
Aviz Support team is located across four timezones offering 24x7 SONiC and related product support for multi-vendor switches and ASICs. Using our support portal, we offer you to
Collaborate with our SONiC experts to expedite your evaluations
Speed up your SONiC troubleshooting SLAs to as low as 15 minutes regardless of the underlying Switch/ASIC platform
Minimize operational delays by centralizing issues across multiple platforms
Users can reach out to customer support on
Supports Options are available:
Integrated Chat
Submit a Ticket
Send an email to support@aviznetworks.com
Refer to the "" section of this document for more details
ONES Supportability
To connect with customer support users can choose the support option available on ONES-UI
Open Networking Enterprise Suite (ONES) is a Network Orchestration, Visibility, and Assurance solution for multi-vendor and multi-NOS operated Network Infrastructure. ONES provides a one-stop solution from delivering deep visibility into your datacenter networks to extending 24x7 support functions for SONiC. It also hosts a powerful analytics engine that assists users to identify network issues and troubleshoot their networks, in case of common network anomalies and disruptions.
ONES uses a YAML-based Device Discovery Template for adding switches and continuously collects streaming telemetry data from them to provide insights on;
Data Center Inventory
Network State
Platform and System Health
ONES monitors various control and data plane metrics to provide these insights.
ONES orchestration provide network admins to automate the fabric configuration using configuration templates for provisioning physical interfaces, layer 3 configuration for building IP-CLOS fabric using BGP as a routing protocol including BGP-unnumbered, system services including NTP, SNMP, SYSLOG etc. ONES orchestration not only configures the fabric but also make sure the Fabric is operational by doing verifying the configuration at every stage.
ONES provides north bound API access for configurations originating from external orchestration tools.
Control and Data Plane resource utilization
Traffic Utilization
Software Compliance
ONES Orchestration
Why do we need Network Orchestration?
Orchestration refers to tasks or actions required to achieve a set of objectives for your Network Infrastructure operations
A centralized application like ONES translates these objectives into a network configuration template, applies and monitors to validate the operational efficiency and functionality
Automated tasks are performed on your Network Fabric in a purposeful order and each step is verified for success before moving to the next
ONES Orchestration - Overview
ONES Orchestration function on the application lets you compose, deploy, and validate network configurations across any SONiC, be it a Community version or a Vendor distro.
As part of the initial release, ONES Orchestration supports to
Create and configure CLOS topology for ToR, Leaf, Spine, and Super-Spine layers
Apply and validate configurations pre- and post-deployment
Compare running configs against applied configs at any point
ONES Orchestration use cases are configured using a set of pre-defined YAML-based templates on ONES Web User Interface
Upgrade devices with a single click via ZTP or custom NOS images
Yaml-based config for VXLAN, MCLAG, BGP IP CLOS & EVPN(L2VPN)
Automate Configuration of interfaces, layer 3 interfaces, BGP-unnumbered and Common Services like NTP, SNMP, SYSLOG etc.
Scalability
ONES Function
Device/Switch Count
Telemetry for Visibility
1024
Orchestration
64
ONES Telemetry Collector(s) and Visibility
Overview
ONES Telemetry Collector(s) and Analytics bring truly unparalleled visibility across all your switches running SONiC (both community and vendor distros), regardless of the underlying ASIC. ONES front end (UI), will enable network admins to;
Manage inventory of your network devices running SONiC on Broadcom, Cisco, Marvell, Nvidia ASICs
View the topology of the entire fabric across multiple hardware platforms, and network operating systems
Monitor traffic, system health, bandwidth utilization, & more
Track Switch CPU/memory consumption, bandwidth, link failures, traffic errors, and more in real-time
Proactively identify and resolve issues that may lead to network downtime
Instantly connect to individual devices for maintenance and troubleshooting
Supported Switch Platforms and NOS
Supported Matrix
NOS
ASIC
Switches
Community SONiC
Cumulus support limited to available Open Config models, is considered by ONES as Agent-less
Agent-based vs Agent-less
SONiC-based switches require ONES Agents (Agent-based) to be installed on the switch being monitored, as a pre-requisite for ONES Telemetry and Orchestrator based functions to work.
ONES Telemetry Agent
ONES Orchestrator Agent
Proprietary NOS like Arista EOS, Cumulus, and Cisco NX-OS does not require an ONES Agent and instead leverage (Agent-less) feature. OpenConfig extends APIs that provide Network Telemetry information about the resources being monitored via (gRPC Network Management Interface) protocol to the ONES Application
ONES does not support Orchestrator-based functions on Proprietary NOS (non-SONiC).
Agent requirements
SSH access
SONiC version beyond 202012 or 202111 are supported
Only x86 intel-based architectures are supported
NVIDIA, Broadcom
SN2010, SN4700, SN 2700, SN2100, SN3700, DellEMC-S5212f-P-25G
ONES Installation follows the below steps in the order sequence of;
License Readiness
Preparing and Installing ONES Application machine
Installing ONES Agents on SONiC Switches for Orchestrator and Telemetry
Enabling OpenConfig on non-SONiC Switches for Telemetry
License Readiness
The installer allows a default capability on managing 8 devices without a license. Beyond this, the following license keys are required for proceeding with the Installation;
ONES Application License (As per device count)
To obtain a license, contact support@aviznetworks.com providing the below details;
License Type - Evaluation Trial or Full
Devices Count - 32, 64, 128, 256, 512 or 1024
ONES installation ID
Users can get ONES installation ID on ONES-UI Login page after the installation
System Hardware Requirements – ONES Application
In the current release, ONES can support managing up to 1024 devices. For ONES Application Installation, the system hardware requirements vary based on the number of devices to manage;
Devices
Processor and Memory
Storage
System Software Requirements - ONES Application
OS
Libraries
Task
Command
Validation
Customer Firewall Configuration (Ports to be opened)
ONES Service
Port Numbers
NOTE: These port numbers should be available to use and all ports must be allowed in the firewall if the Database server and devices are in the different DMZ zone
API Access for configurations originating from External Orchestration Tools
ONES allows users to leverage pre-defined templates, and customize them for Ports, IPv4/IPv6 Routes, BGP-Unnumbered, and Switch Services (NTP, SNMP, SYSLOG, ZTP, etc.) functions
###########Connecting to Switch############
###########Connecting to Switch############
###########Connecting to Switch############
###########Connecting to Switch############
Connection to switch 10.4.4.75 successful…………
Looking for previous installation………………………
Removing Agents currently installed………………….
Connection to switch 10.4.4.76 successful…………
Looking for previous installation………………………..
ones-agent is not in the device 10.4.4.76 for uninstallation….
...
...
...
###########Connecting to Switch############
###########Connecting to Switch############
###########Connecting to Switch############
###########Connecting to Switch############
Connection to switch 10.4.4.75 successful…………
Installing agent on 10.4.4.75………………………..
Installation of agent on 10.4.4.75 successful………………….
Connection to switch 10.4.4.76 successful…………
Installing agent on 10.4.4.76………………………..
Installation of agent on 10.4.4.76 successful………………….
...
...
...
ONES Orchestration Agent Installation
On the ONES Application server, go to GAv1.1/ones_fm_agent
root@ones-application:~$ cd /GAv1.1/ones_fm_agent
Installation (Agent Install on multiple switches at the same time)
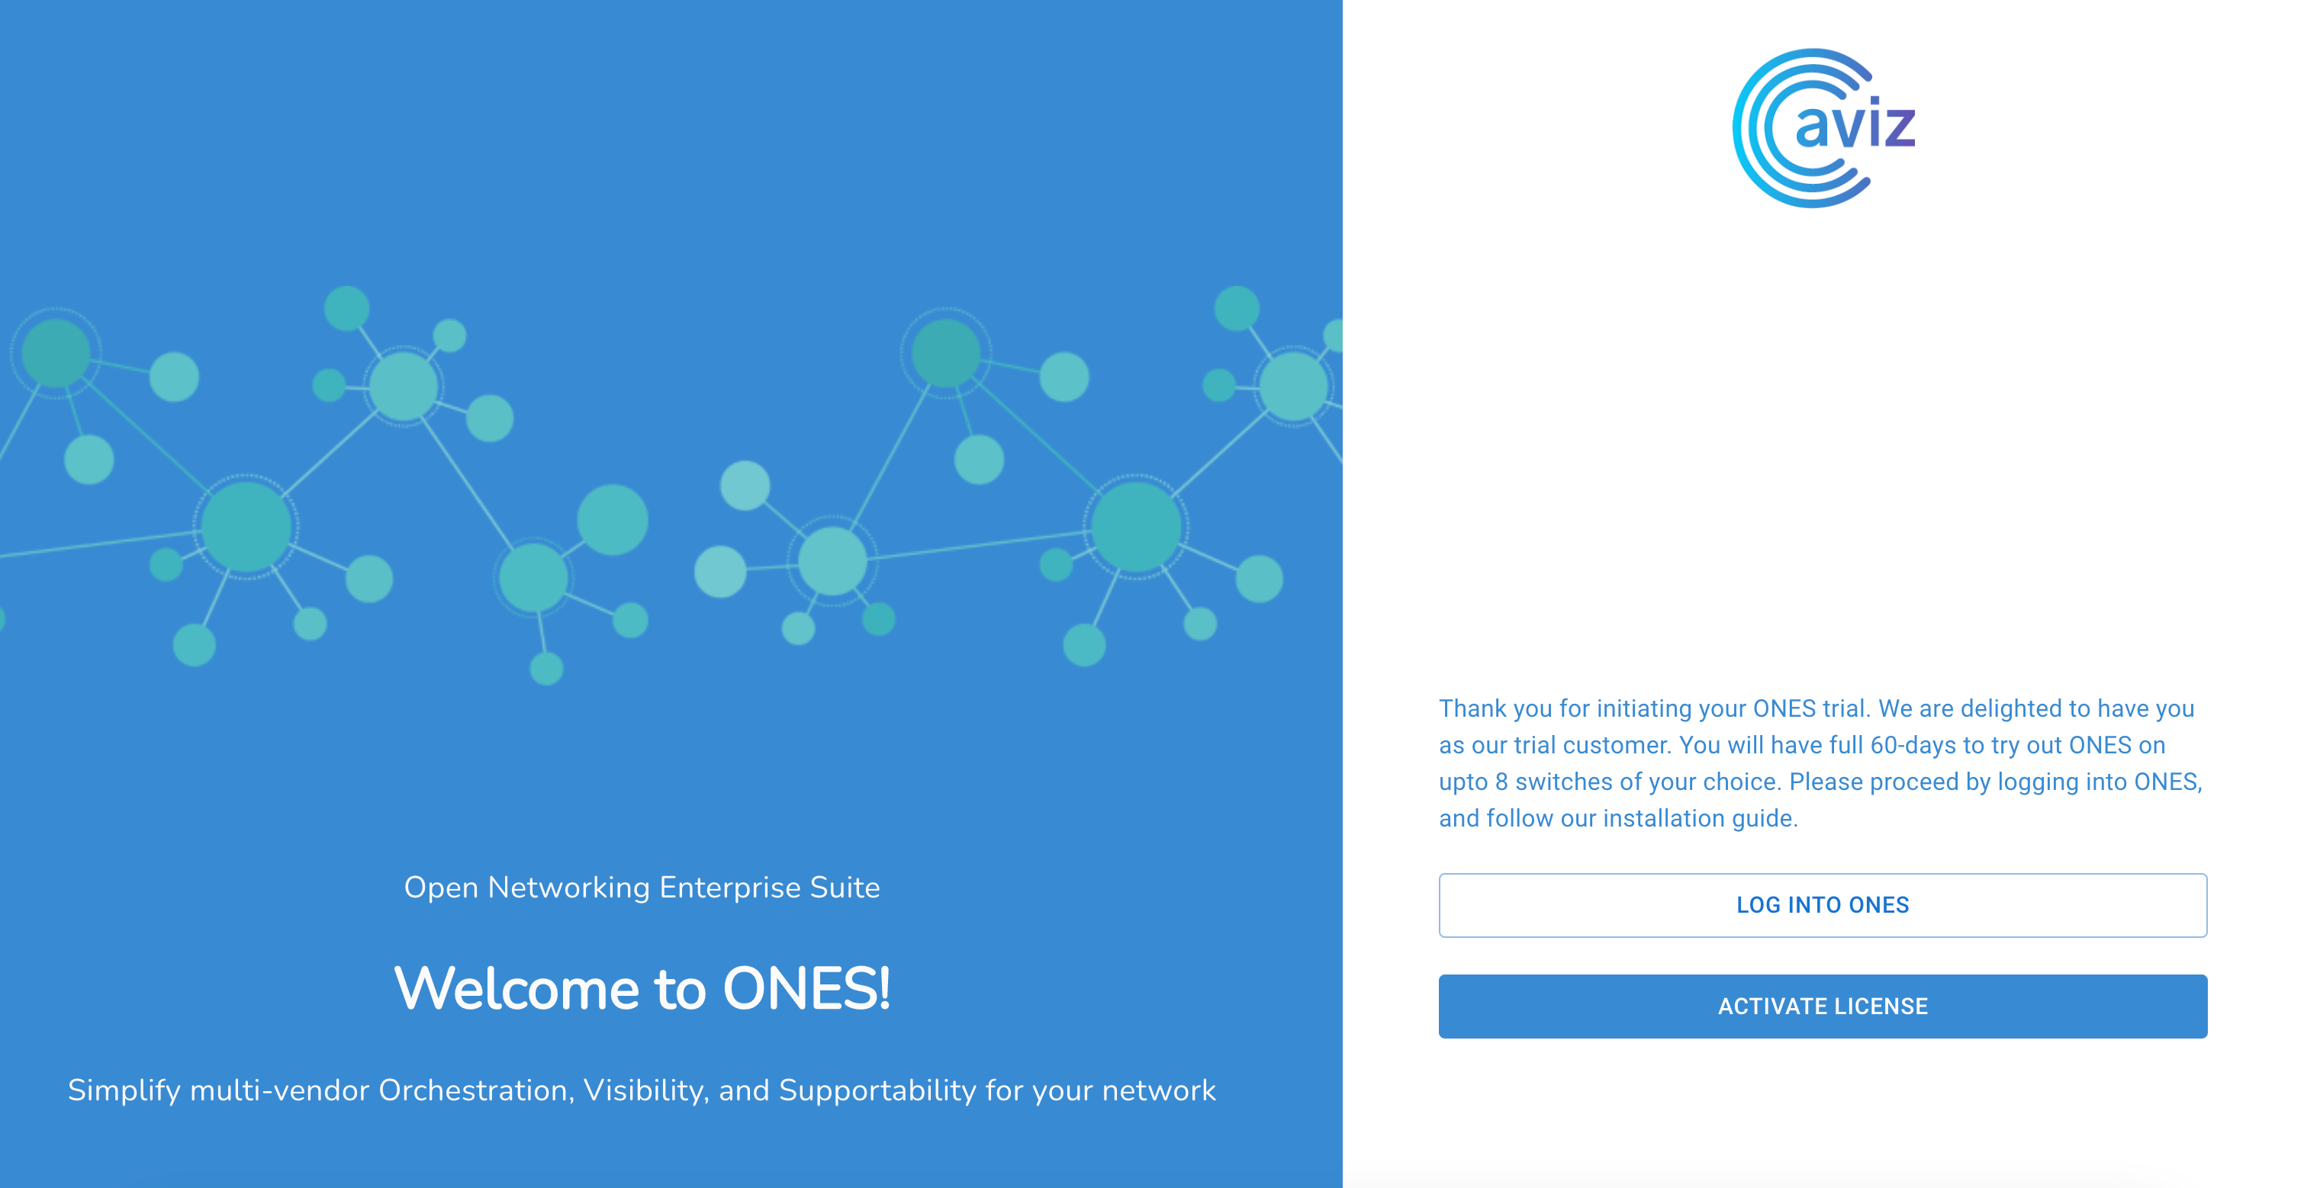
Login Page
To access the ONES application, use Server IP with HTTPS
https://<host-ip>
Use default credentials to login, refer page for default credentials
Enter device details (Management IP, Username, Password ) in device_info.csv
root@ones-application/GAv1.1/ones_fm_agent:~$ vi device_info.csv
###########Connecting to Switch############
###########Connecting to Switch############
###########Connecting to Switch############
###########Connecting to Switch############
Connection to switch 10.4.4.75 successful…………
Installing agent on 10.4.4.75………………………..
Installation of agent on 10.4.4.75 successful………………….
Connection to switch 10.4.4.76 successful…………
Installing agent on 10.4.4.76………………………..
Installation of agent on 10.4.4.76 successful………………….
...
...
...
FMCLI: System Initialization in progress......
fmcli#
Click on the Downloads section, under ONES, click to download ONES Release 1.1
Copy ONES Release 1.1 package (tar.gz) to ONES Application machine
Dashboards
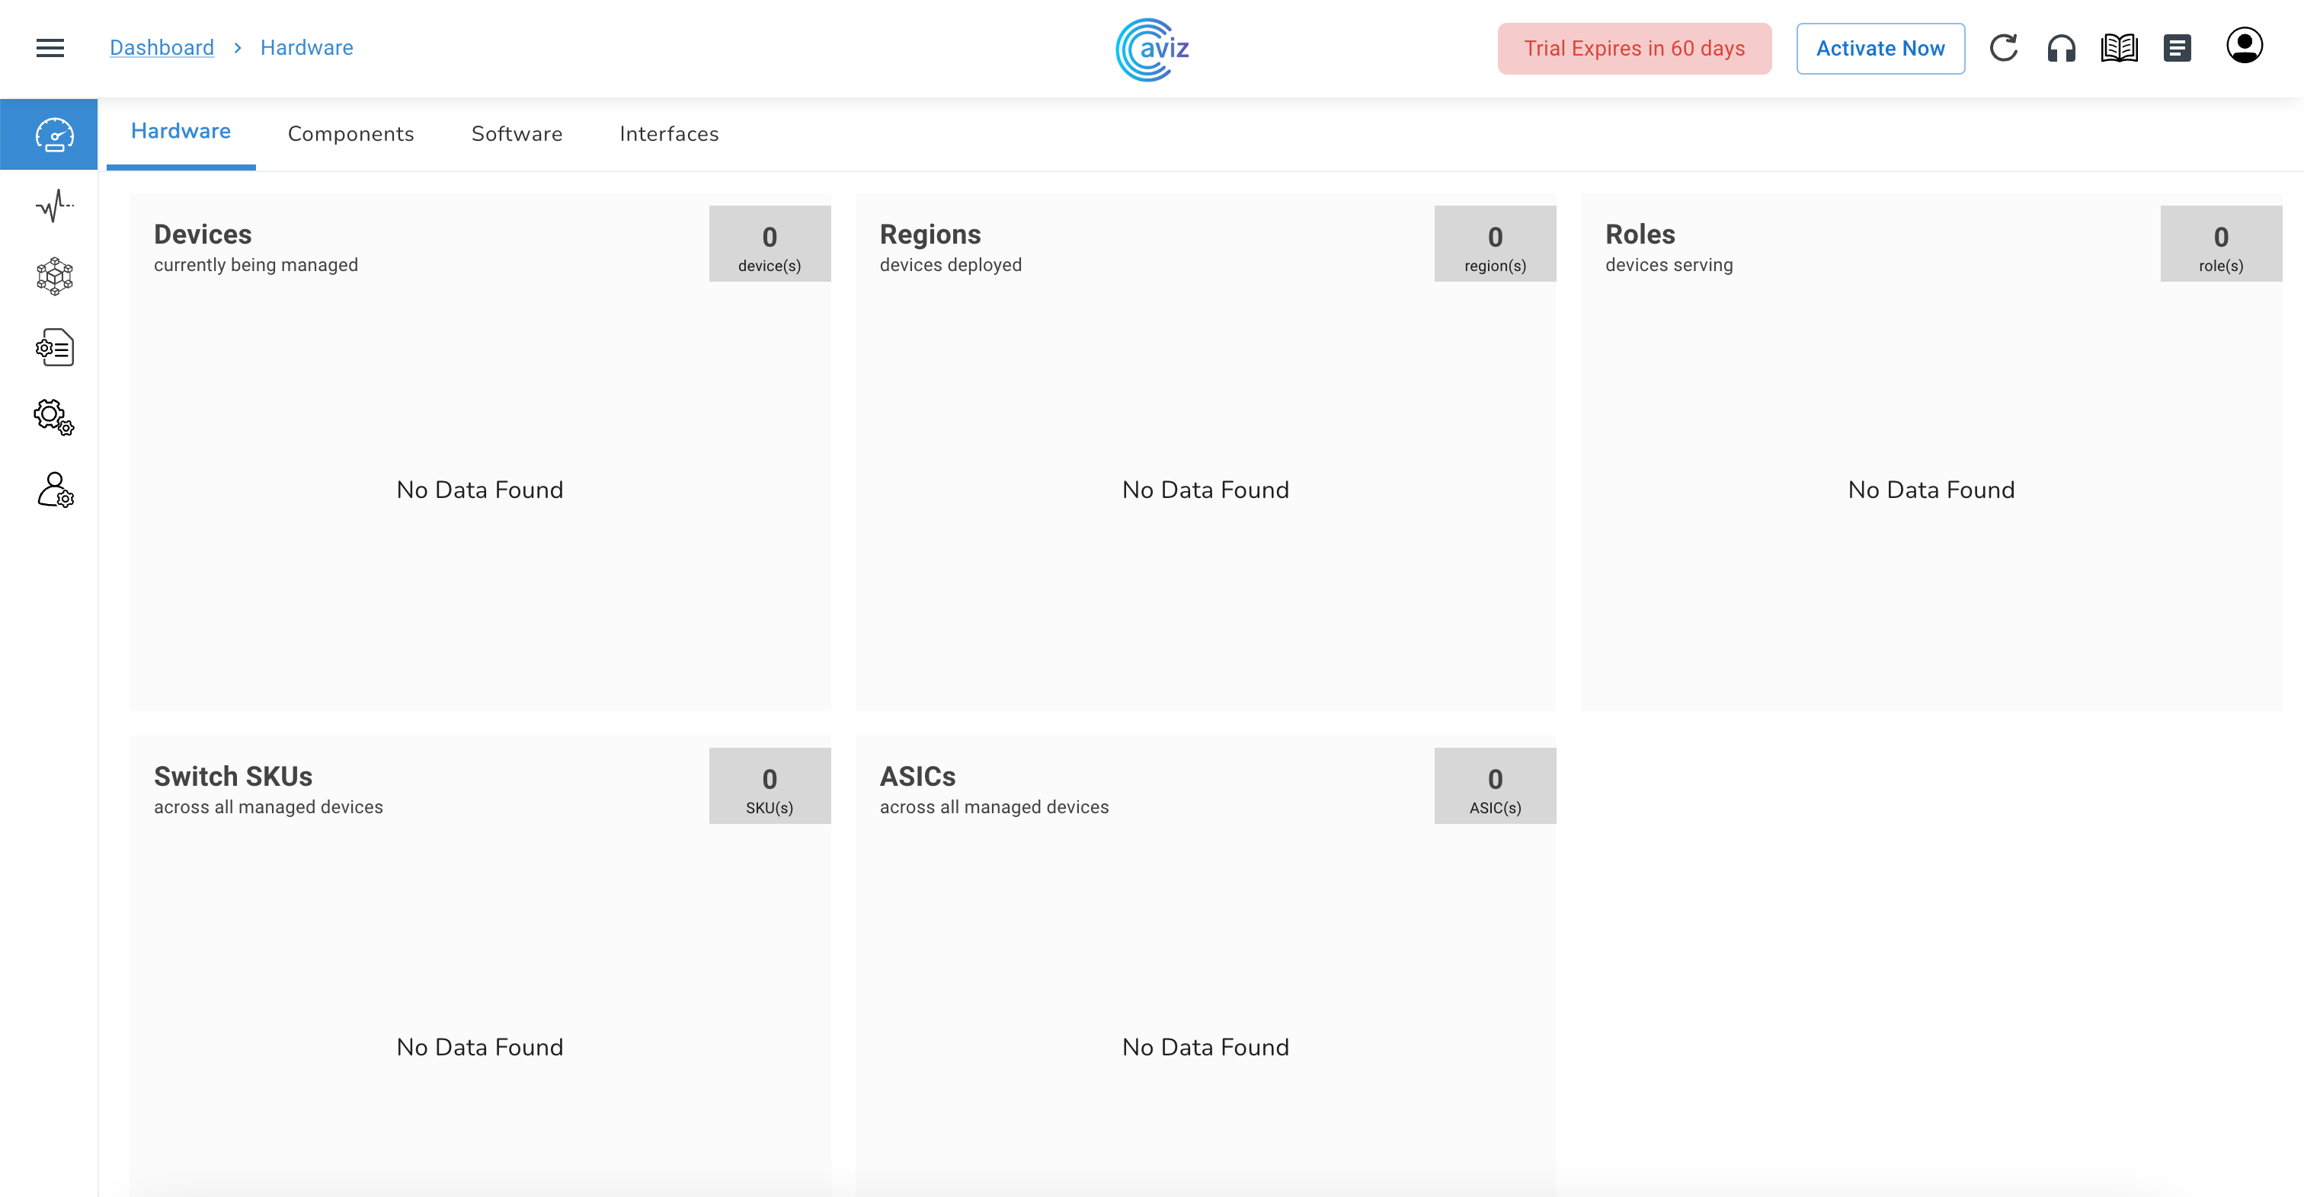
Hardware (Default)
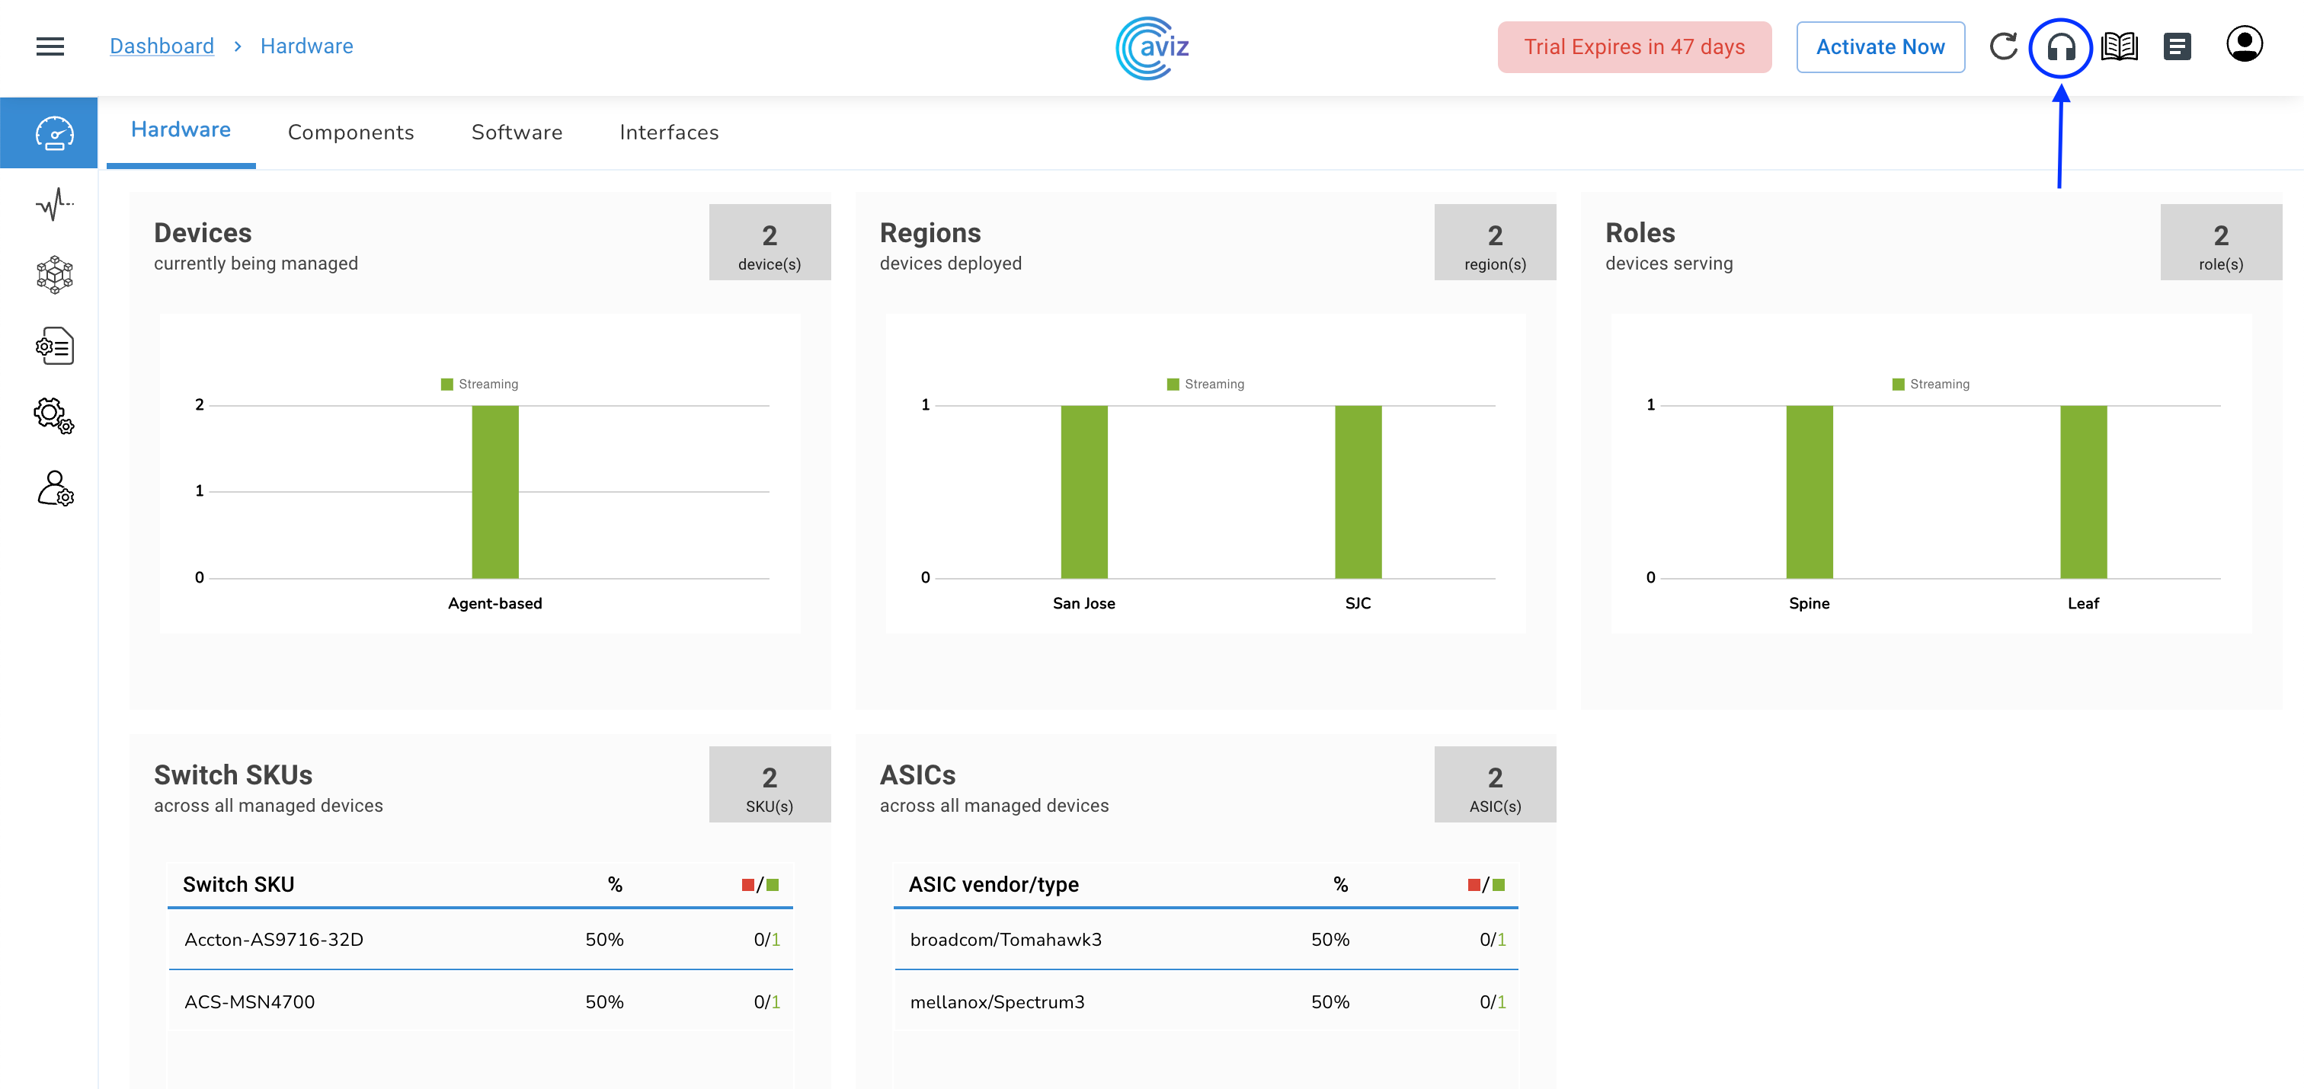
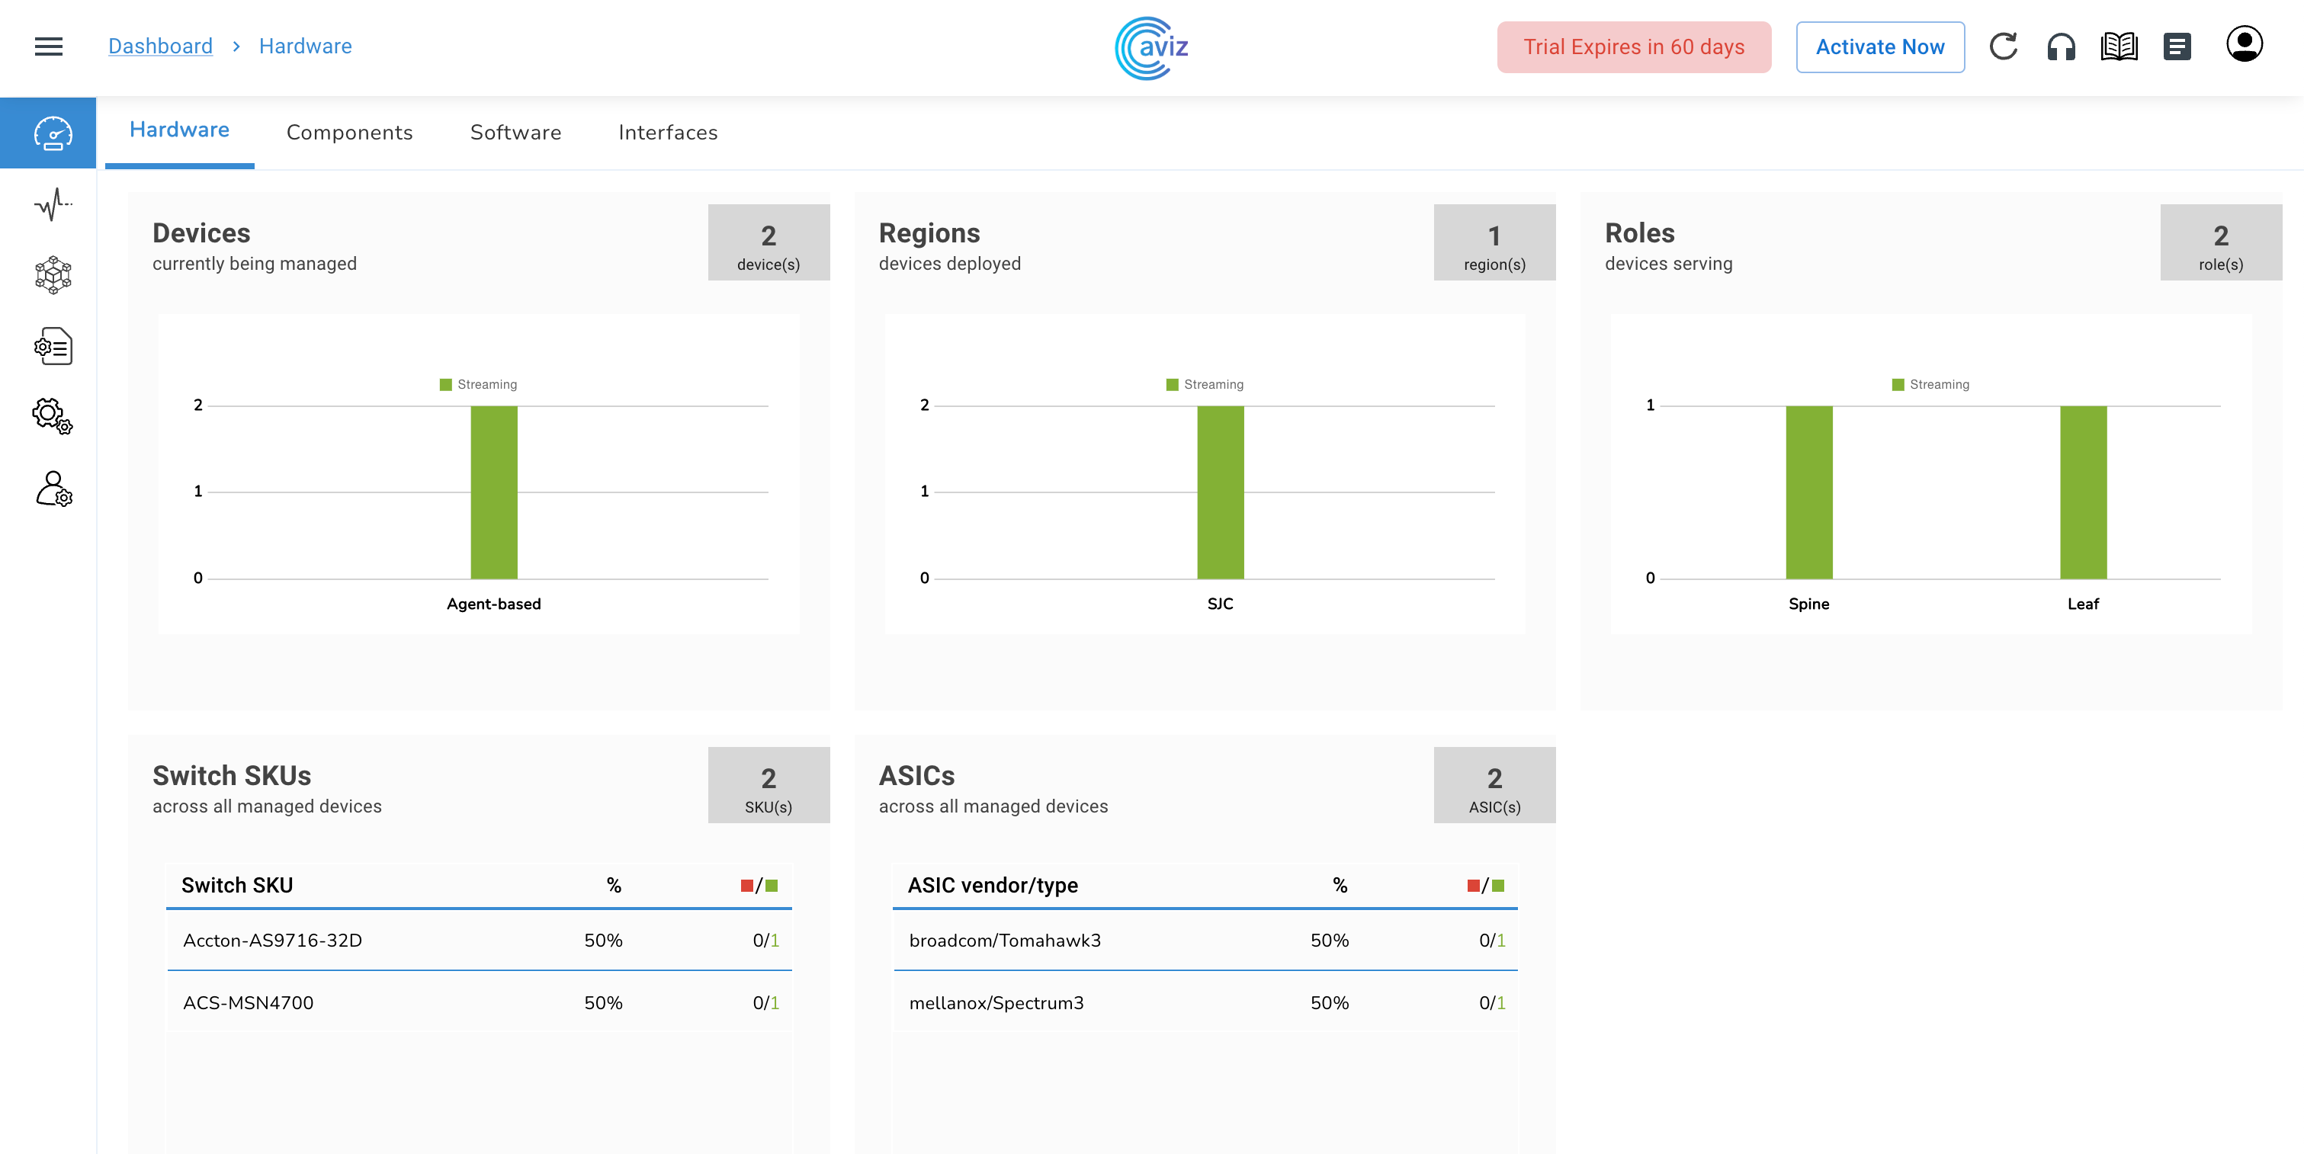
The dashboard provides the NetOps with an overview of the data centre. It contains the entire hardware inventory of the network and shows the status whether these switches are streaming or not streaming.
Feature
Use
After the Installation of ONES Application for the first time, the Dashboard is empty and Devices need to be onboarded for them to reflect
Dashboard will be used to
monitor the status of an agent running on all the devices present
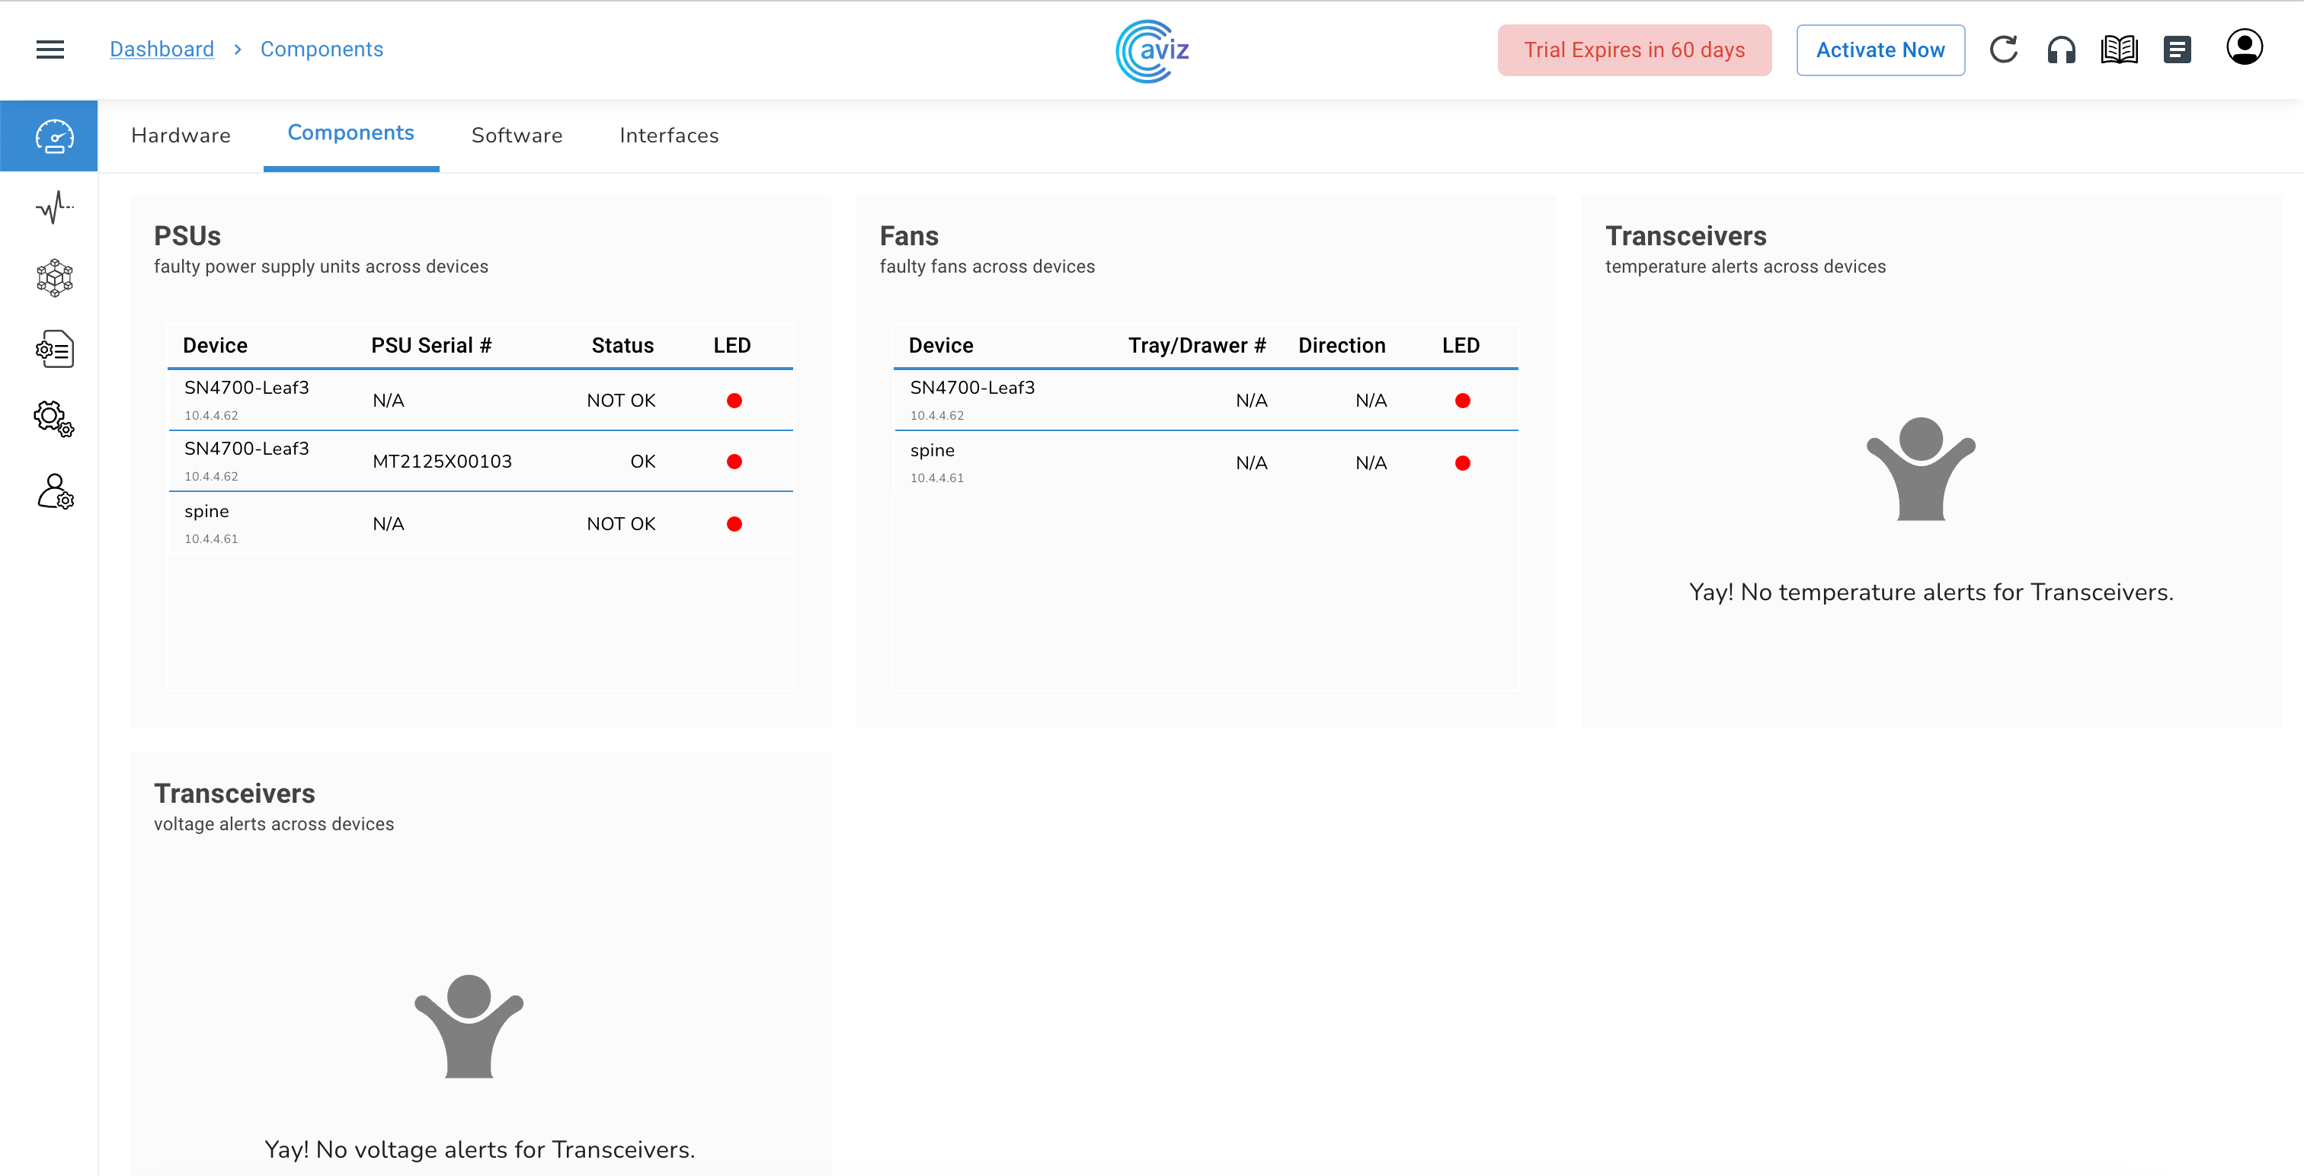
Components
Navigate to Dashboard >> Components
Feature
Use
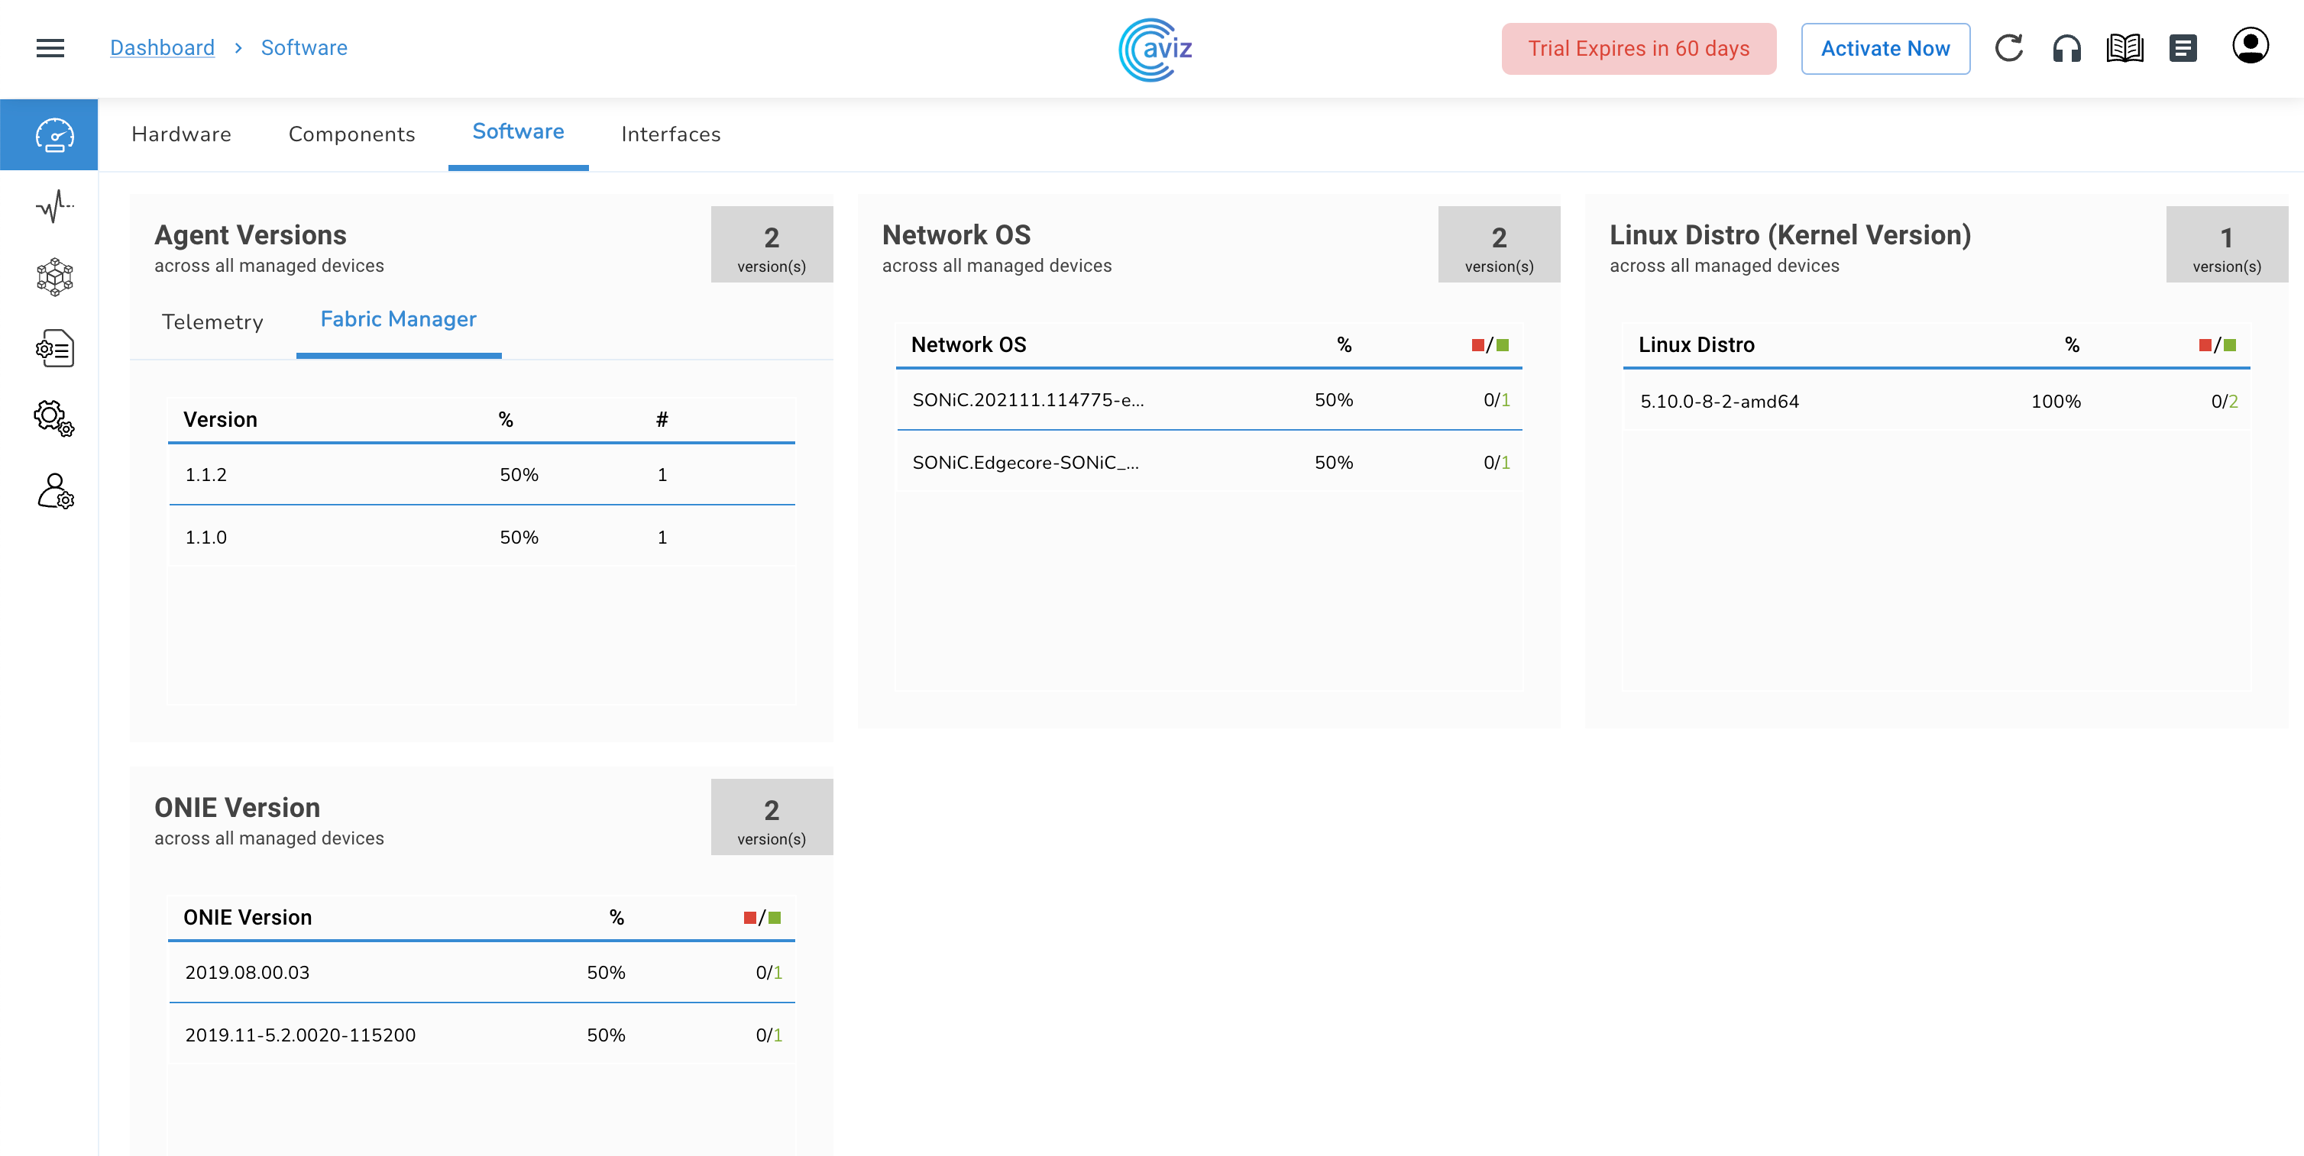
Software
Navigate to Dashboard >> Software
Feature
Use
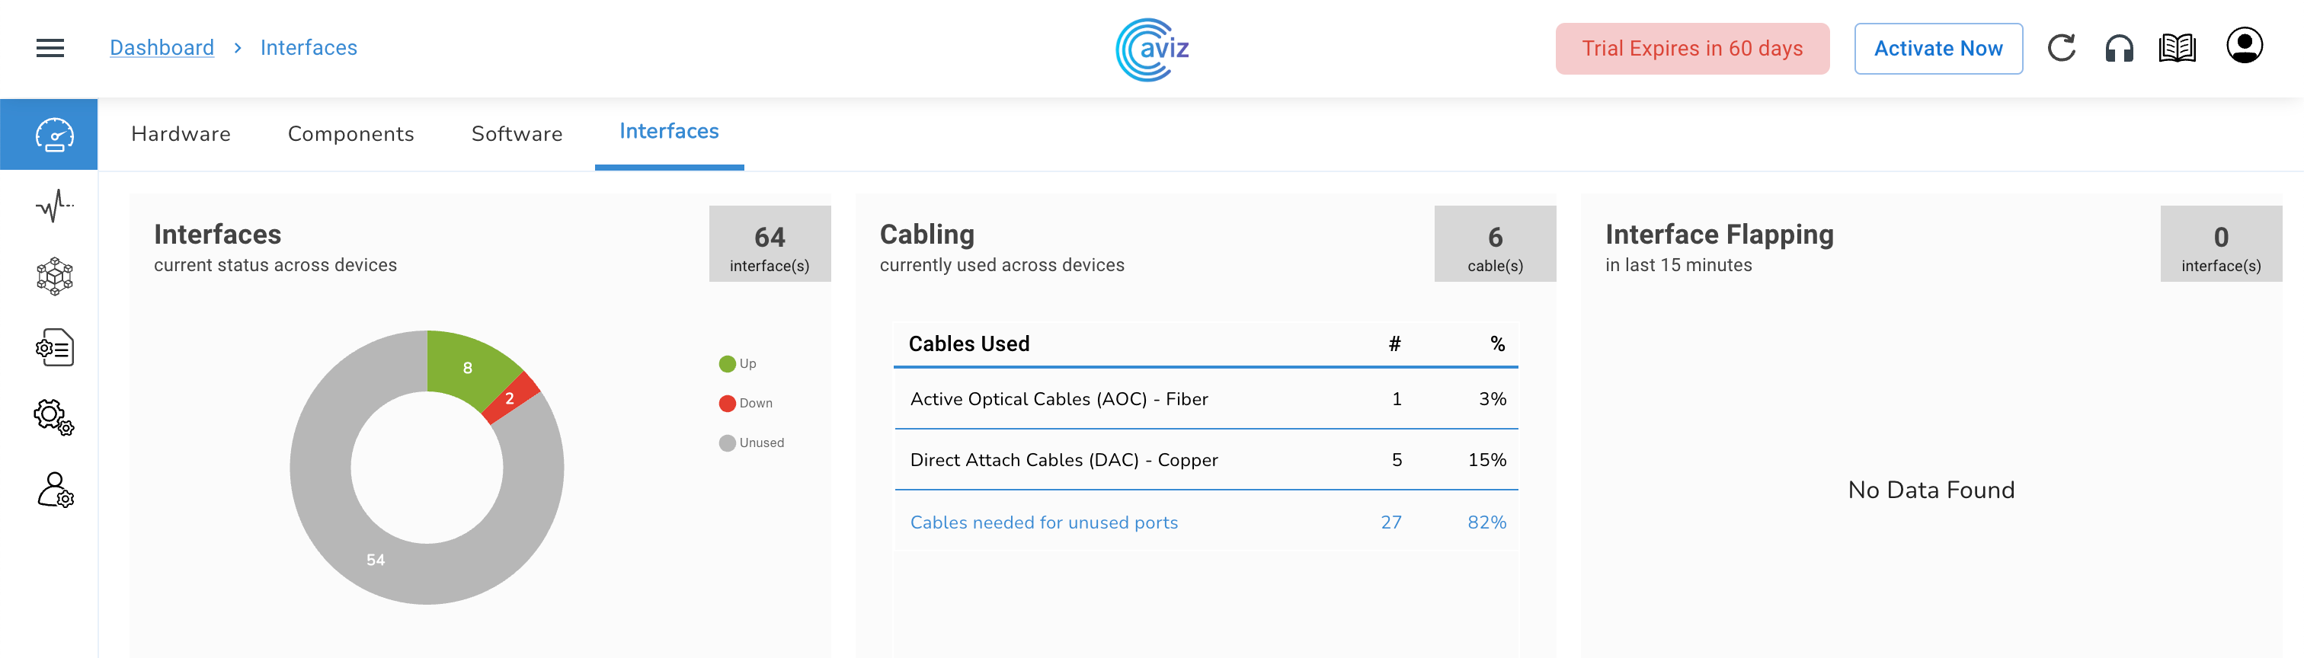
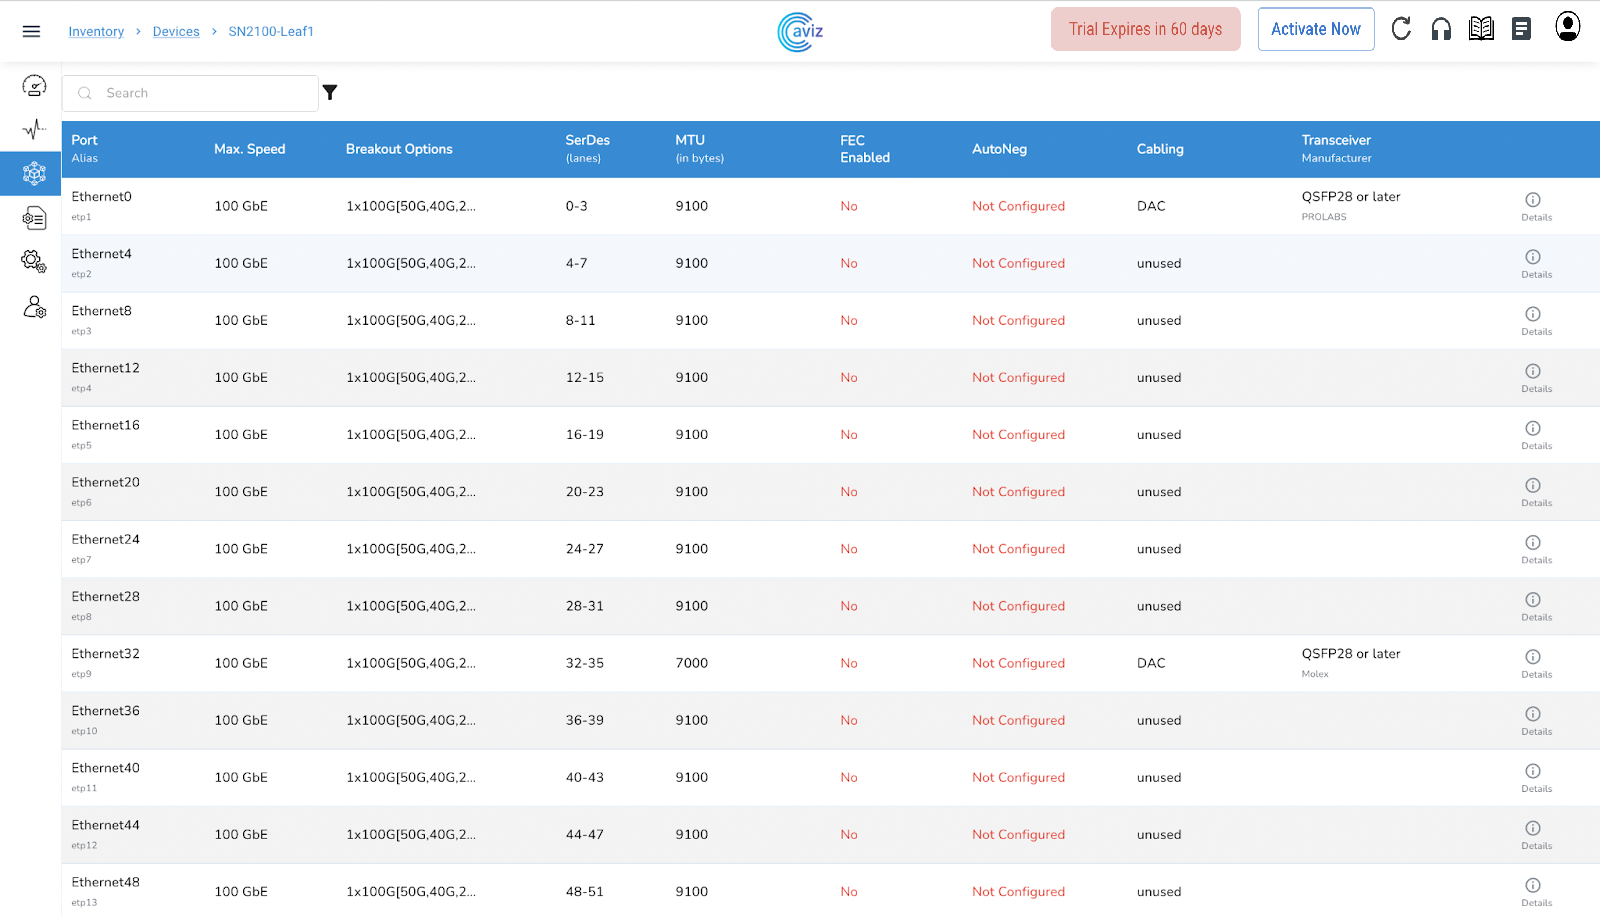
Interfaces
Navigate to Dashboard >> Interfaces
Feature
Use
Using this page a user gets the status of
the cables utilized in the network
how many pairs of cable can be used for future topology (helps the admins in capacity planning)
Device Roles and associated Regions and
Details of Switch Hardware SKU and ASICs
interface to identify if any power failure is happening over the interface
Devices
Status of Switch
Not Streaming: The device is Inactive/Unreachable
Streaming: The device is in a Working state
Regions
Status of Regions, their Location and Device Mappings
Roles
Device Roles in Customer Environment
Super-Spine
Spine
Leaf
ToR
Switch SKUs
Switch Hardware Vendor, Model Number and SKU
ASICs
ASIC Vendor, Model and Hardware version details
PSUs
Shows the list of
all faulty Power Supplies across managed switches
LED status of managed switches
Fans
Show the list of
all faulty fans across managed switches
airflow direction of faulty fans for troubleshooting
Transceivers Temperature
Temperature readings and alerts for Optics
Transceivers Voltage
Voltage readings and alerts for Optics
Telemetry Agent version
version across all managed switches
distribution of Agent-based vs Agent-less switches
Device Status (Up/Down) based on Distro
Orchestrator Agent version
version across all managed switches
Agent Health - Up and Down
Network OS
NOS status and version across all managed switches
Distribution based on NOS versions
Device Status (Up/Down) based on NOS versions
Linux Distro
version across all managed switches
Distribution based on Linux Distros
Devices Status (Up/Down) based on Linux Distro
Interfaces
Total number of ports available across devices
Status of Up interfaces across devices
Unused interfaces across the devices
Cabling
Total number of cables used across devices
Cable type used across device
Fiber
Copper
Count of cables required for unused ports
Interface Flapping
Information on Flapping Interfaces
Agent Status of a Device for a Down
Interface Historical Flaps starting with 15-minutes interval
Provides two types of Status:
#of interfaces flapped
Device not streaming
Agent Version Running on all devices
Fabric Manager Version Running on all devices
Installing ONES Agents
Overview
ONES requires user to install the below agents on SONiC NOS to allow Network Orchestration and Visibility
ONES Orchestrator Agent for Network Orchestration
ONES Telemetry Agent for Telemetry Data Streaming (Network Visibility)
NOTE: for non-SONiC switches,
OpenConfig feature on its NOS needs to be enabled for Network Visibility (Telemetry Data Streaming)
Network Orchestration is not supported
Subscription
ONES provides the following subscriptions to manage and monitor the devices.
The installer file will automatically detect & will process fresh installation or upgrade to the new version
NOTE:
By default, the installer has license for 8 devices upto 60days
ONESv1.1 support SSL certificate integration
User can choose YES if the User wants to integrate own SSL certificate
The installation allows a user to enable DB backup
Users can choose the local or remote location to backup the database
By-Default application creates a database backup in every 86400 seconds(1 day), but user can modify it as per the requirement
NOTE: The system might have multiple IP addresses, so the user can use any IP to access ONES-UI.
Installation begins
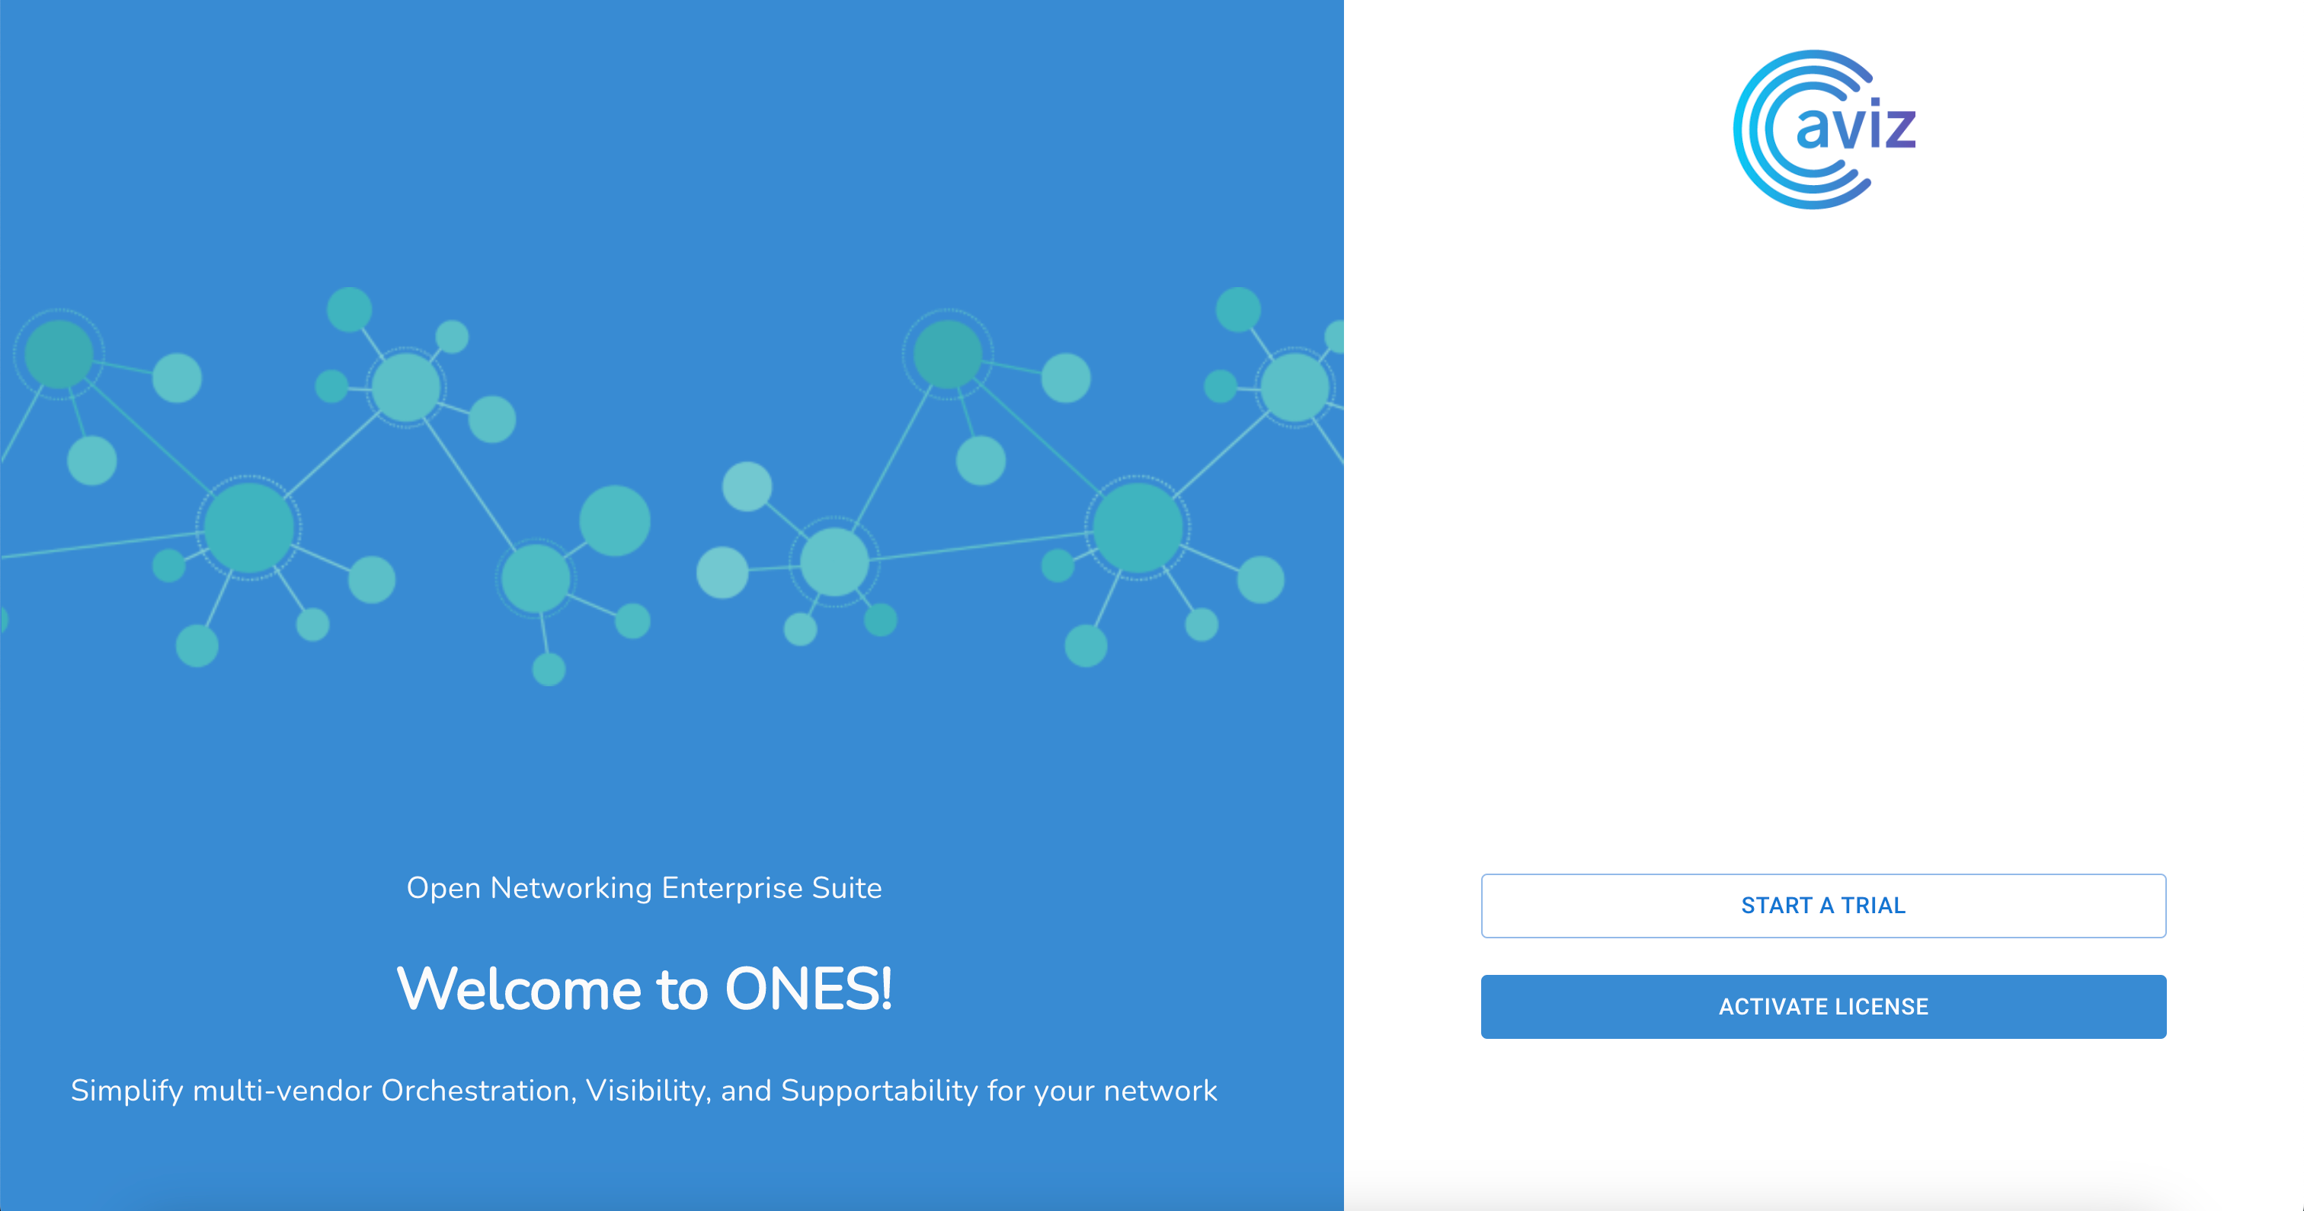
Access ONES Application Web GUI from a supported browser using https://<host-ip>
Activation:
For Trail, user can choose Start A Trial
Then user can choose Activate License if user has activated key to supporting more then 8 devices
Start A Trail
Use Default credentials as below;
Username: superadmin
Password : Admin@123
Password should contain:-
Minimum Password Length - 8 characters
Maximum Password Length - 24 characters
Character Support - Alpha Numeric
Login To ONES
After Resetting the password use new credentials to login
You will see the default Dashboard → Hardware view
Choose NO, if the user does not have their own SSL certificate and wants to use the certificate provided by AVIZ
By-Default application creates 5 backups and once it will add one more it will remove the first copy of the database, User can modify the number of backup files at the time of installation
Update/Change your password on the first login
Special Characters - (# @ $ ! & % only)
Character Rule - At least one Upper Case and one special character
Fresh install
Installing ONES application...
Do you want to install SSL certificates? [y/n]n
Using self signed certificates.
Local backup:
Do you want to enable DB backups? [y/n]y
Where do you want to store the backups? [local/remote]: local #local keyword trigger local database on server
Enter the backup directory: ./backups #Enter the server directory in which user wants to take backup
Enter the backup interval in seconds : 86400 #Enter the time in seconds to take backup after every interval
Enter the number of backups to retain (Older backups will be deleted): 5 #Enter the number of backup user wants to create
Remote backup:
Do you want to enable DB backups? [y/n]y
Where do you want to store the backups? [local/remote]: remote #remote keyword trigger remote database on server
Enter the remote machine IP: 10.4.4.11 #Enter the Database Sever IP
Enter the remote machine username: dbserver #Enter the Database server username with write permission
Enter the remote machine password: #Enter the Database Server password
Enter the backup directory: ~/dbserver/backups #Enter the Database server directory in which user wants to take backup
Enter the backup interval in seconds : 86400 #Enter the time in seconds to take backup after every interval
Enter the number of backups to retain (Older backups will be deleted): 5 #Enter the number of backup user wants to create
Fresh install
Installing ONES application...
Do you want to install SSL certificates? [y/n]n
Using self signed certificates.
Do you want to enable DB backups? [y/n]y
Where do you want to store the backups? [local/remote]: local
Enter the backup directory: ./backups
Enter the backup interval in seconds : 86400
Enter the number of backups to retain (Older backups will be deleted): 5
Loading docker images..
Loading Collector..
92a4e8a3140f: Loading layer 83.87MB/83.87MB
...
...
...
Creating default user accounts
Aviz S3 Apps tables [AccessToken,ACL,RoleMapping,S3Role,S3User,S3Acl,S3RoleAclMapping,Setting,S3ComponentAcl,S3RoleComponentAclMapping,RedundancySetting] created in postgresql
Total roles created: 1
Total s3acl created: 5
Total s3Componentacl created: 9
Total settings created: 5
User created!! username: superadmin
Installed ONES application successfully.
Open browser at https://<host-ip>
Settings
Overview
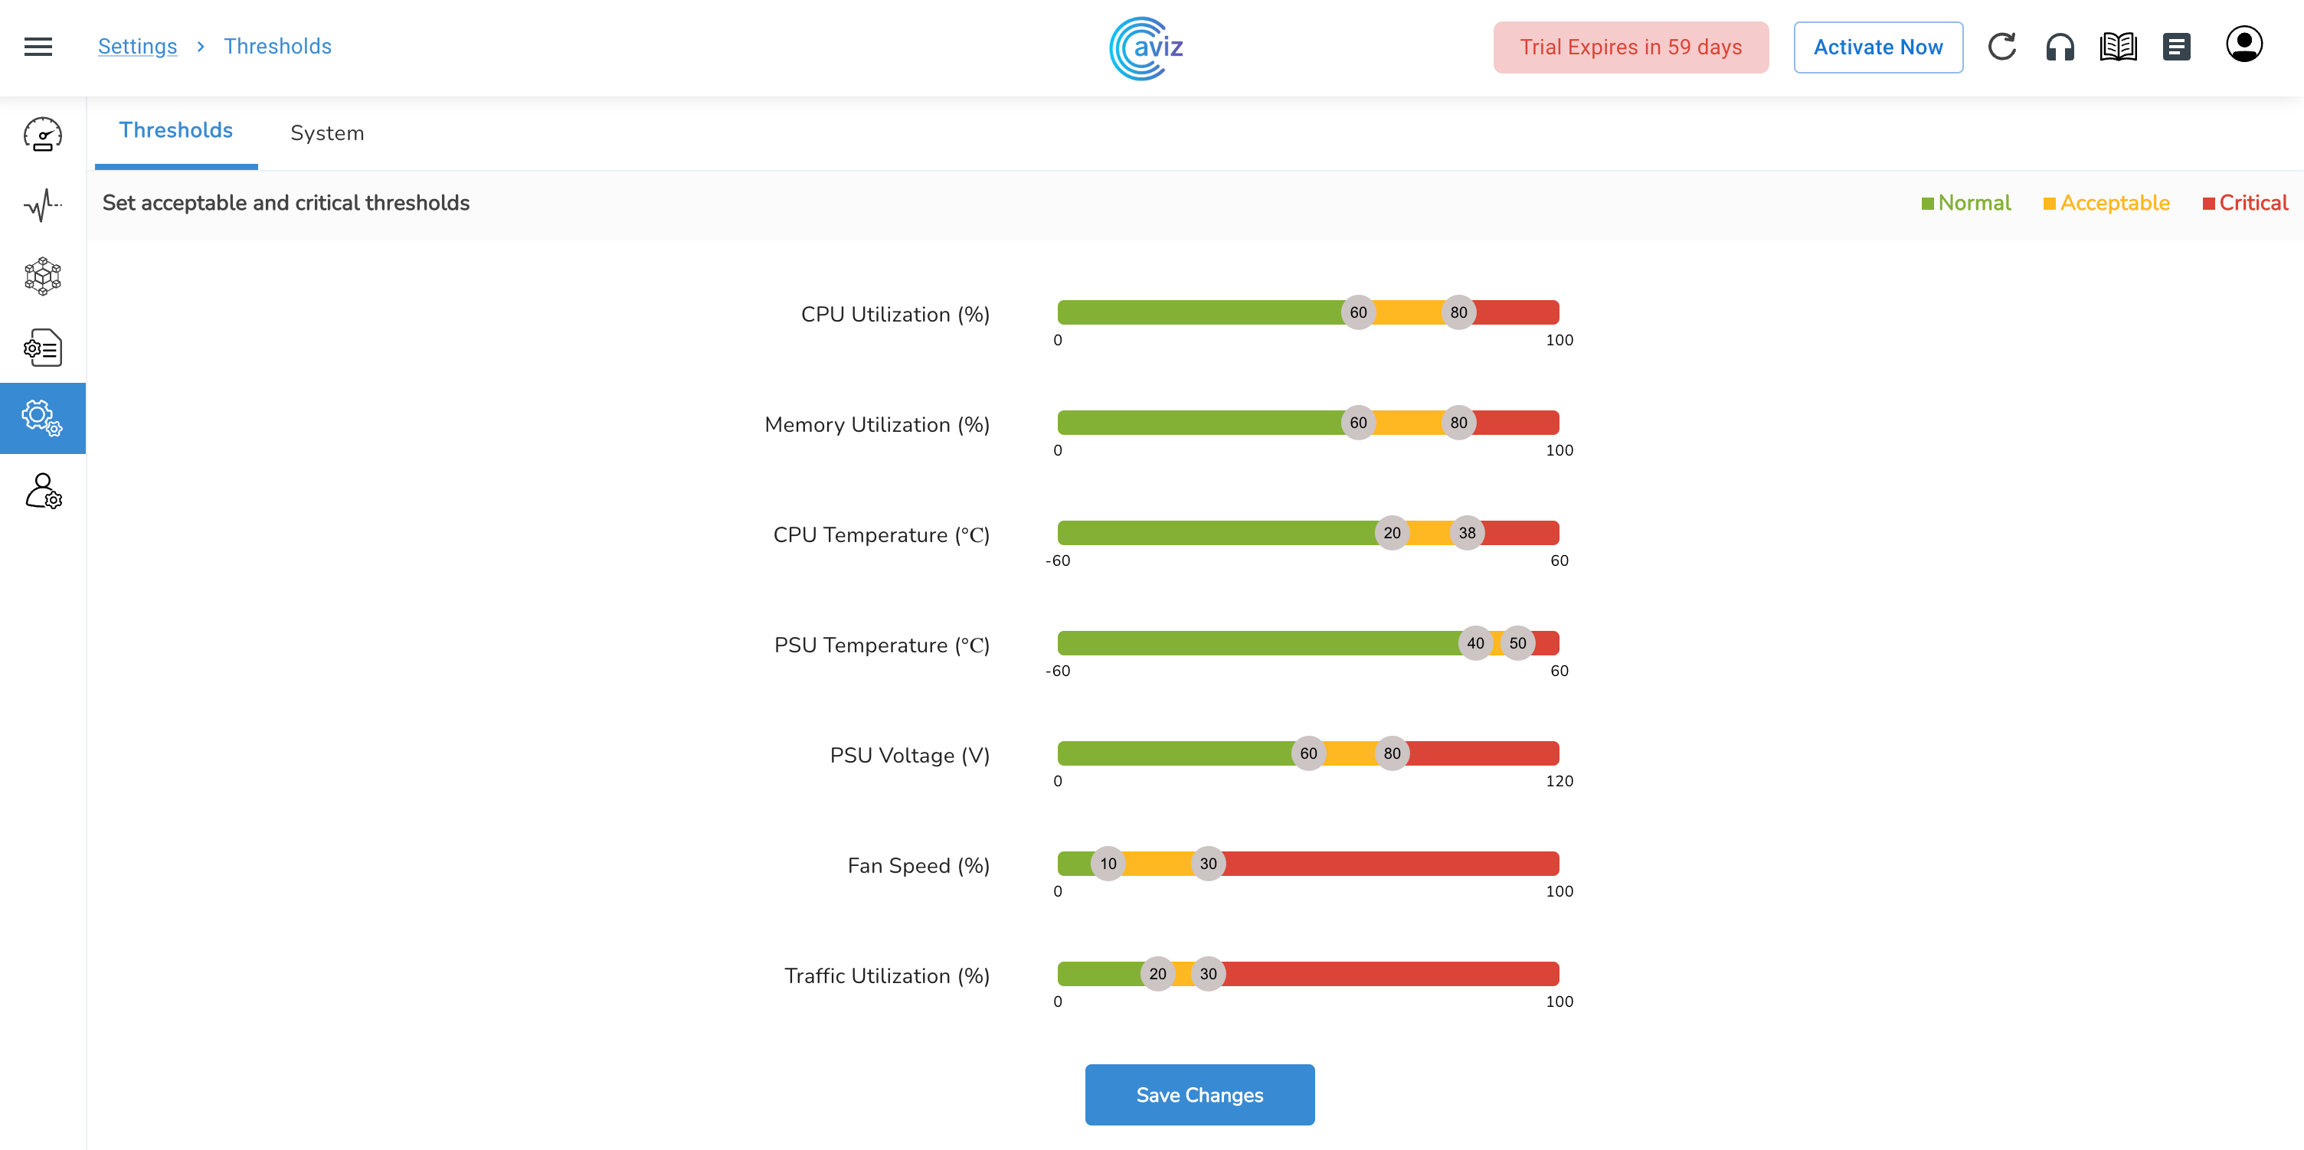
Using this feature setting we can set the acceptable and critical percentage level for the following device components
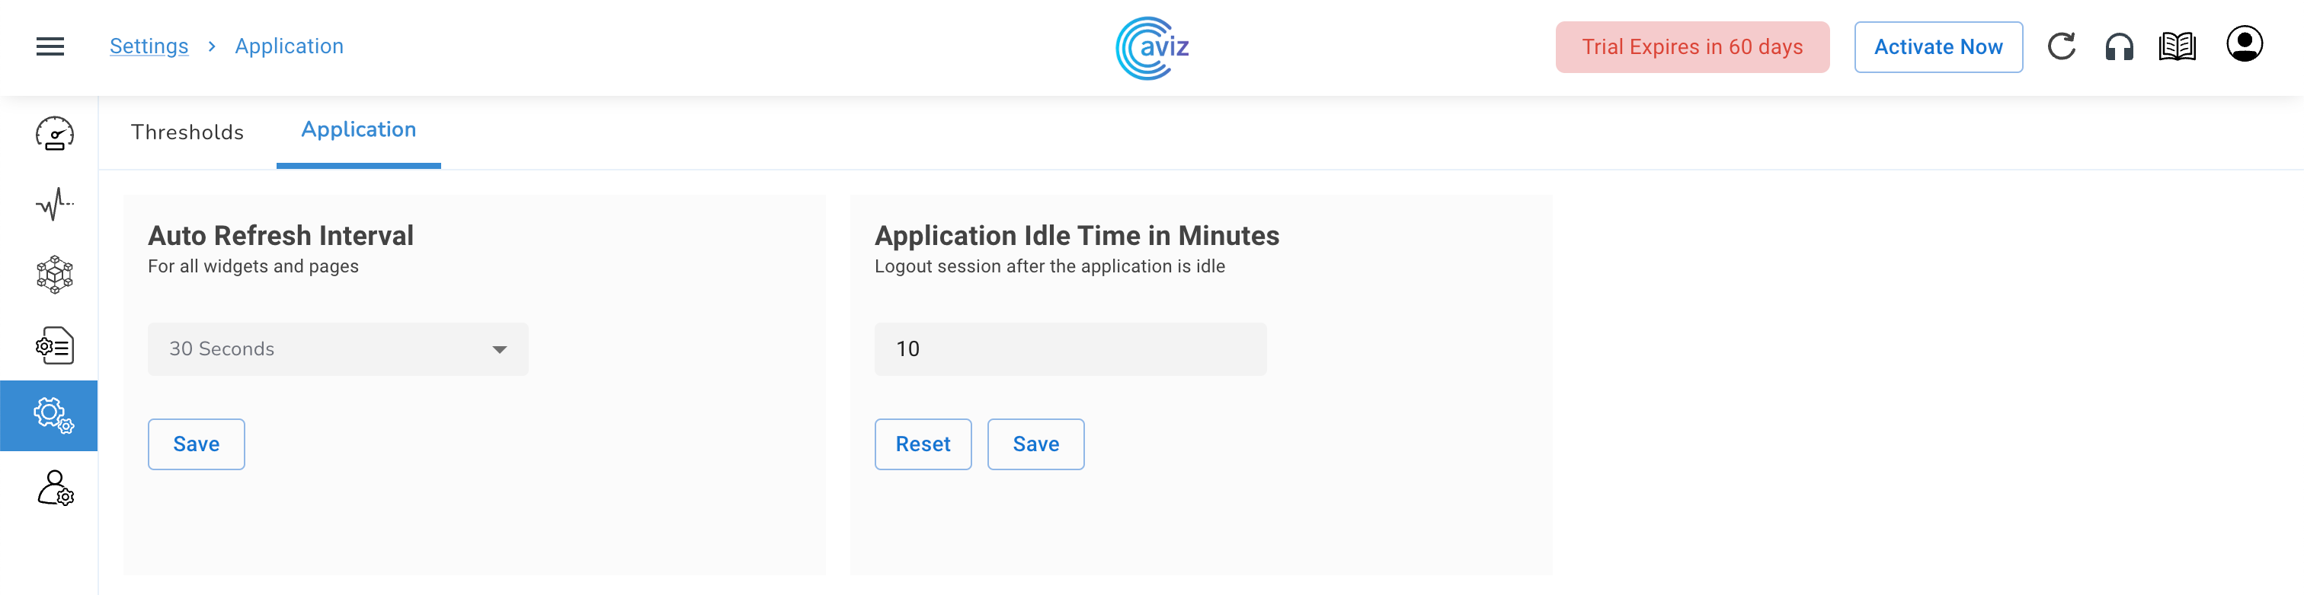
This page gives the control over the widget refresh timer and user idle state
Users can set the manual timer to refresh all the widgets after a time interval (default is 30sec)
Users can set the timer after how many minutes of idle state the ONES-UI should be logout
Thresholds we can set for Components
CPU Utilization
Memory Utilization
Thresholds
Navigate to Settings >> Thresholds
Change the values as per your requirements
Update it to get these new settings live, after Save Changes, all these metrics will be reflected on devices metric pages under Inventory
System Control
Navigate to Settings >> System
Using this page, users can change the refresh interval in seconds for all the widget
In the dropdown menu, available intervals are:
30 Seconds
Fan Speed
PSU Temperature
PSU Voltage
As per requirement, we can set different lower and higher threshold values for each component
User can see the acceptable and critical number of devices in the Monitor Health tab view
Navigate to Monitor >> Platform when any component breach the higher value
60 Seconds
90 Seconds
120 Seconds
Users can set the timeout in minutes for the ONES-UI
User Management
Overview
Use this feature to
Create new users and roles
Remove and suspend existing user one by one
Remove and suspend multiple users at the same time
Password reset of existing users
Only super admin or Enterprise admin can perform these actions
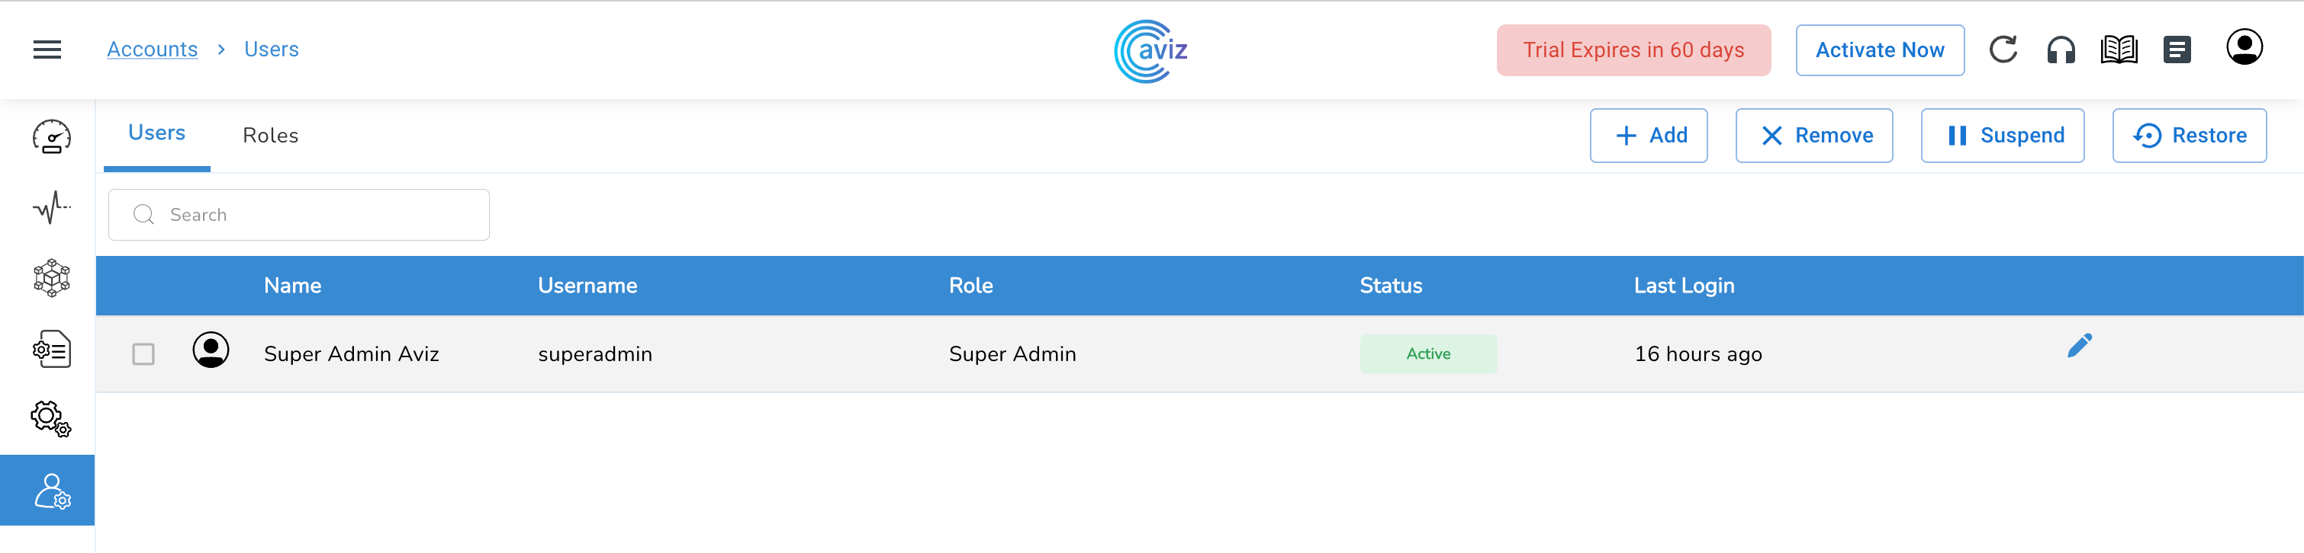
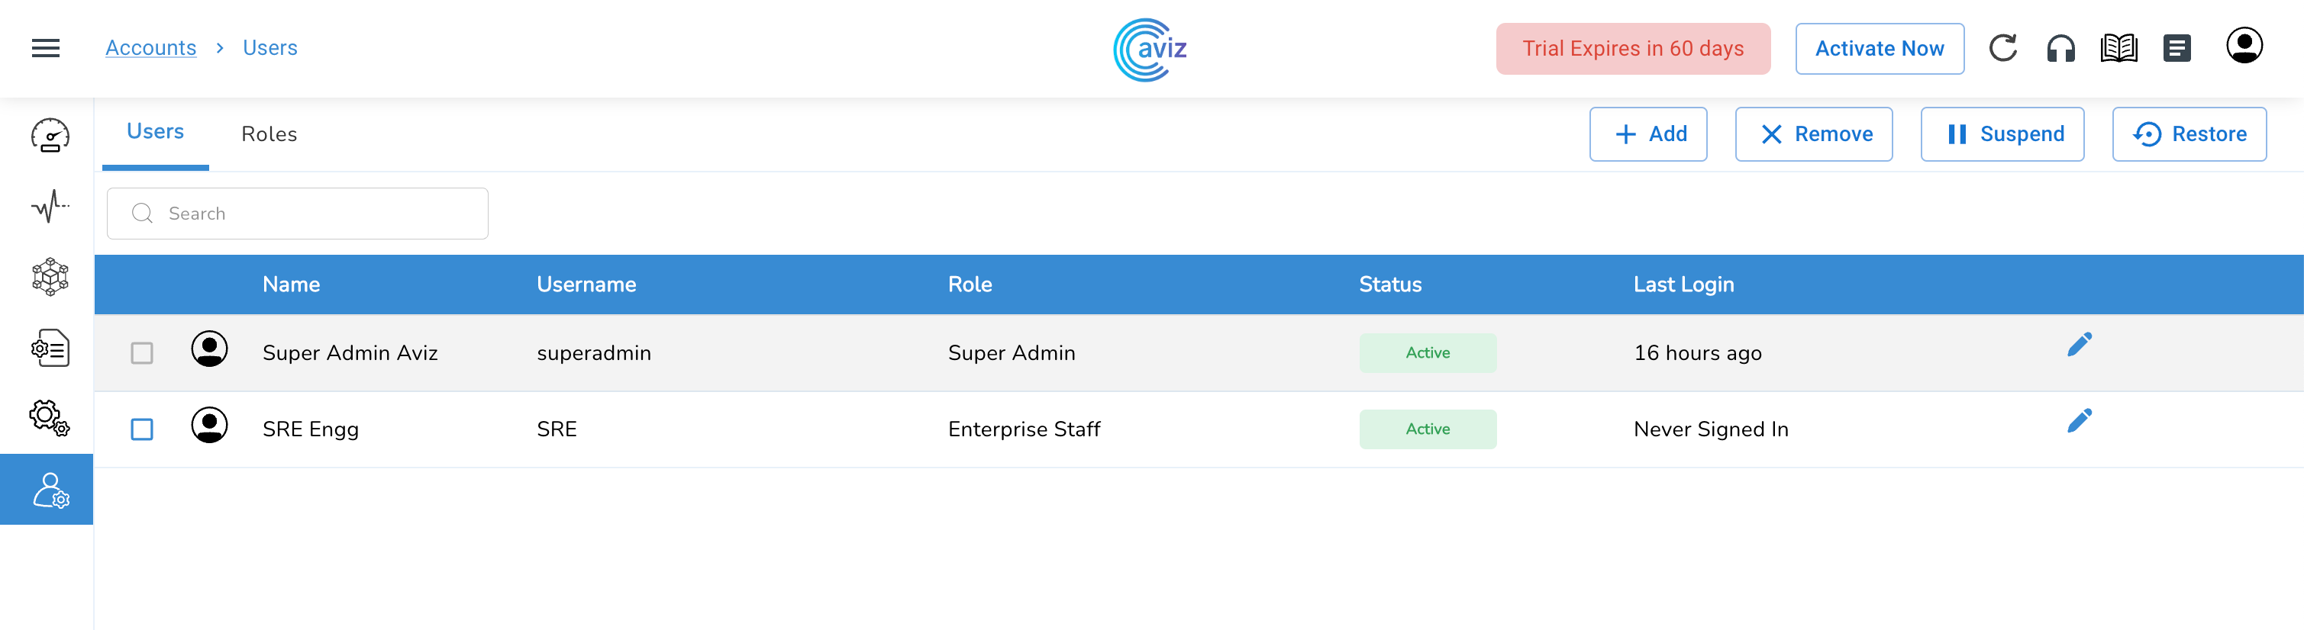
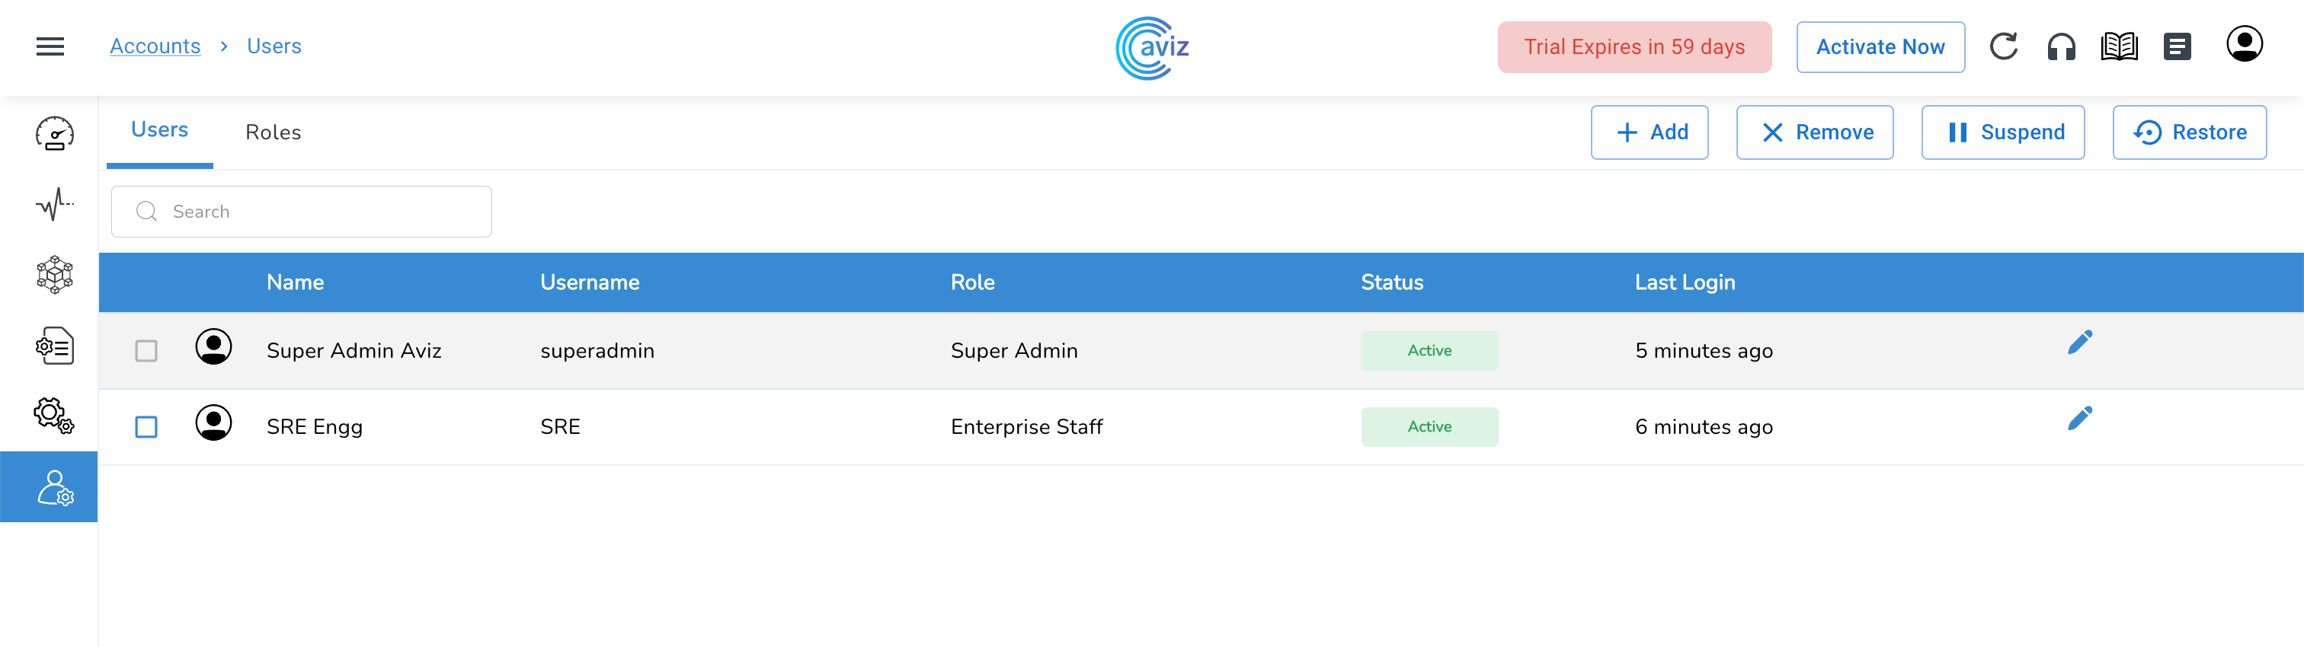
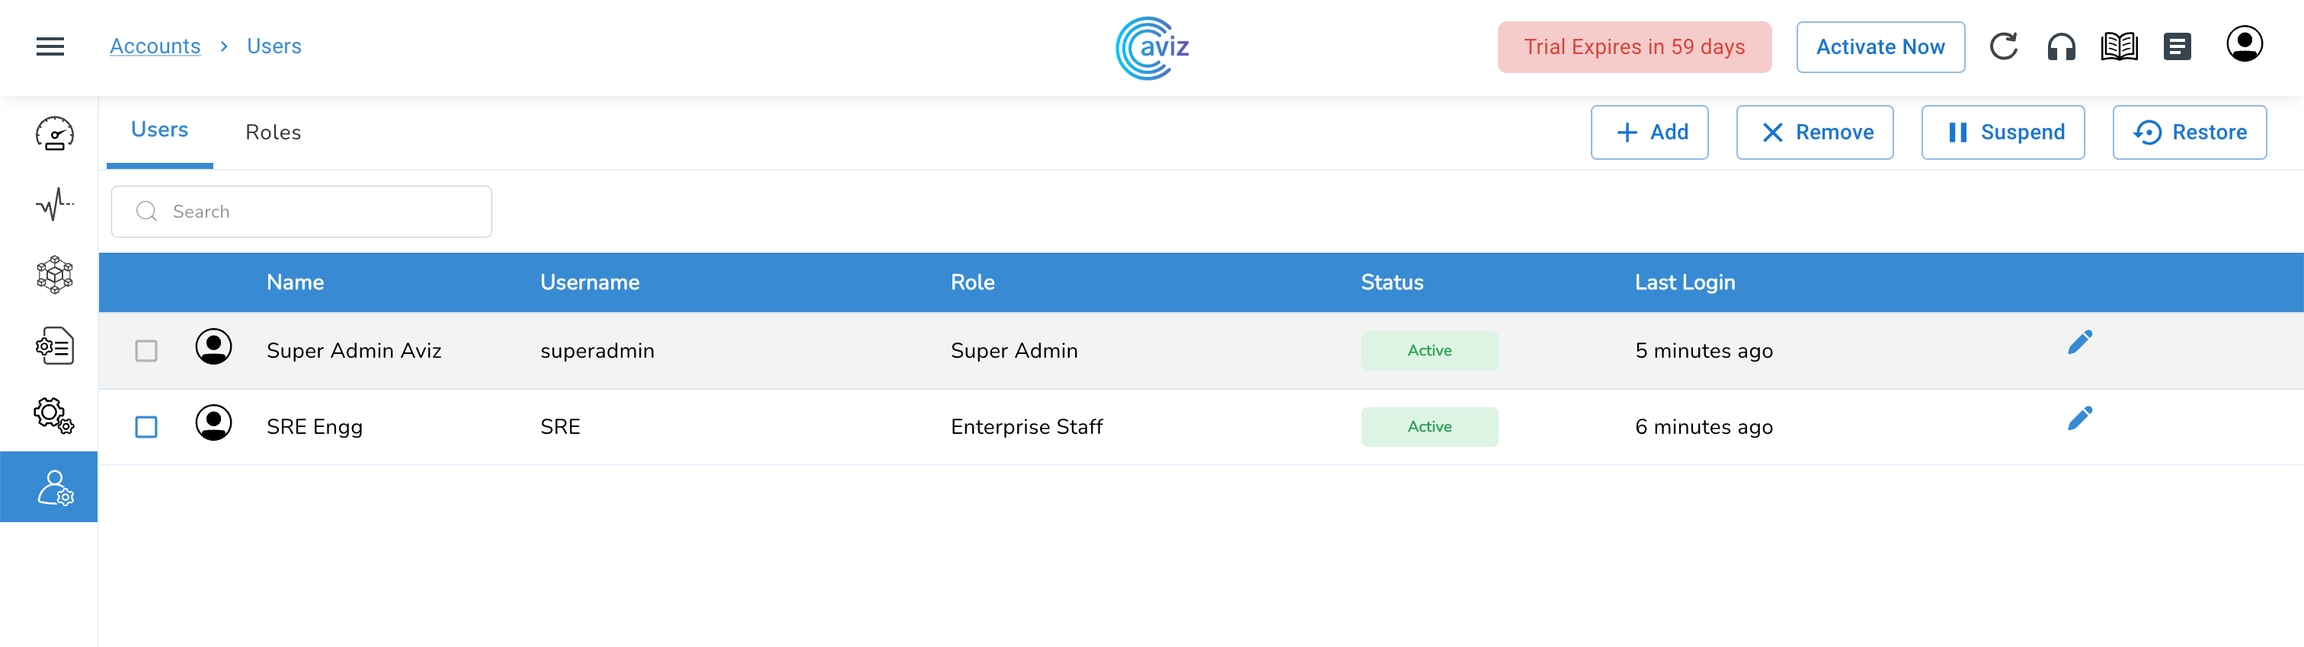
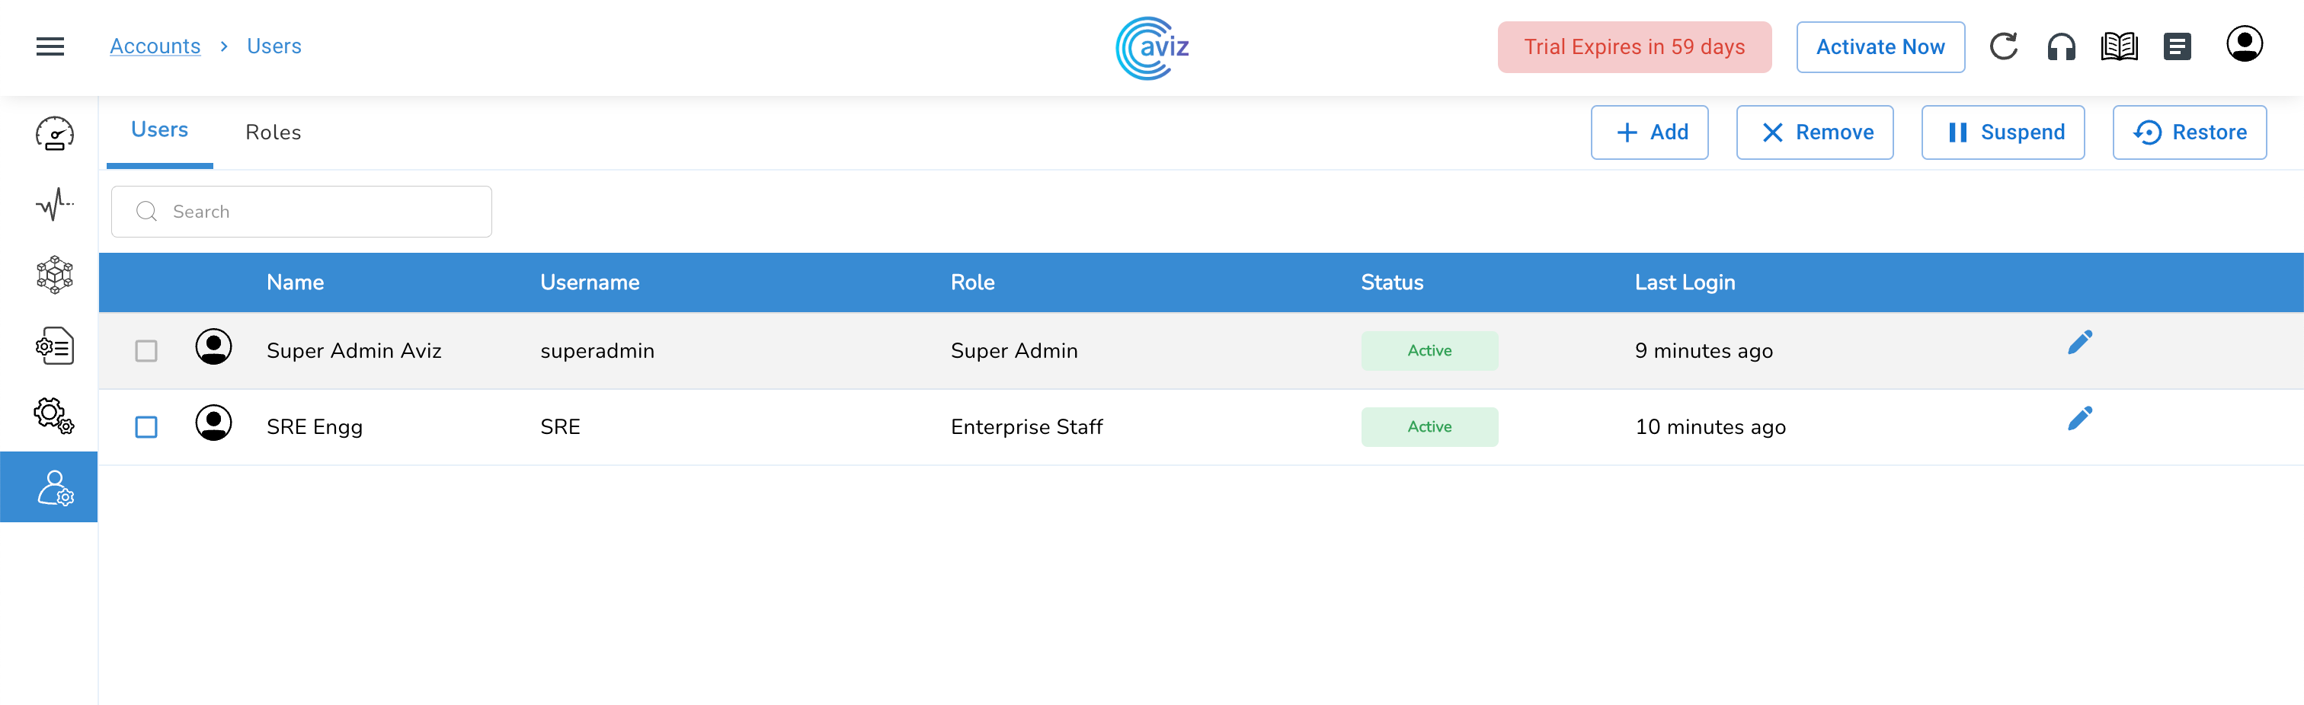
Users
Navigate to User Management >> Accounts >> Users
Initially, we get one default Admin User Credential
In this view, we get the User status and Role given to it and the Last login time by the user.
On this User tab, we can Add new users and can remove or suspend any existing users
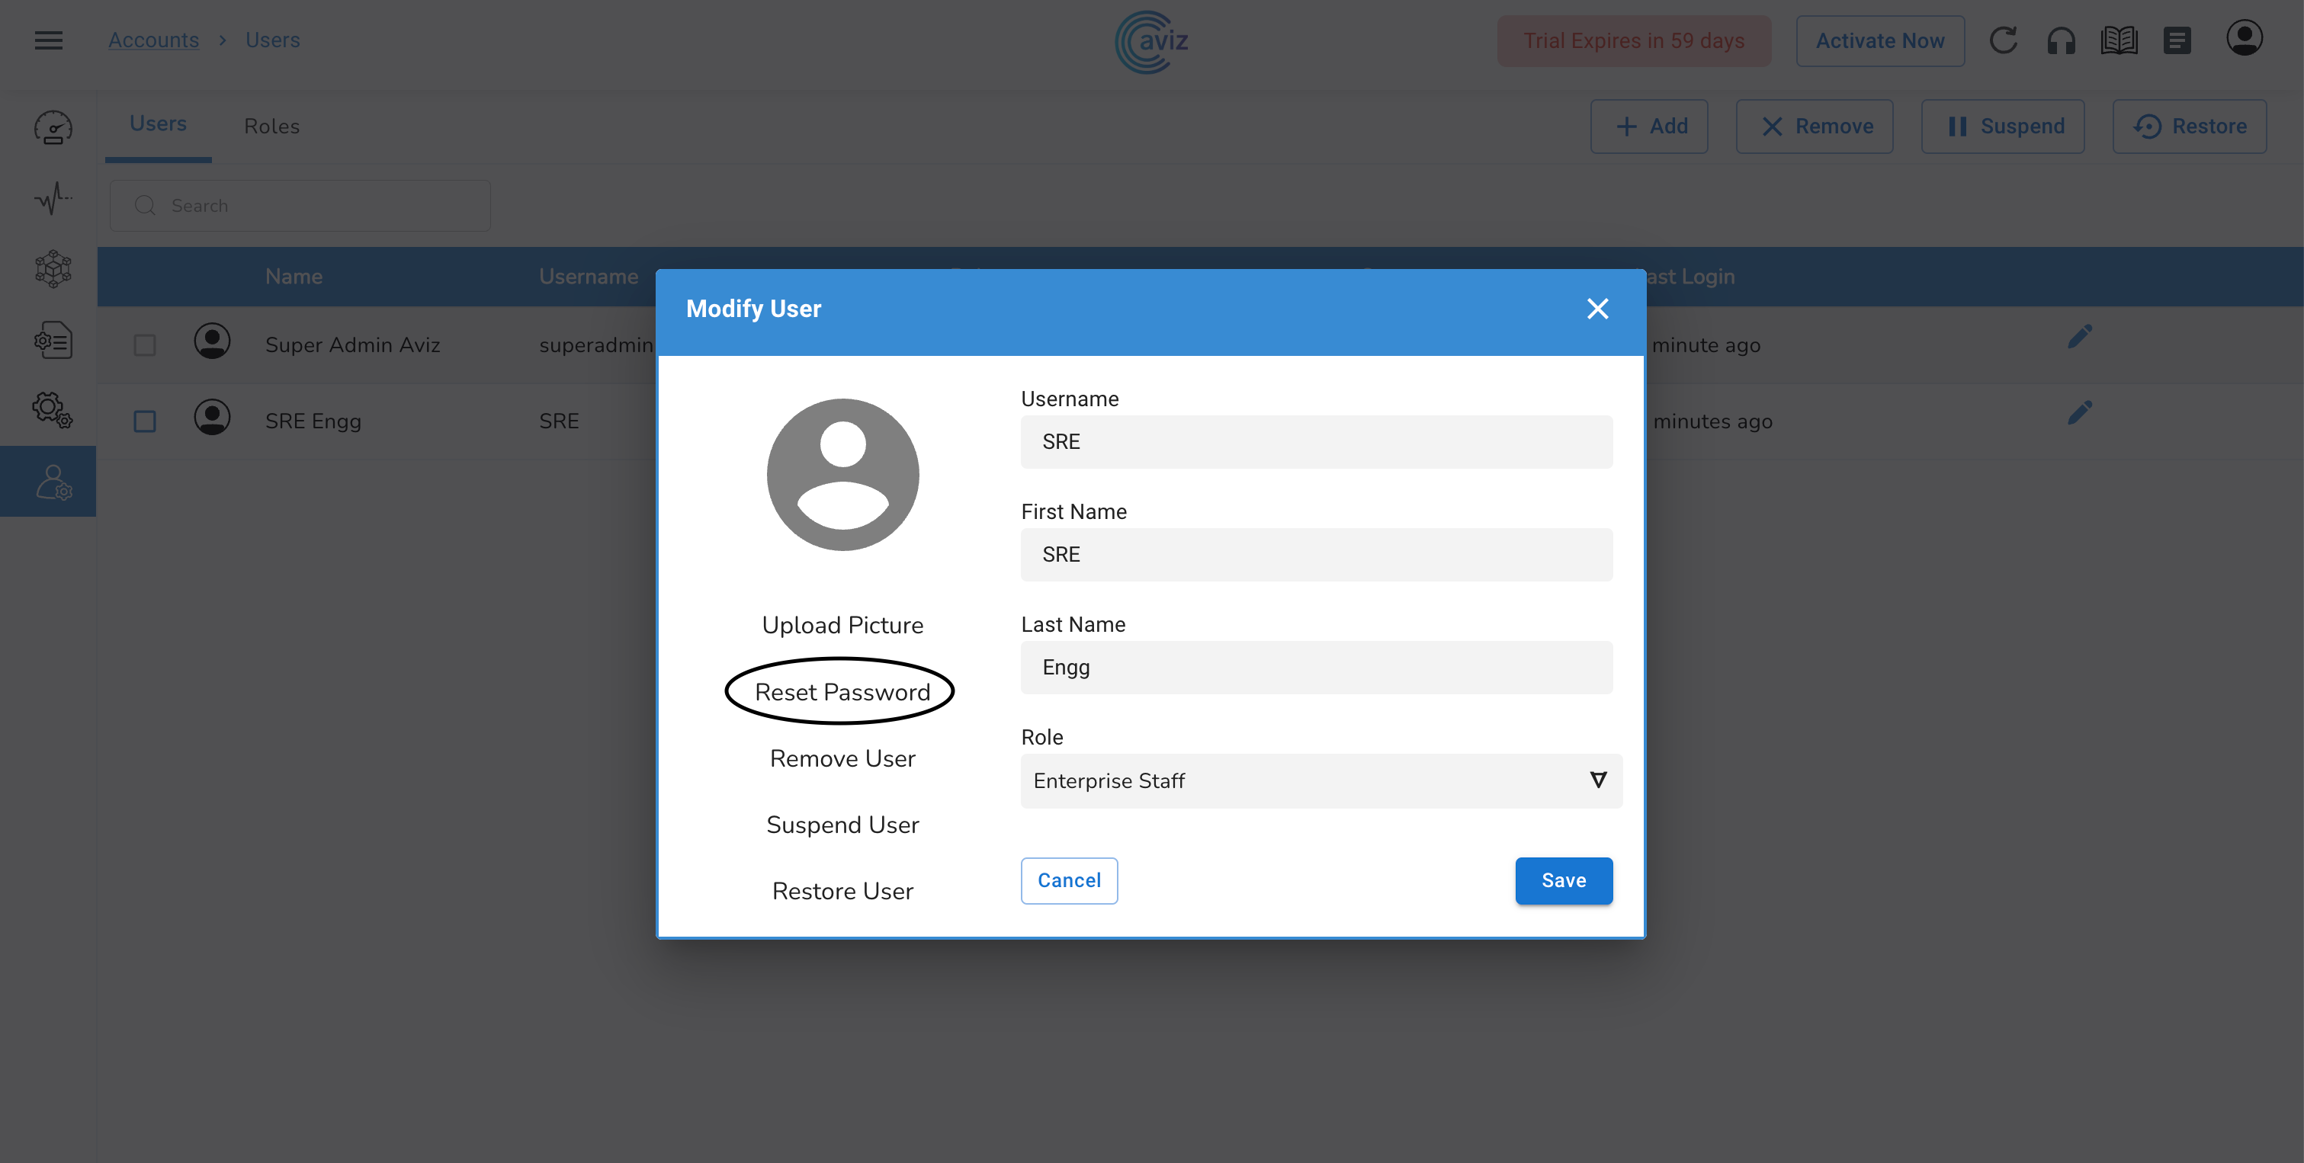
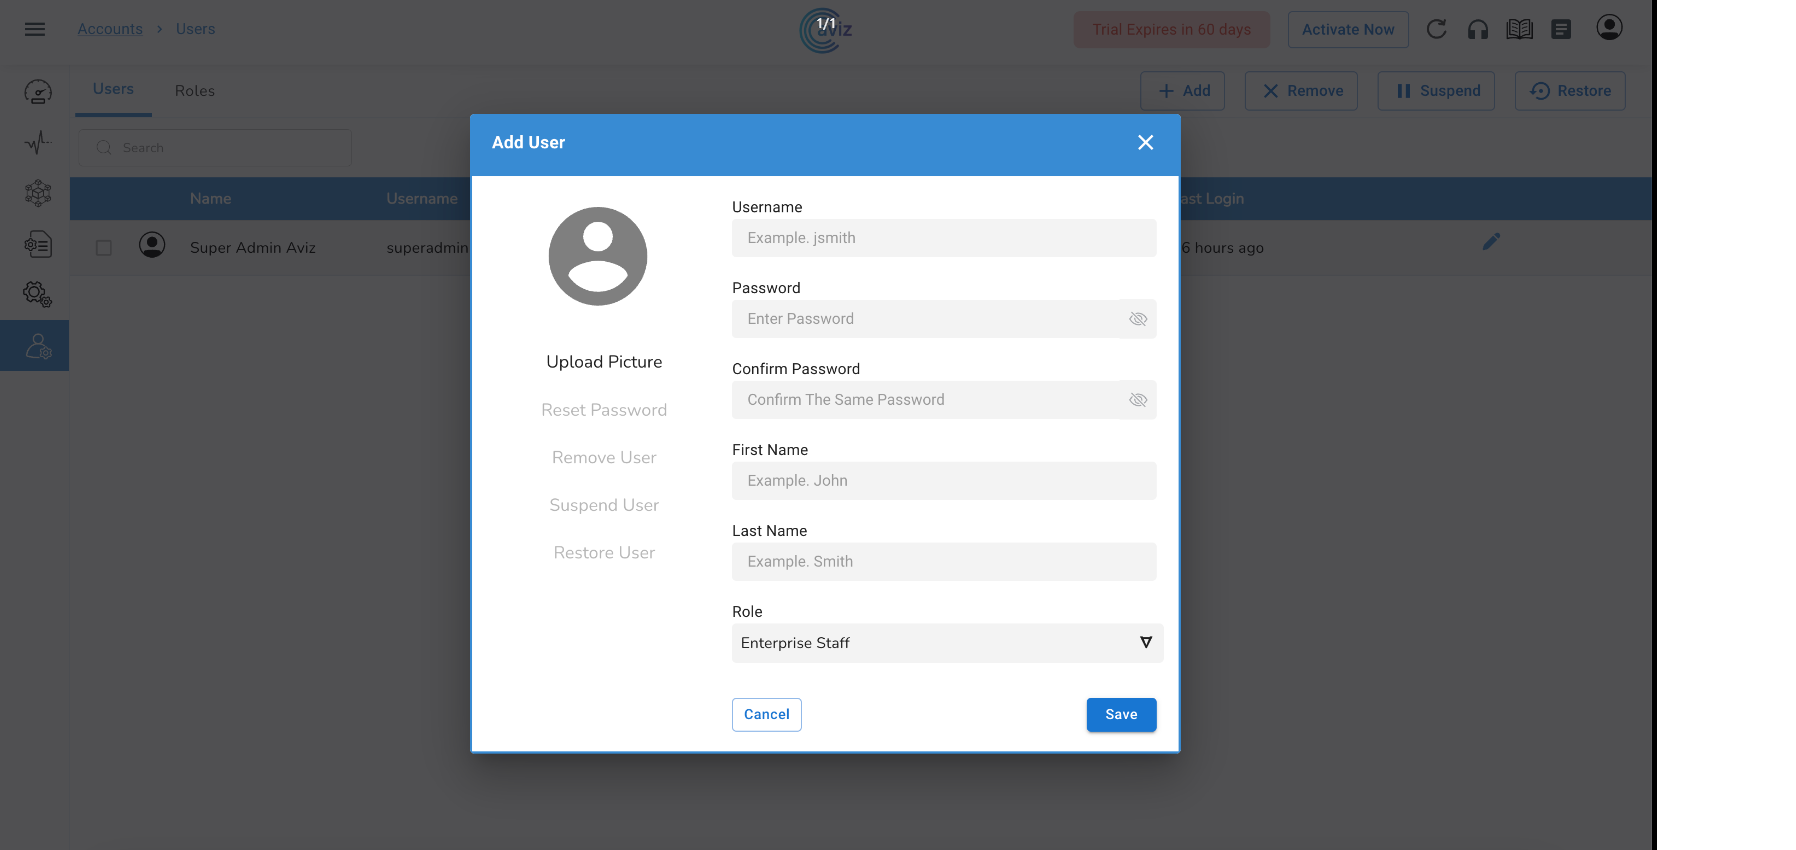
Users - Add New
Navigate to Accounts >> Users >> Add
Admin can add
Profile picture
Username
"on the first login by the user with given details, ONES application prompt with a screen to rest the password
Now User is ready to login with valid credentials
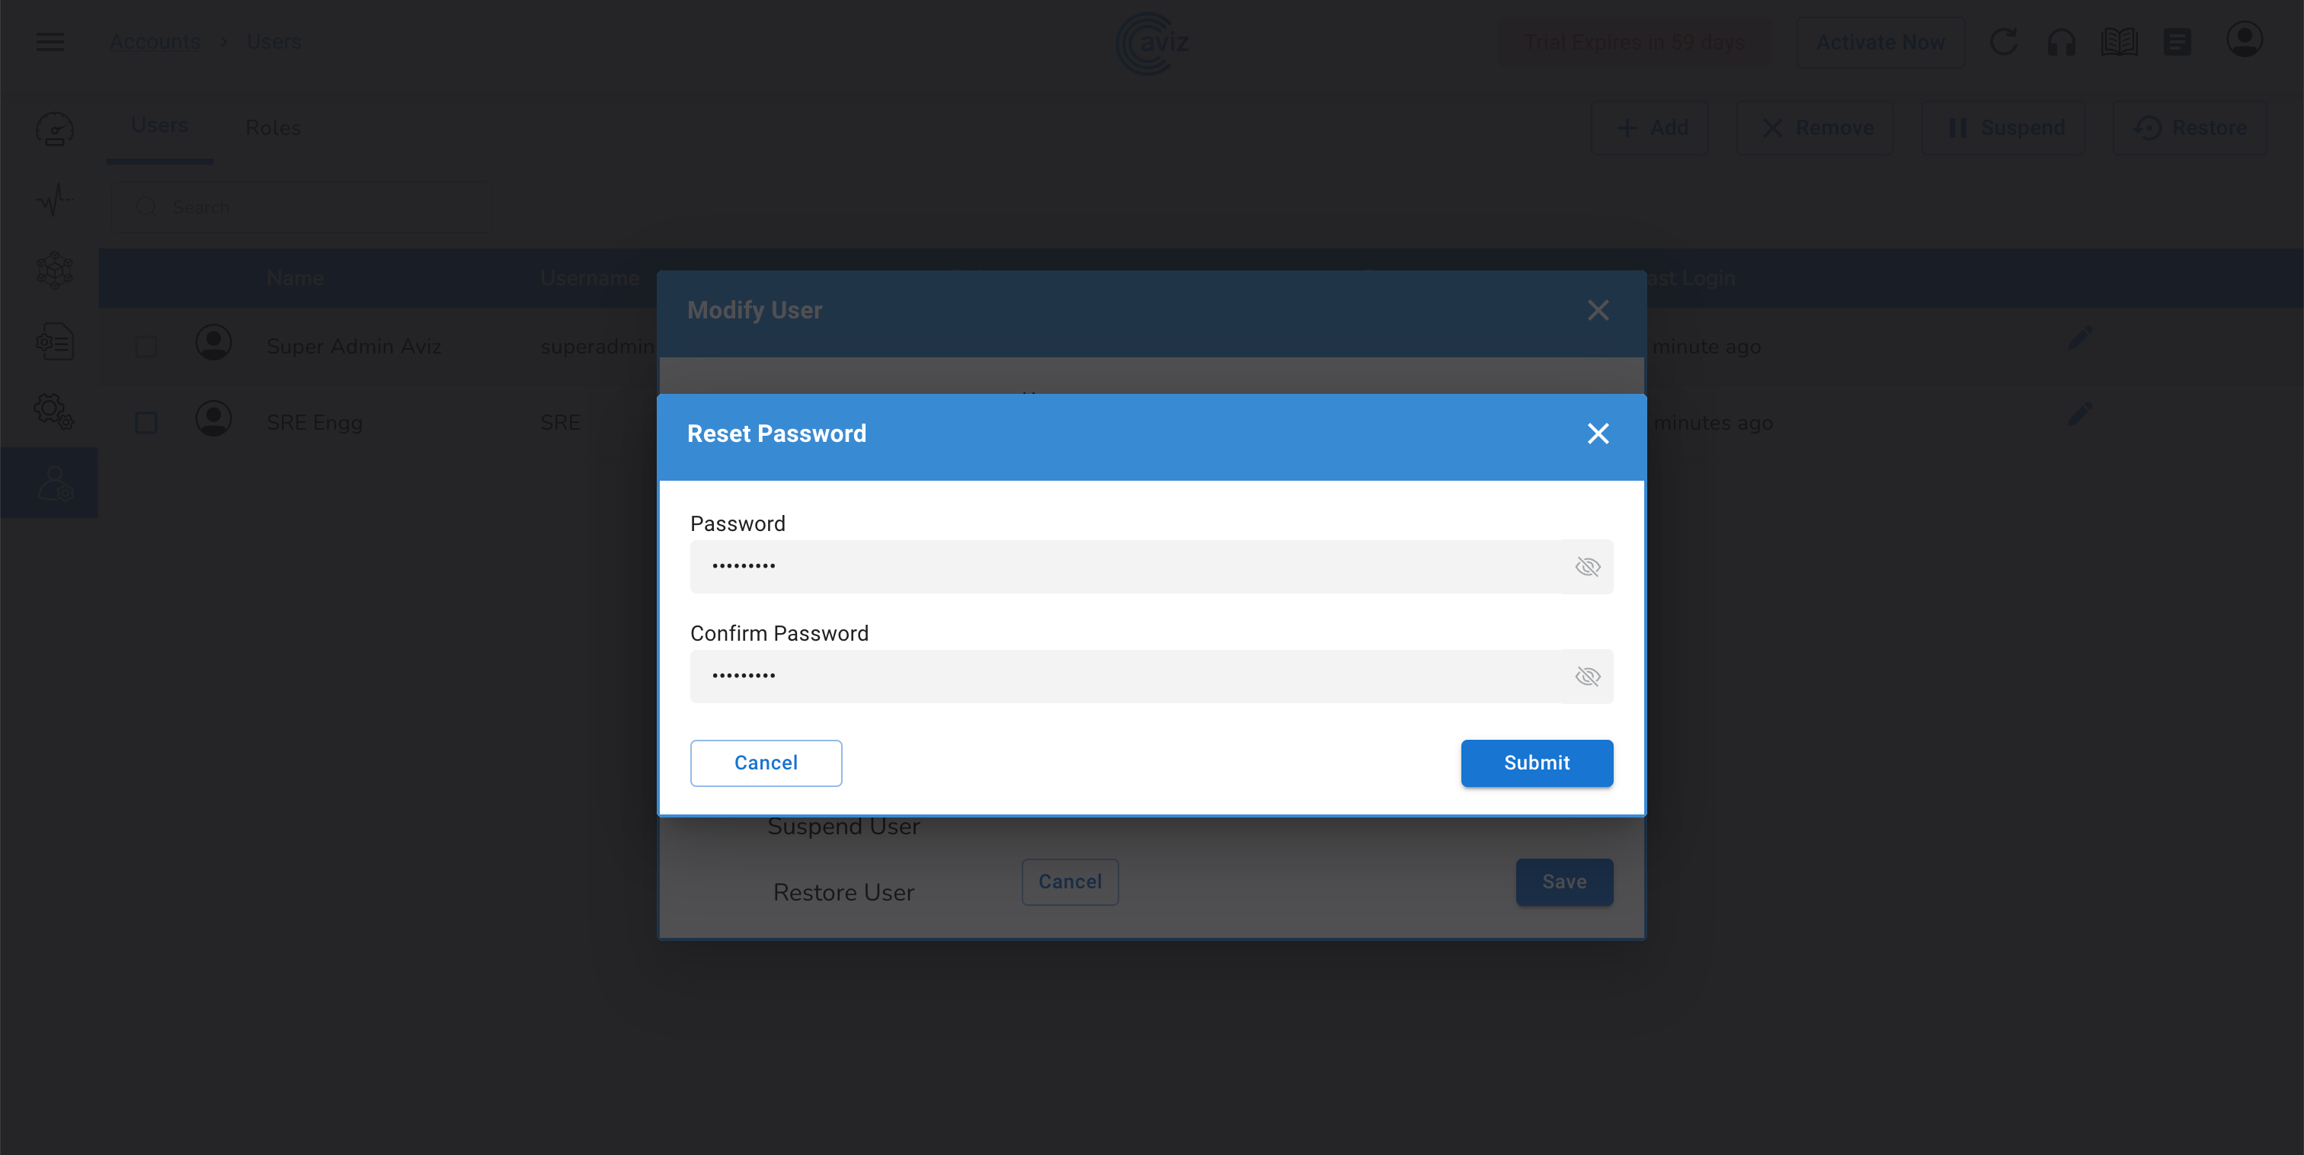
Users - Reset Password
Navigate to Accounts >> Users >> Edit User >> Reset Password >> Yes
Using Admin credentials you can reset the user password
Click on Reset Password
Submit & Save
After this user can try login with the temporary password, on the first login, ONES application actively asks to change the password
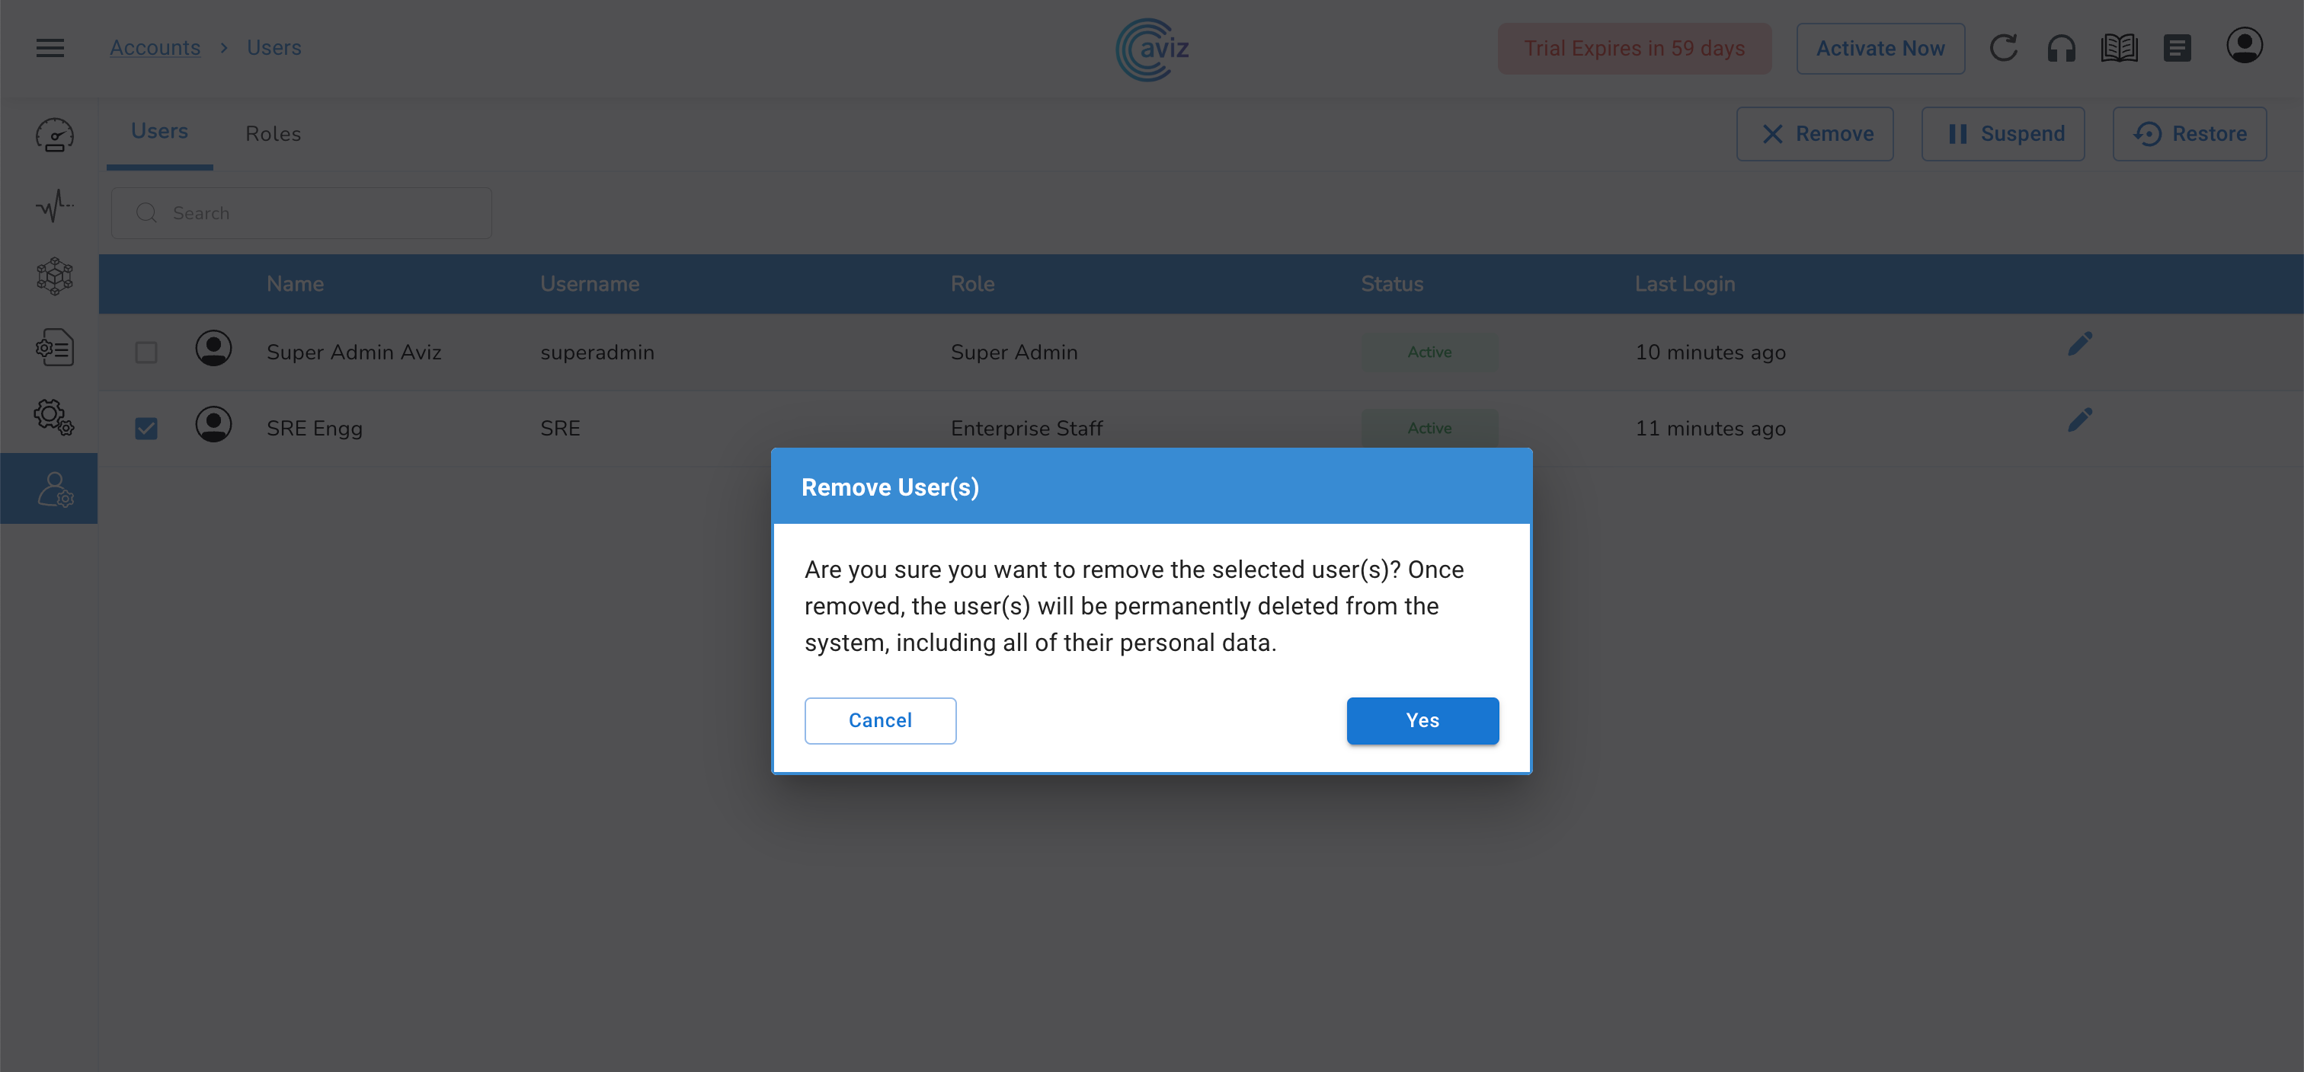
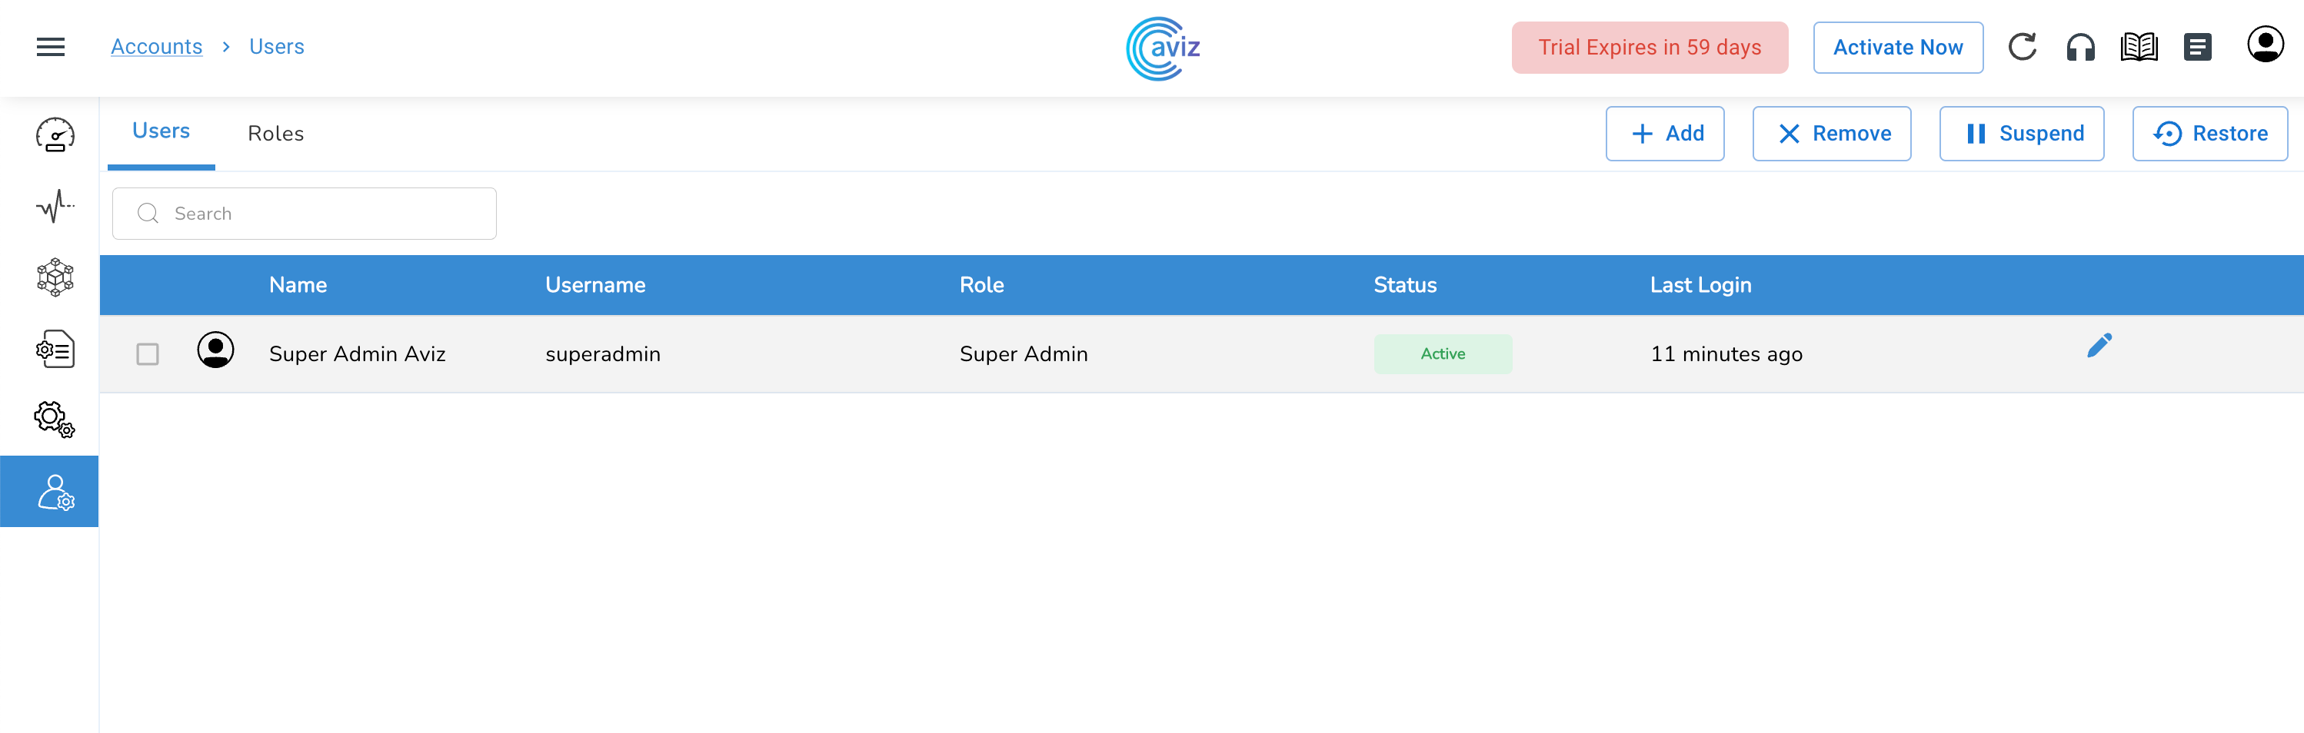
Users - Remove User
Navigate to Accounts >> Users >> ((Select Users you want to remove)) >> remove >> Yes
We can remove multiple users at a time
After this, the user will be removed from the database and cannot use credentials to login again
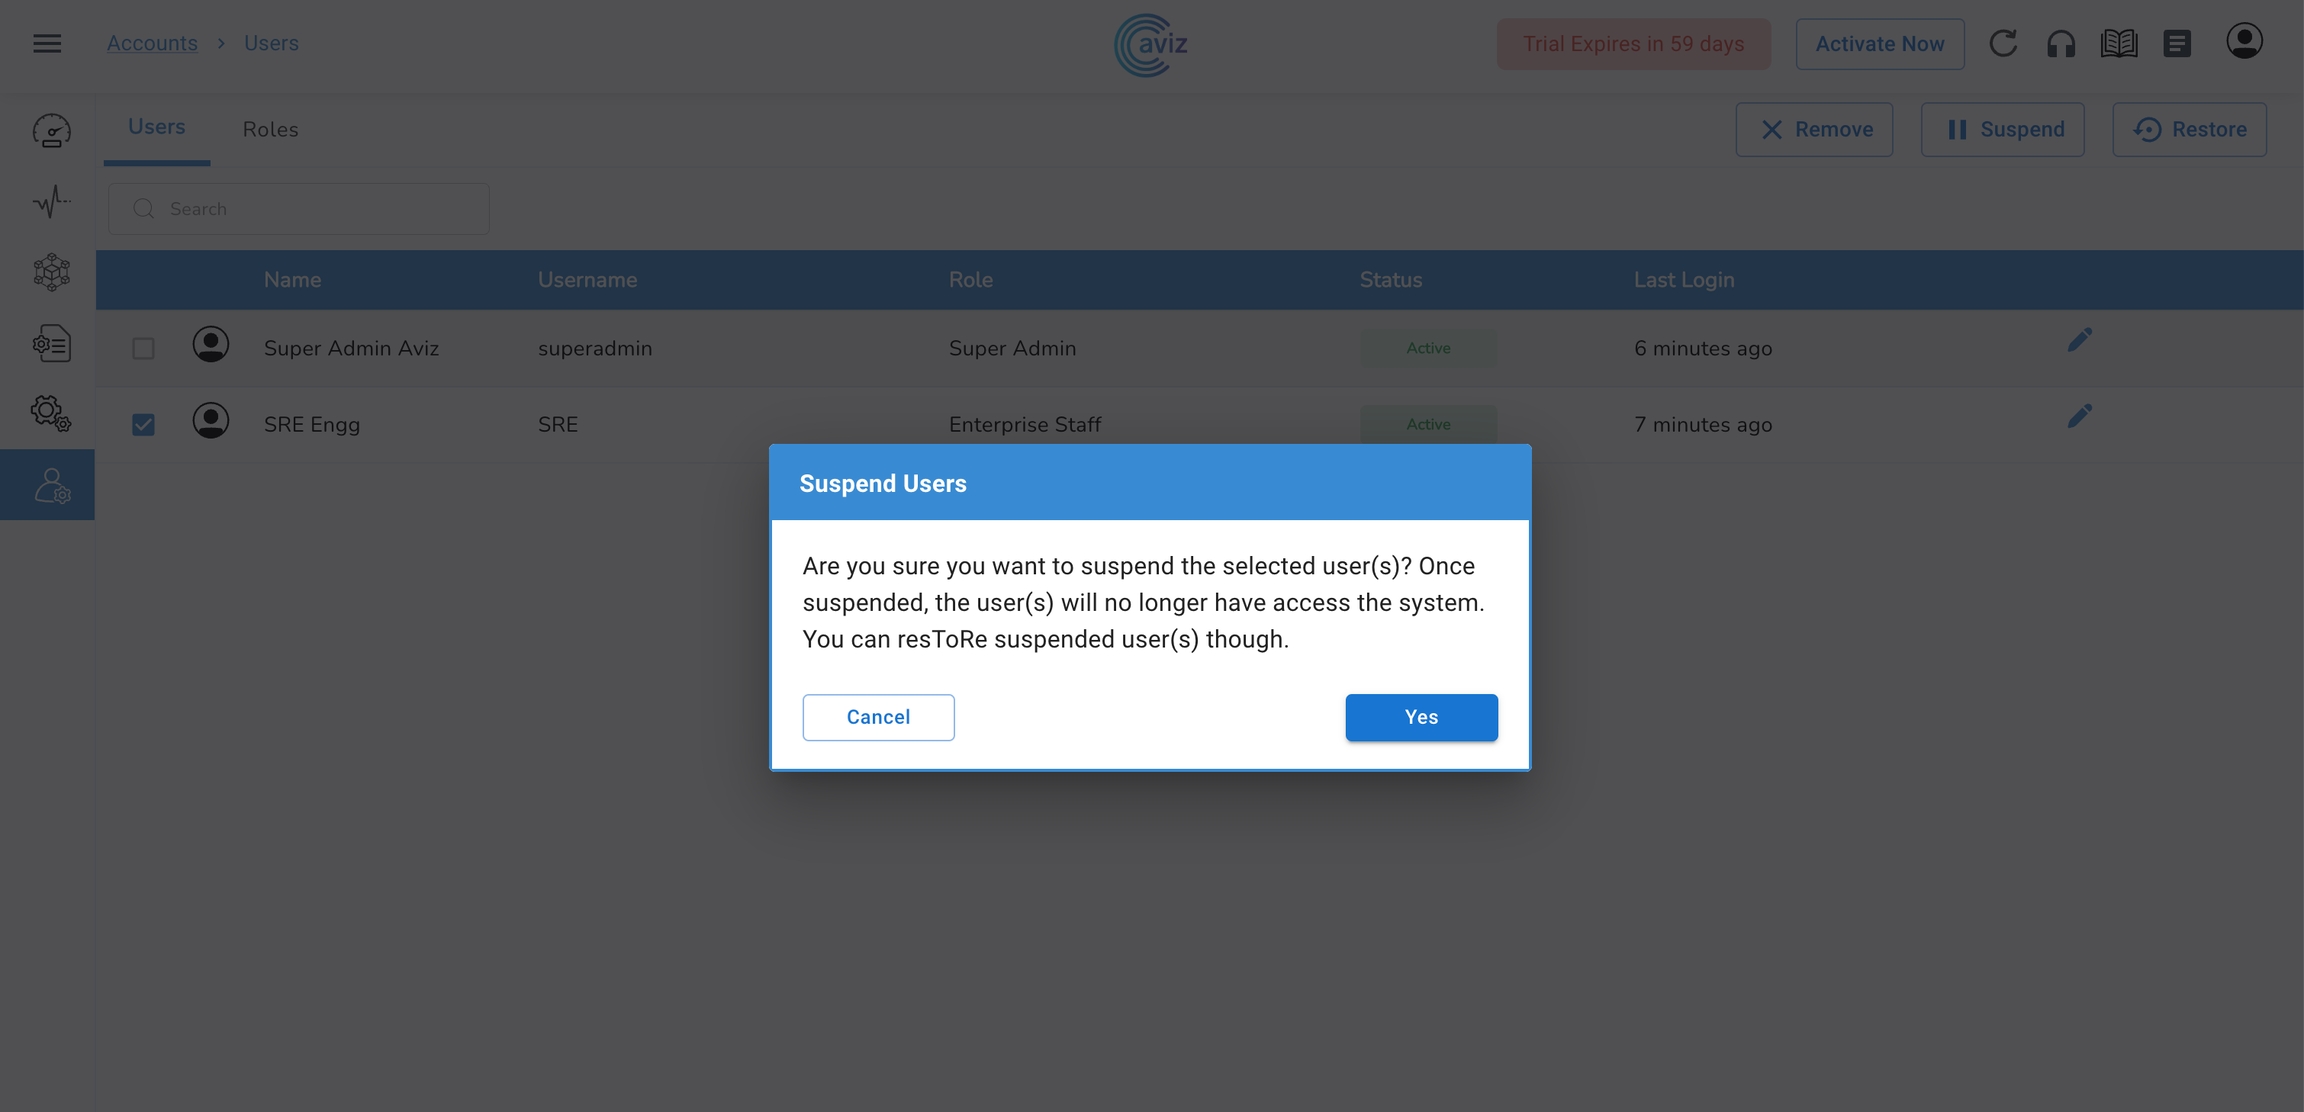
Users - Suspend User
Instead of removing any user, we can also suspend the user
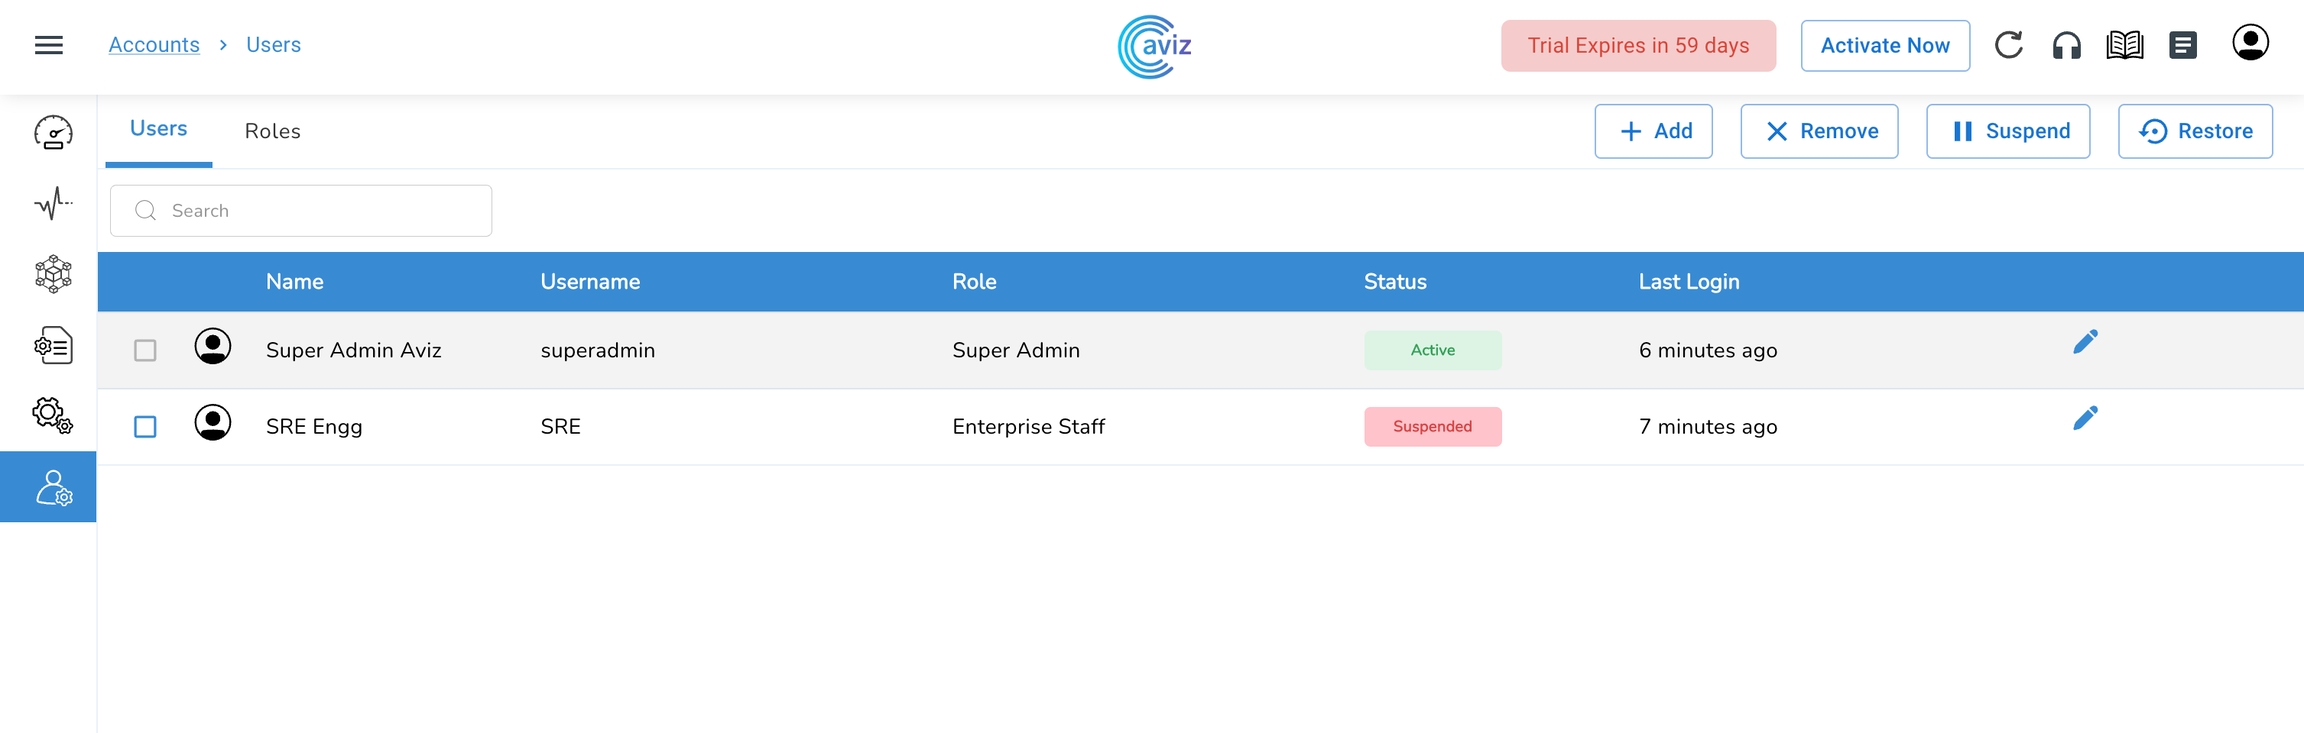
Once we suspend a user it will not be removed from the database but it will be in an Inactive state in the database
Later if we need we can restore the user to its active state
Choose users & click on Suspend
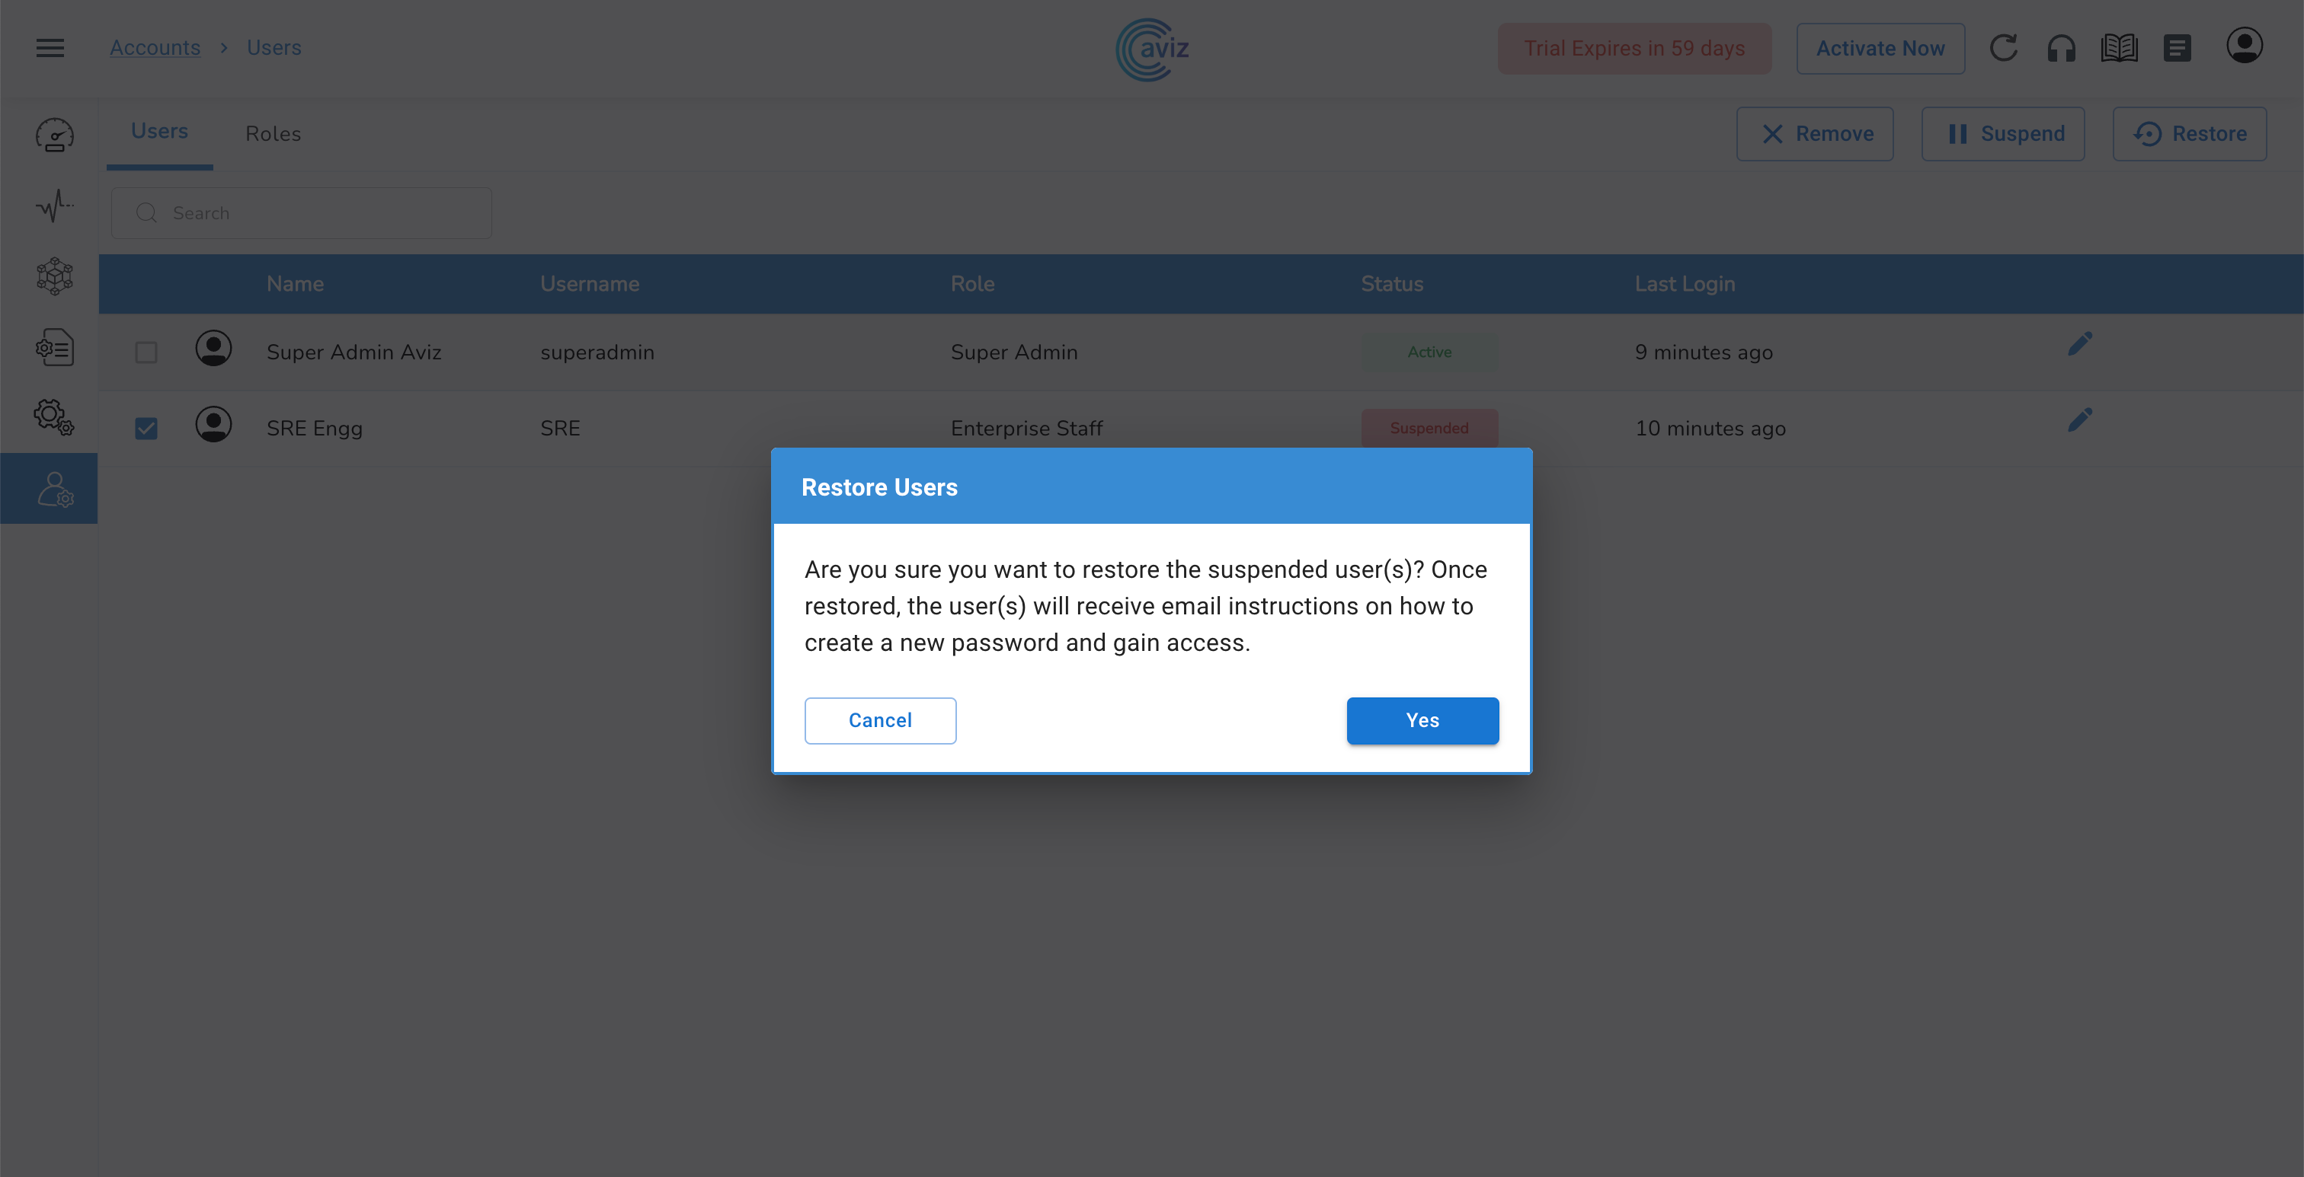
Users - Restore User
Navigate to Accounts >> Users >> ((Select Users you want to restore)) >> Restore >> Yes
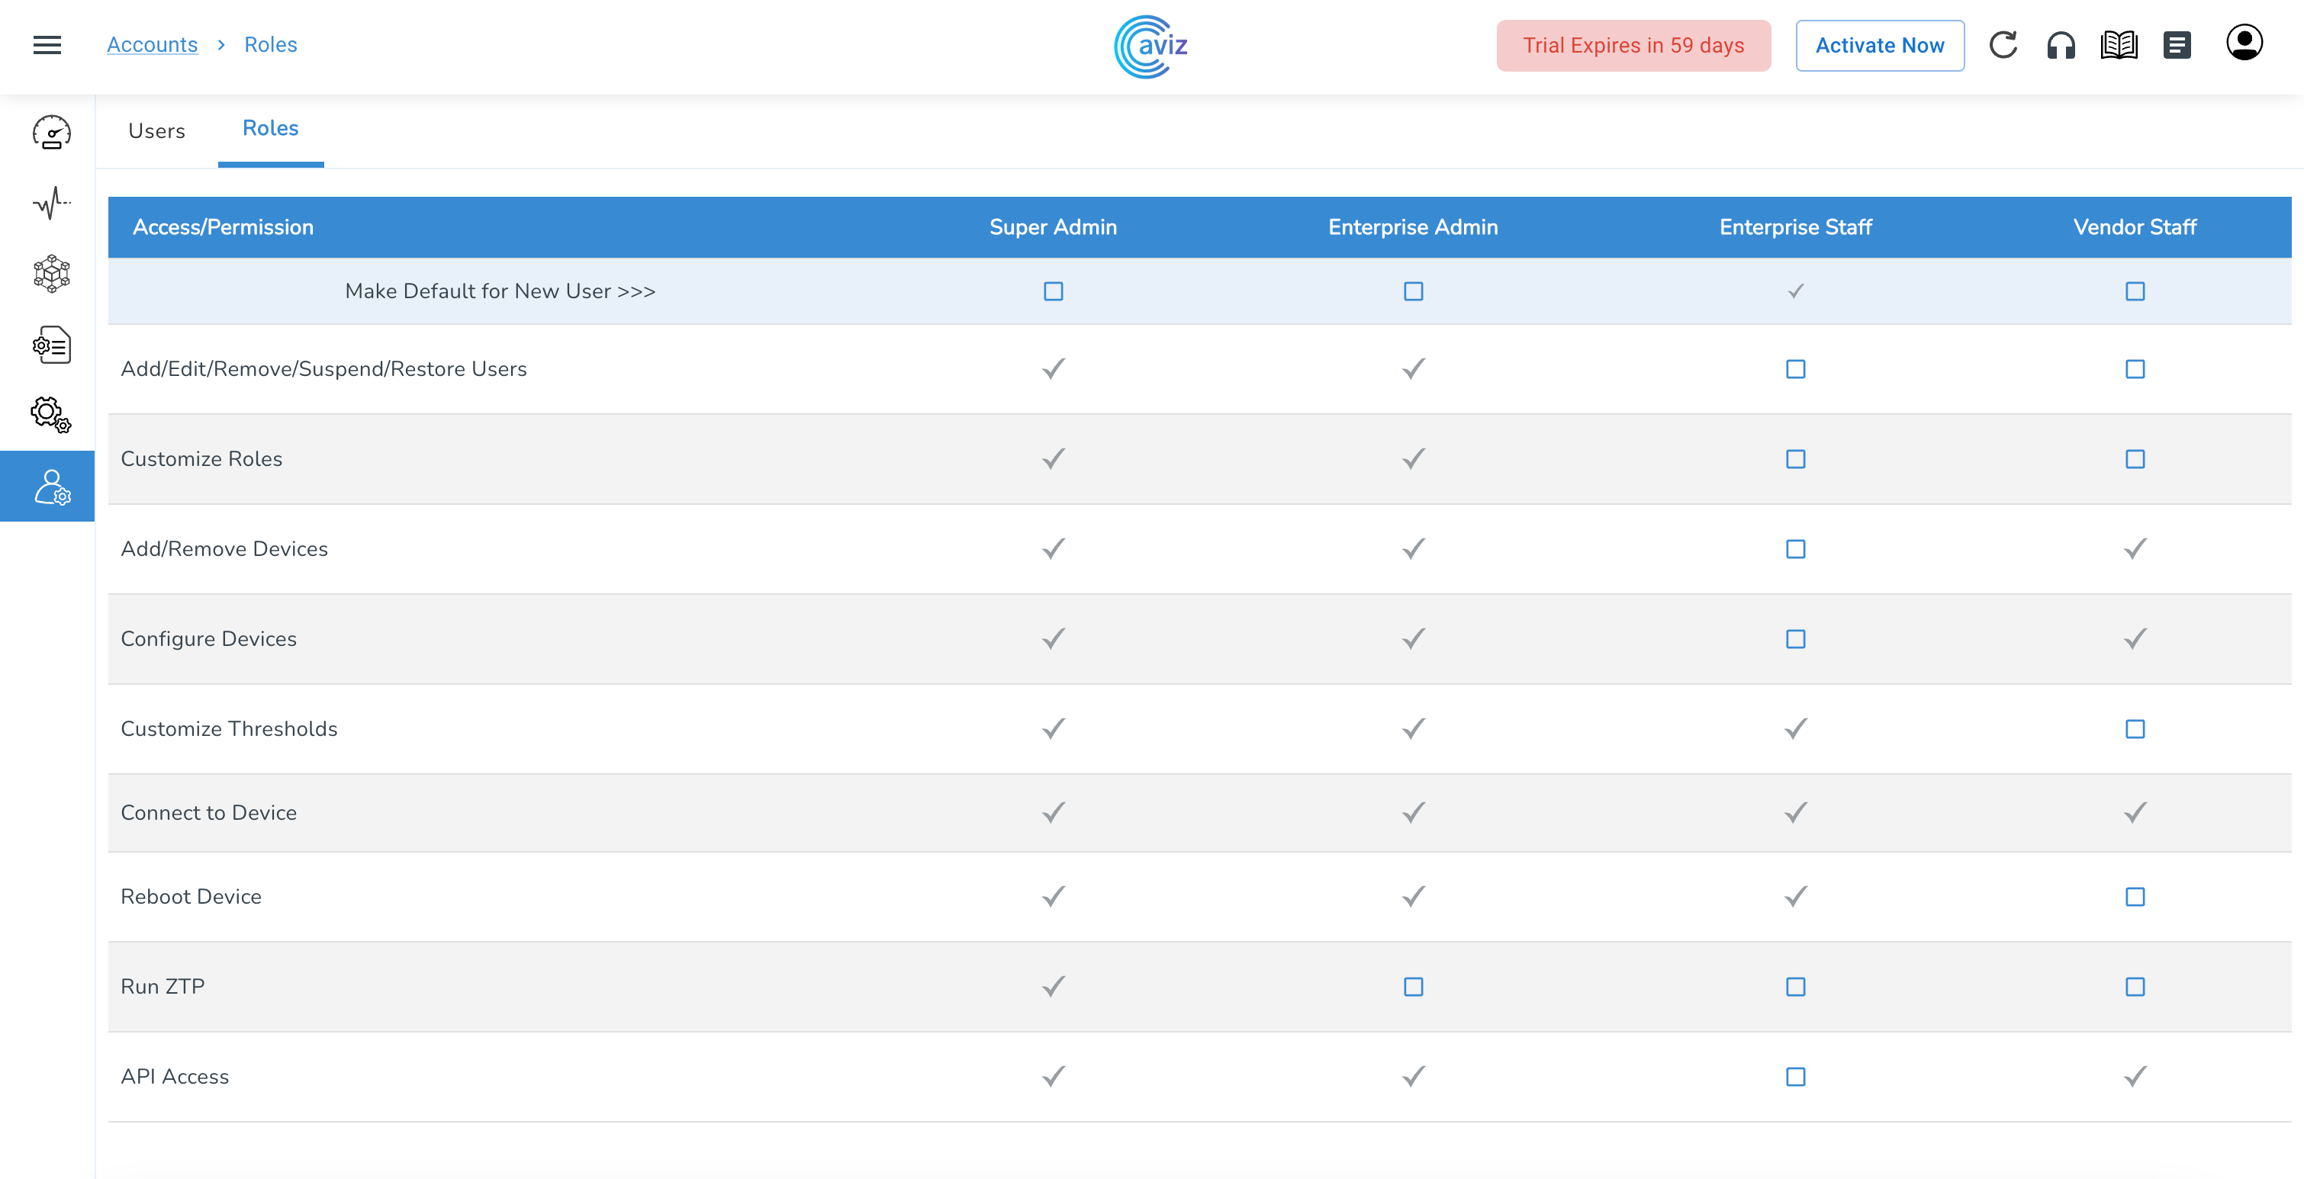
Roles
Navigate to Account >> Roles
By default, the device comes with these 4 Roles
Super Admin
Enterprise Admin
Roles - Add User Roles
Navigate to Accounts >> Roles
Now let's add few extra permissions
Add/Remove Devices
After giving permissions, the user can be added to this role in the user section.
Password
Password should contain:-
Minimum Password Length - 8 characters
Maximum Password Length - 24 characters
Character Support - Alpha Numeric
Special Characters - (# @ $ ! & % only)
Character Rule - At least one Upper Case and one special character
First and Last Name
Role
Enter all the required details
Click Save
Navigate to Accounts >> Users >> ((Select Users you want to suspend)) >> Suspend >> Yes
Enterprise Staff
Vendor Staff
As per the new user access requirement, we can assign limited access to user roles
Configure Device
Run ZTP
Monitor
Overview
The monitor widget in ONES:
Shows the complete topology view of the fabric
The Topology view can be filtered by:
Region
Brick
This page shows all the links and information connected to each other
Low and high utilization of all components
Input / Output errors on links
ASIC detailed view of all managed devices
BGP status
Neighbour Count
Neighbor status (Up/Down)
Traffic View
input/output packets in million per sec
Errors and Discard packets per interface
NOTE: If all the managed devices have the same Region/Brick ID, we do not get any filter ribbon
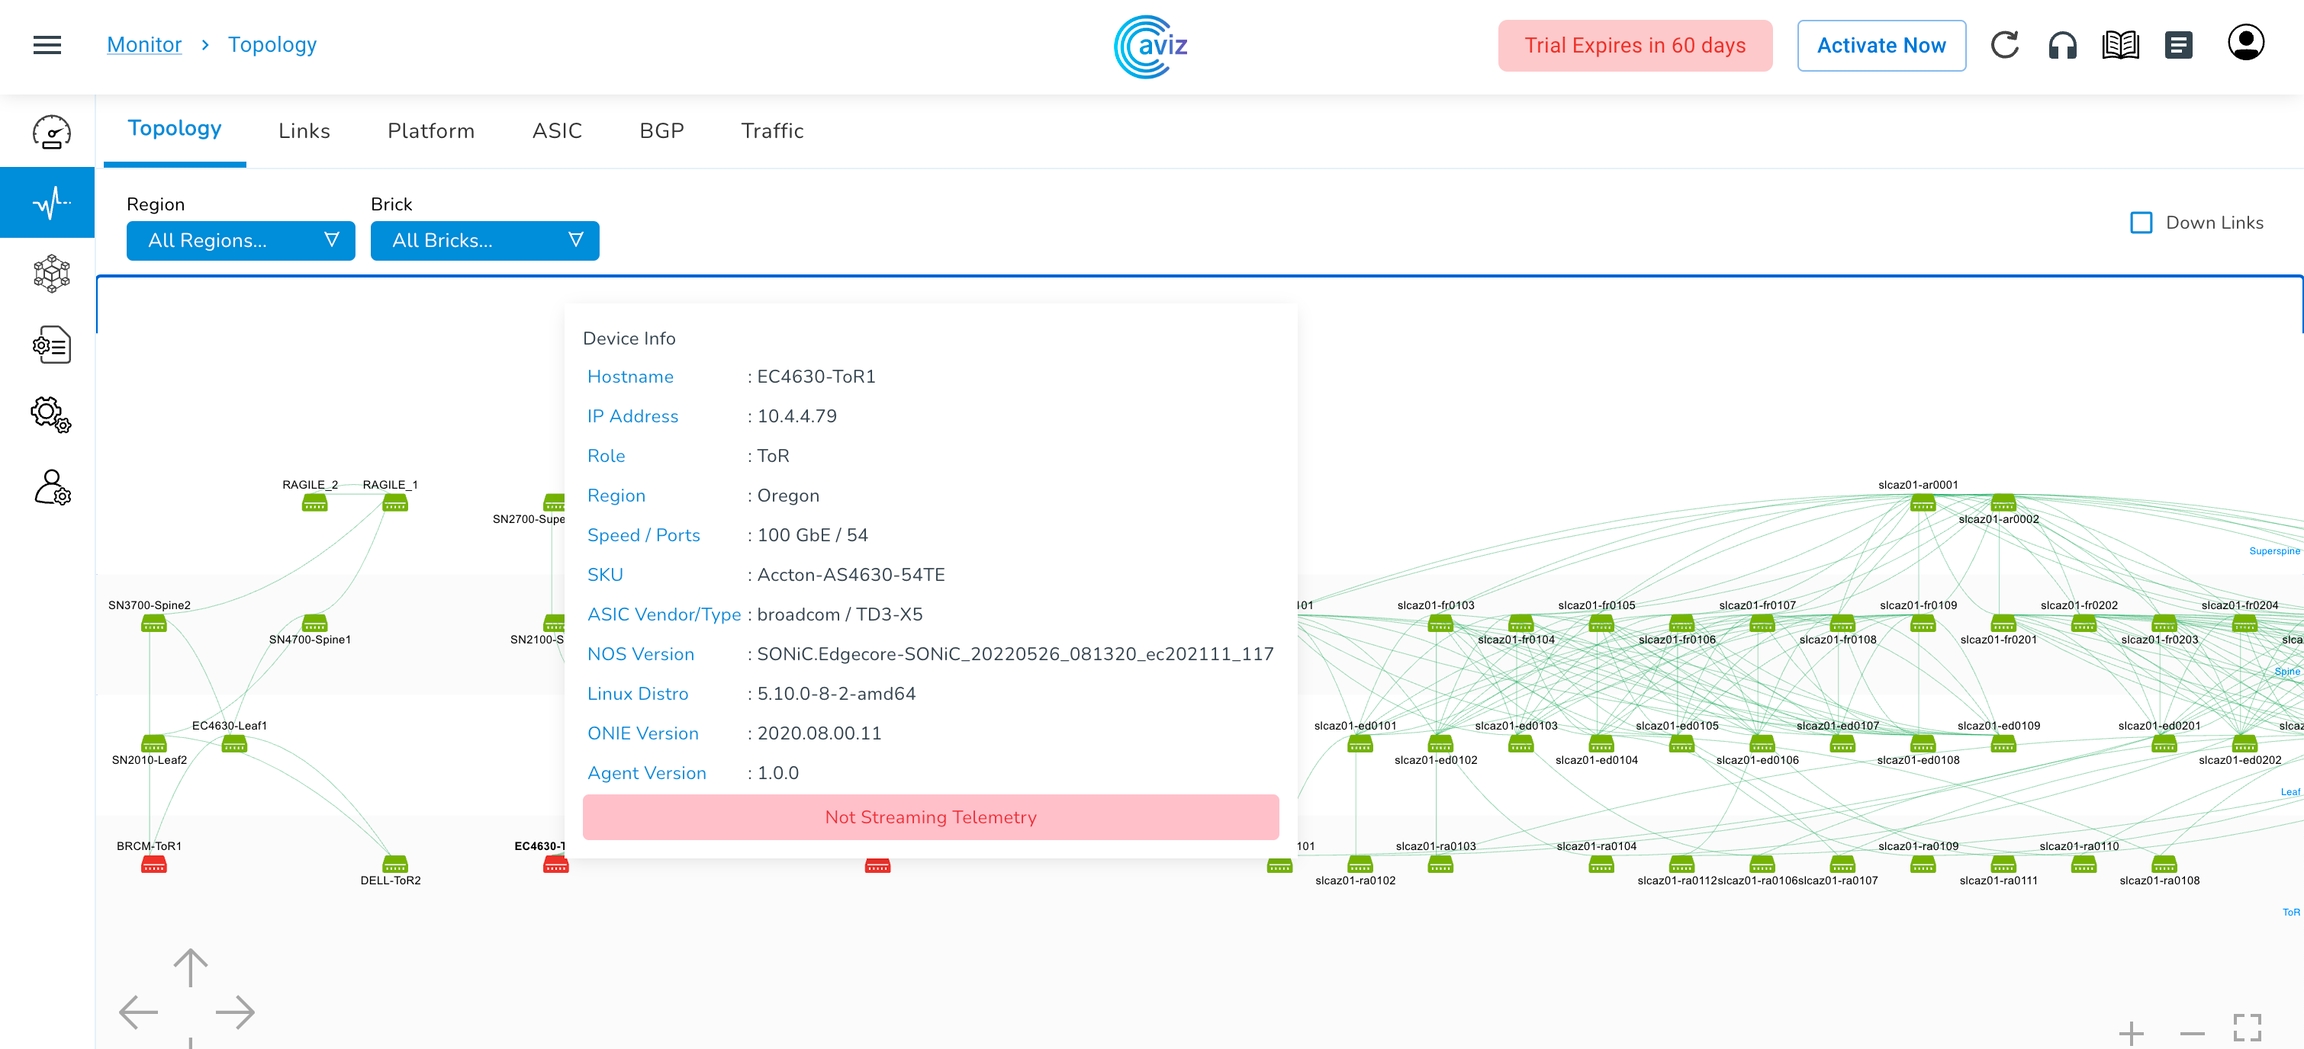
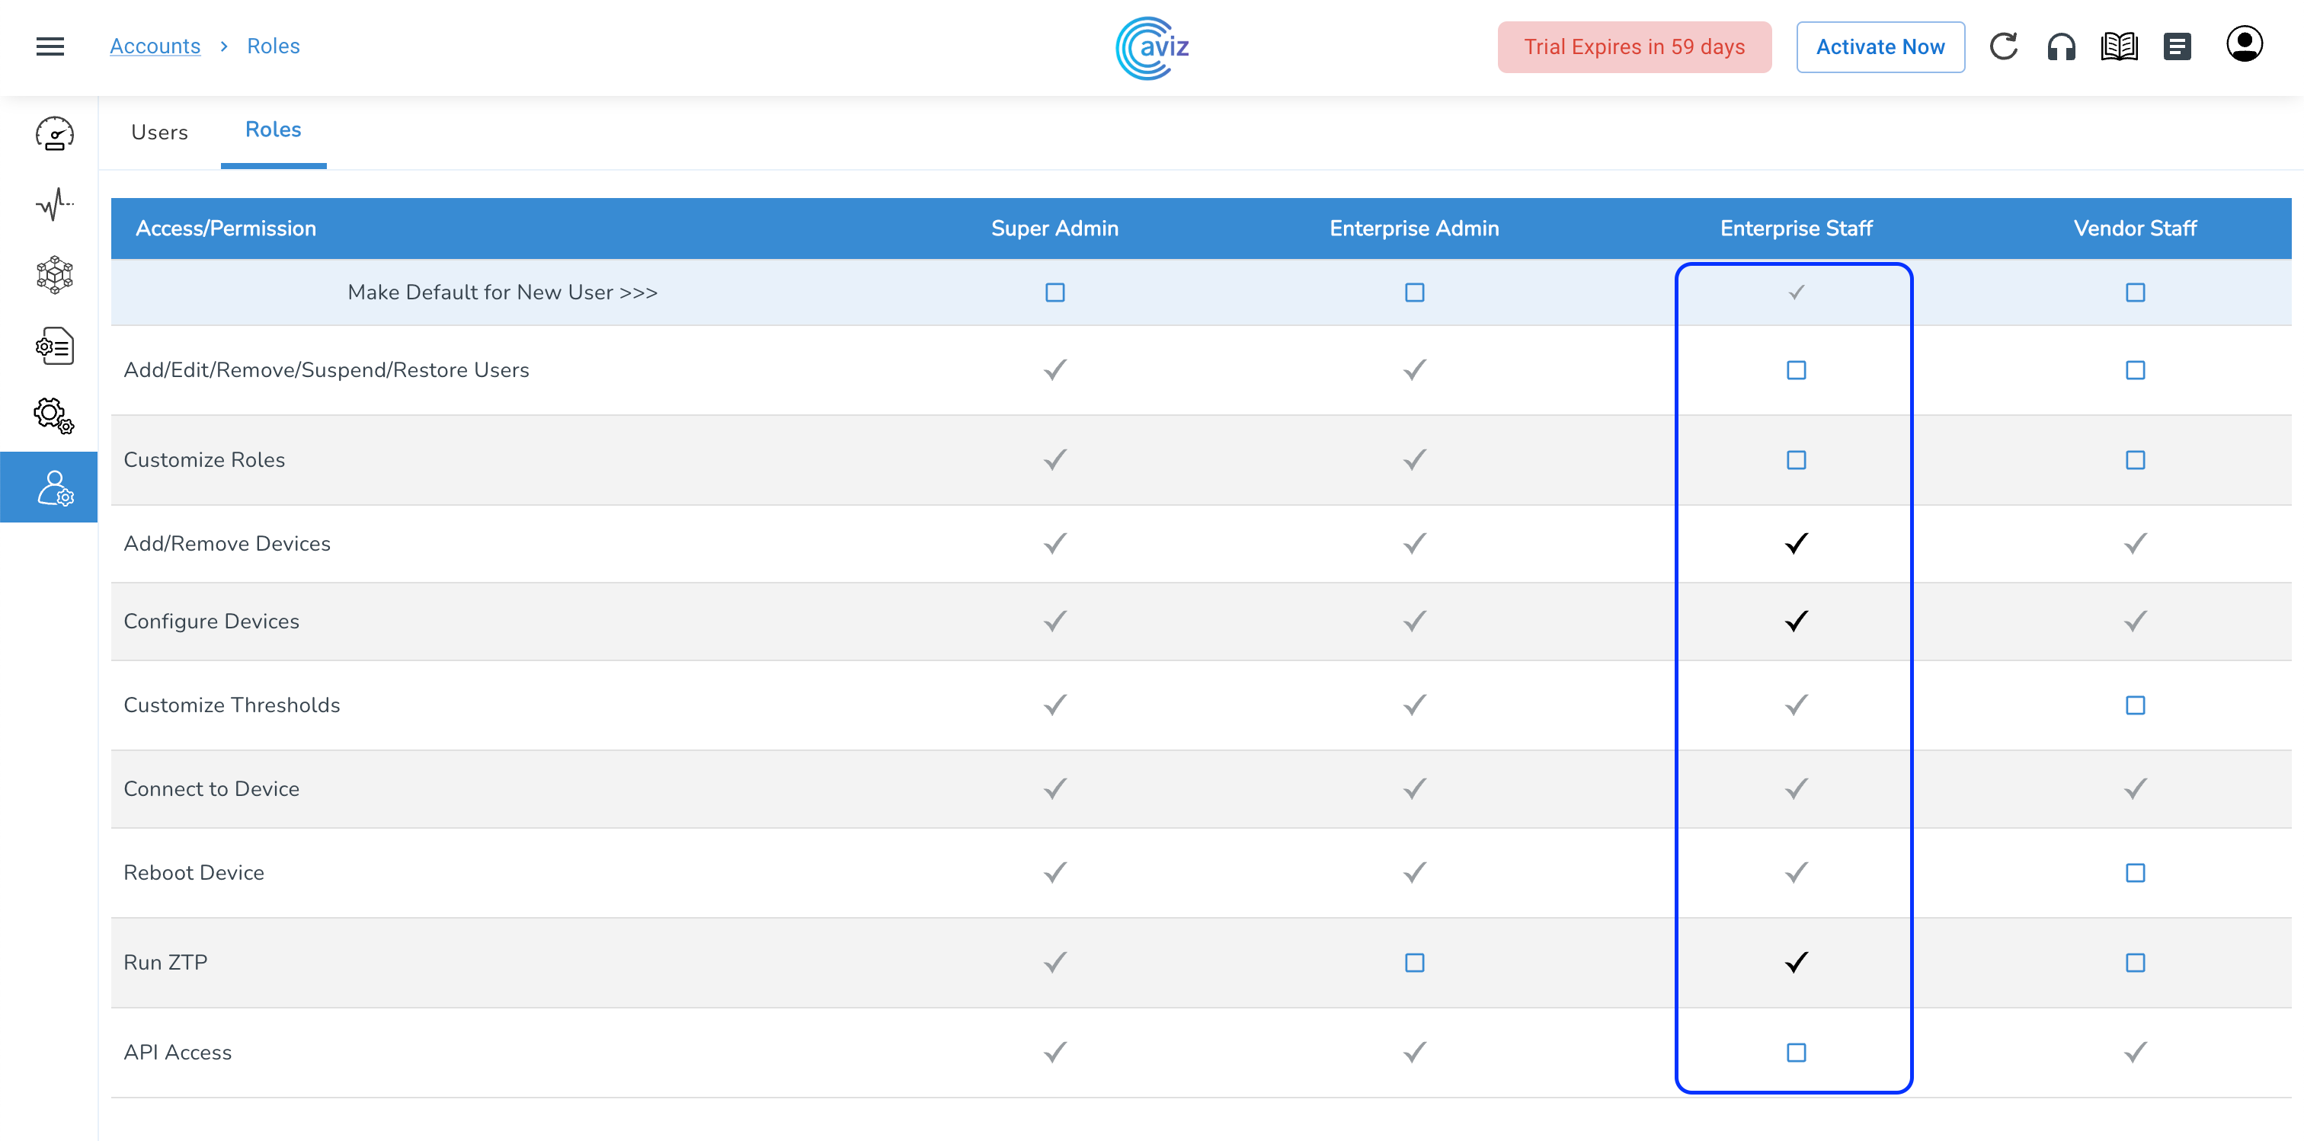
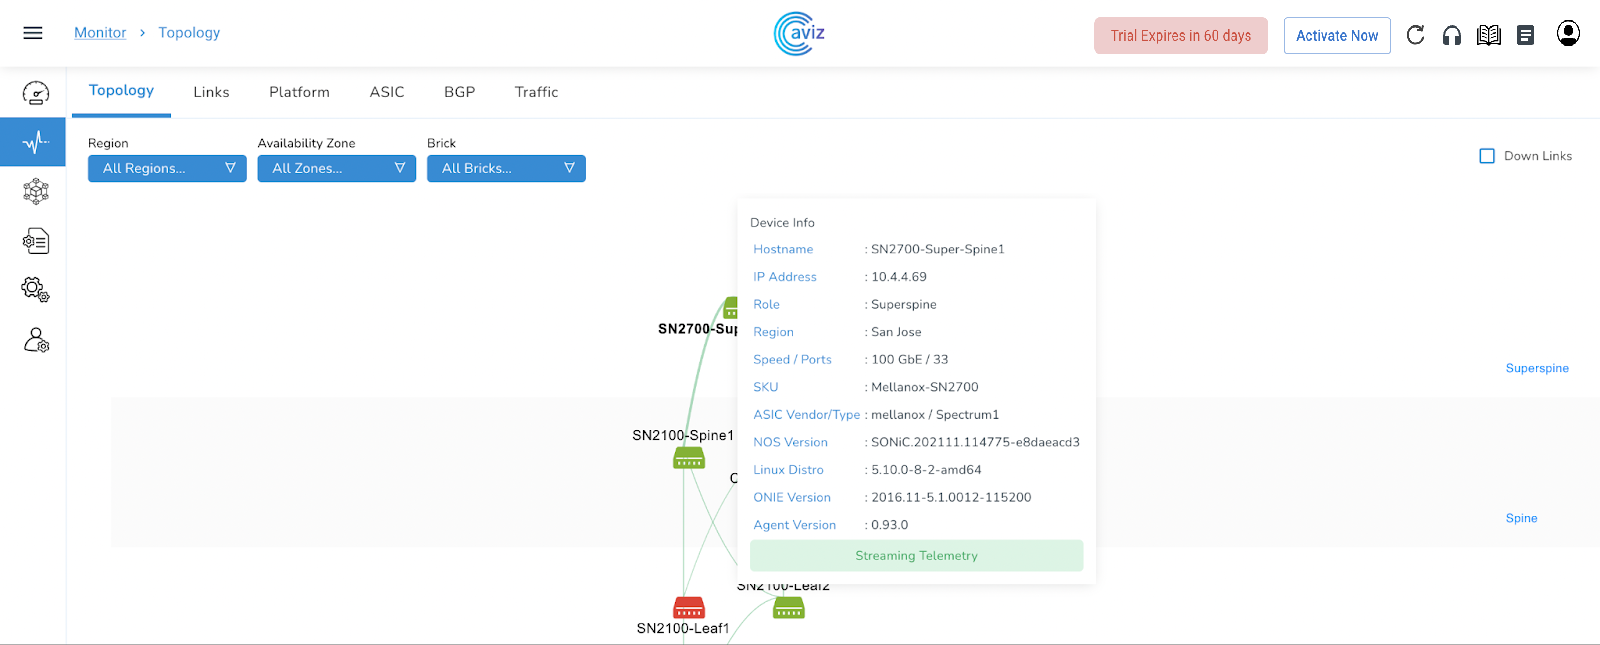
Topology
Navigate to Monitor >> Topology
This shows the complete Topology view, how the devices are connected and to which role they belong to
We can put the filters to check the customized view of the Diagram by: Region Availability Zone Brick ID
NOTE: we do not get filter ribbon if all devices belong to the same Region/Availability Zone/Brick ID
We can also check Down Links to check the topology those are having links in the shutdown state as per Role
Super Spine
Spine
Users can easily filter the view as per the Region, Availability zone and Brick ID
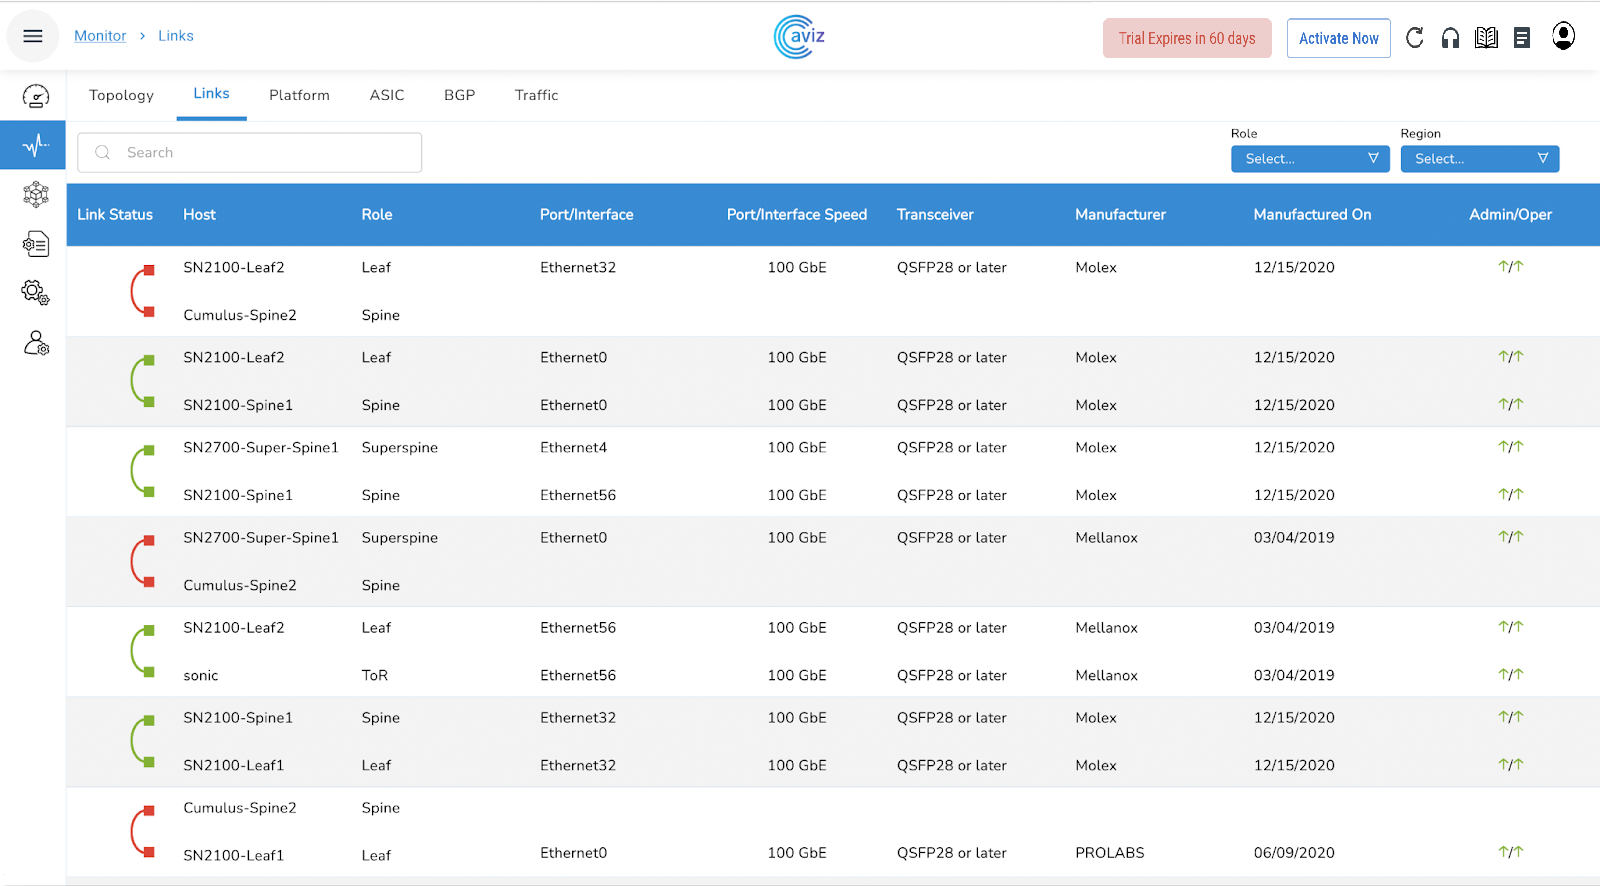
Links
This page gives a view to the user for all the possible connected links between devices with a few more capabilities
Navigate to Monitor >> Links
Feature
Use
This page helps a user to get the best view of the number of connections between devices with speed and other manufacturer details
This page gives the exact view of the interface name, interface speed, transceivers and admin & operator status
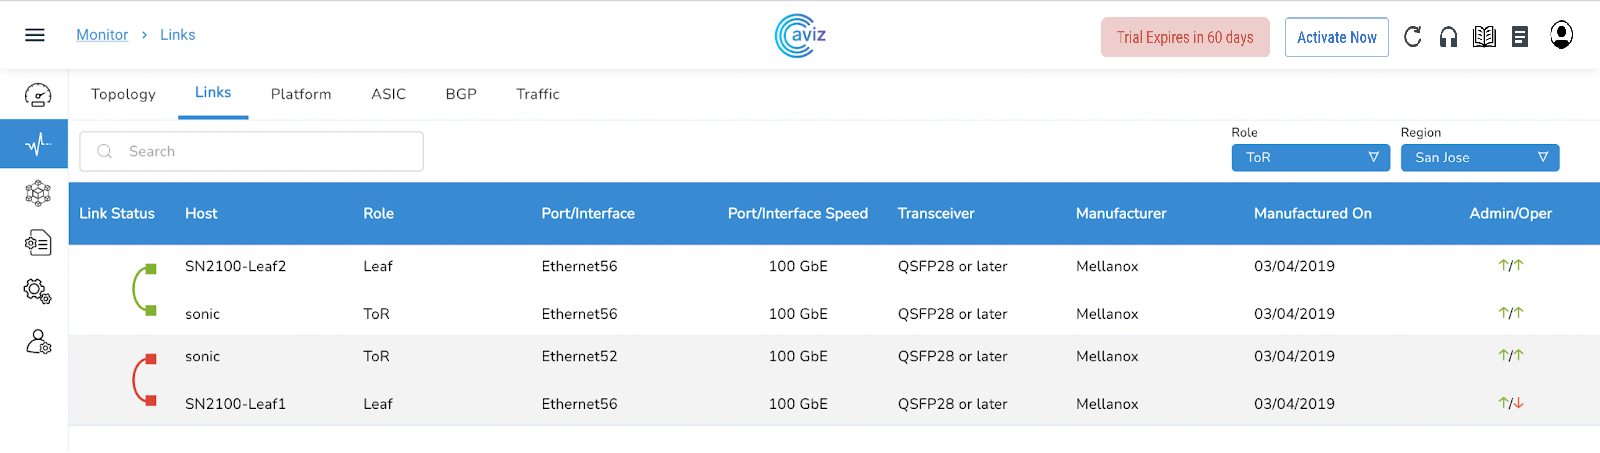
Links View with Filter Ribbon
We can also have a filtered view of links
Choose a specific Role and Region to filter
let's choose:
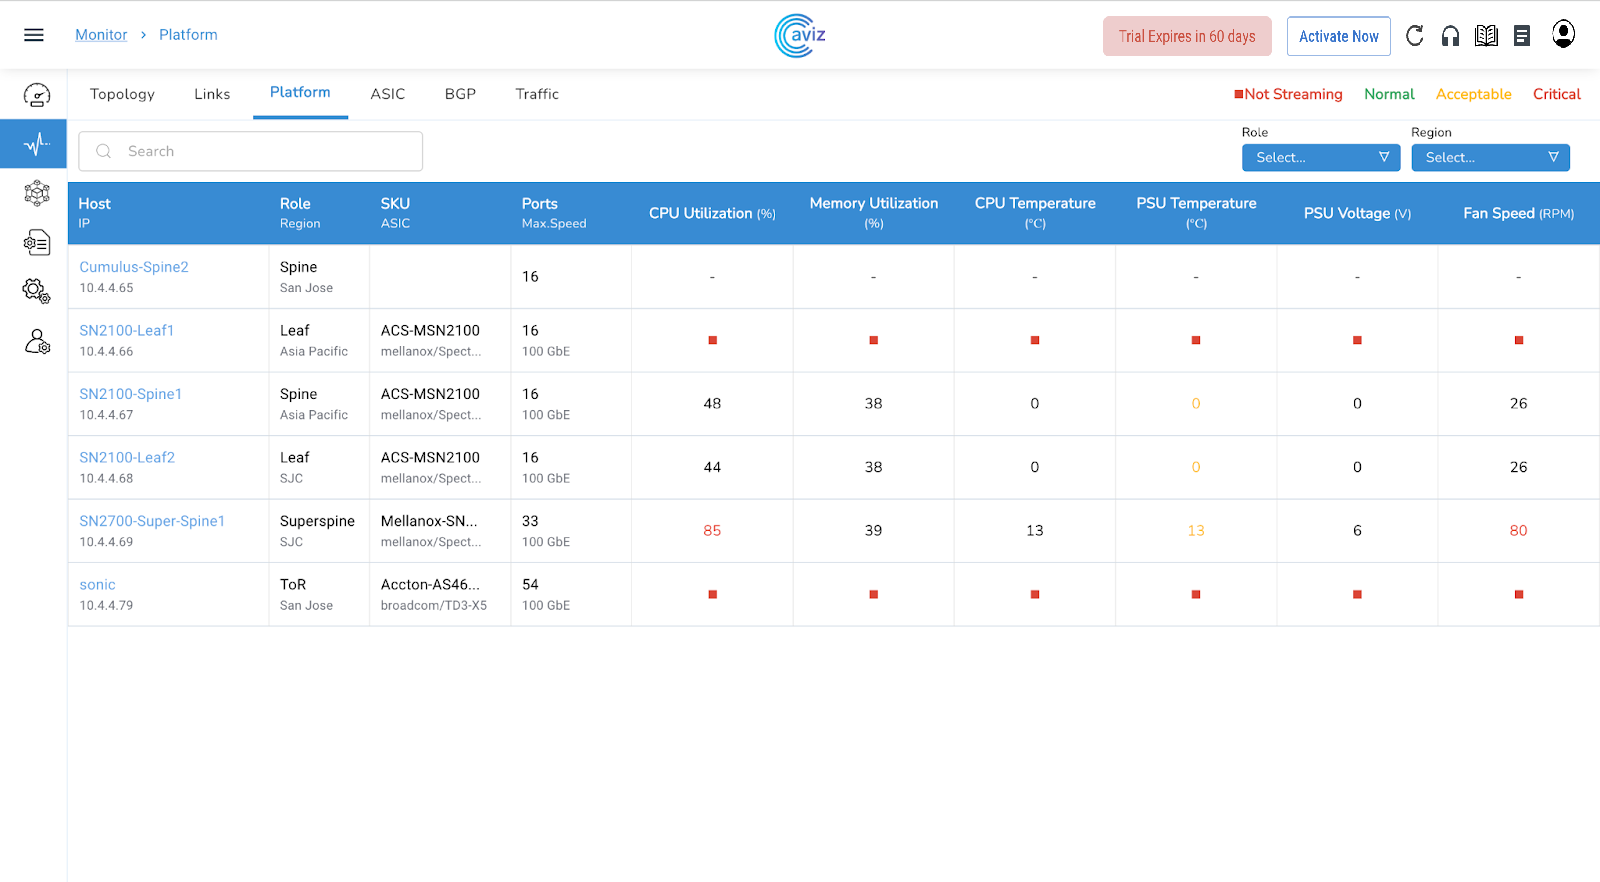
Platform
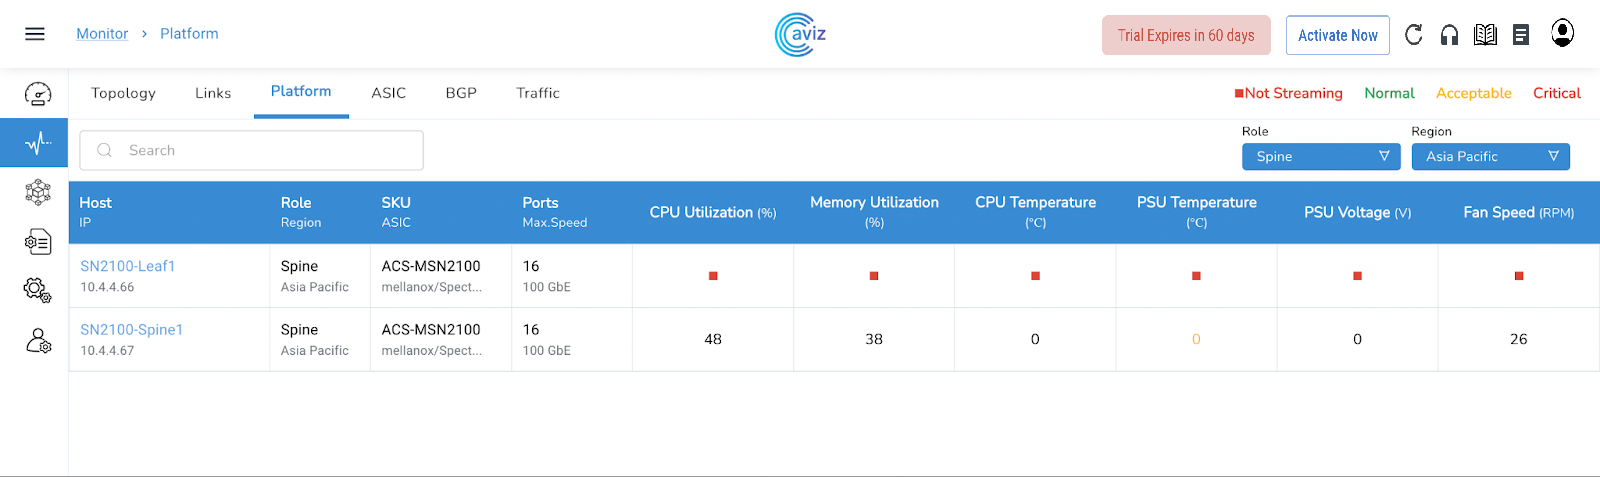
This page shows the latest utilization of the devices with CPU & Memory utilization, Temperature & Voltage of PSU, and fan speed in RPM
Navigate to Monitor >> Platform
Platform Status
Platform Status is reported for the following components
Roles
SKU/ASIC
Ports/Max Speed
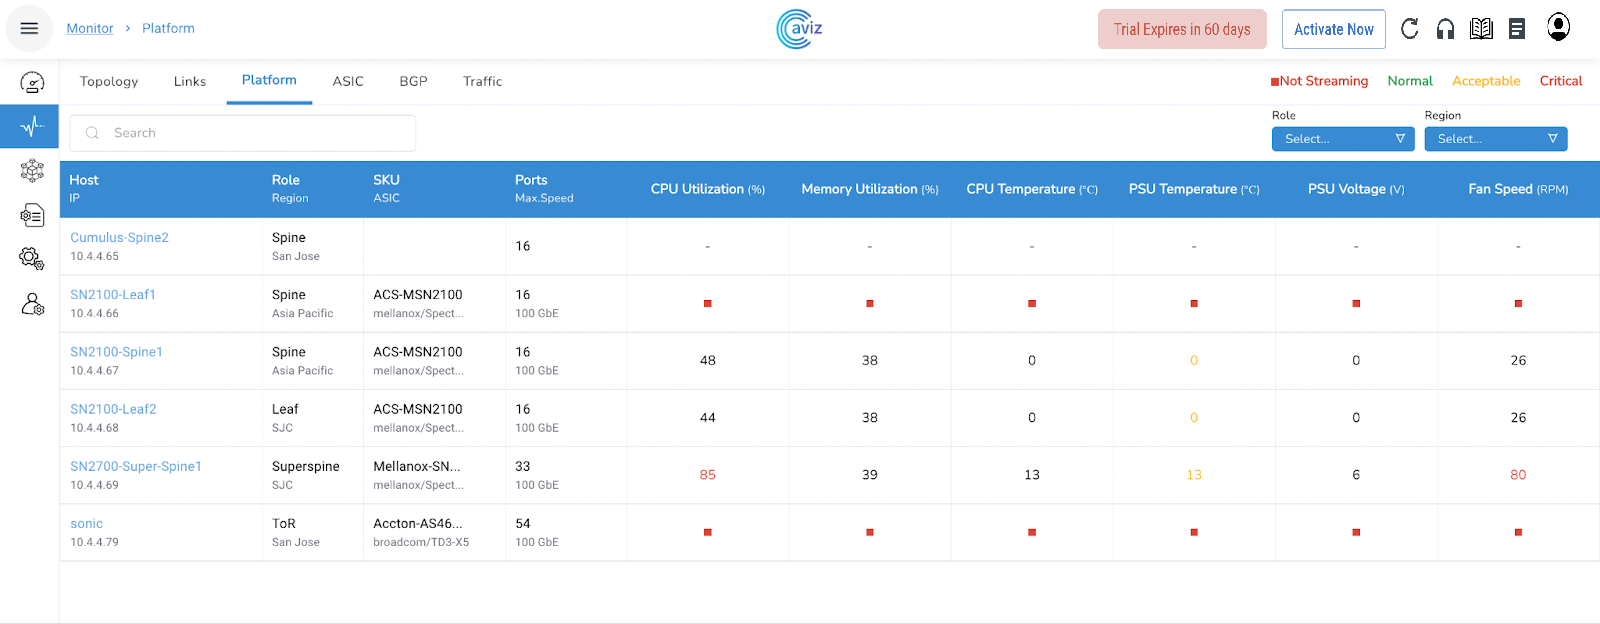
Customized View
We can check the health of the device as per some customization
We can filter the devices by:
Roles
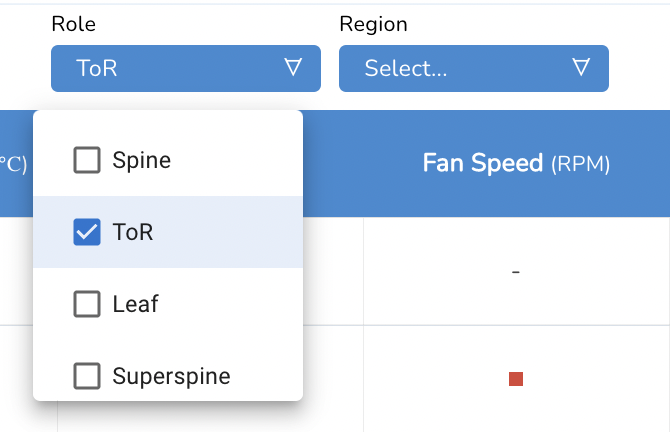
Role-based Customization
We can choose a role using the available Role-based option
4 Roles available
Super Spine
After selecting ToR input, here is the new view of only devices that belong to the ToR Role
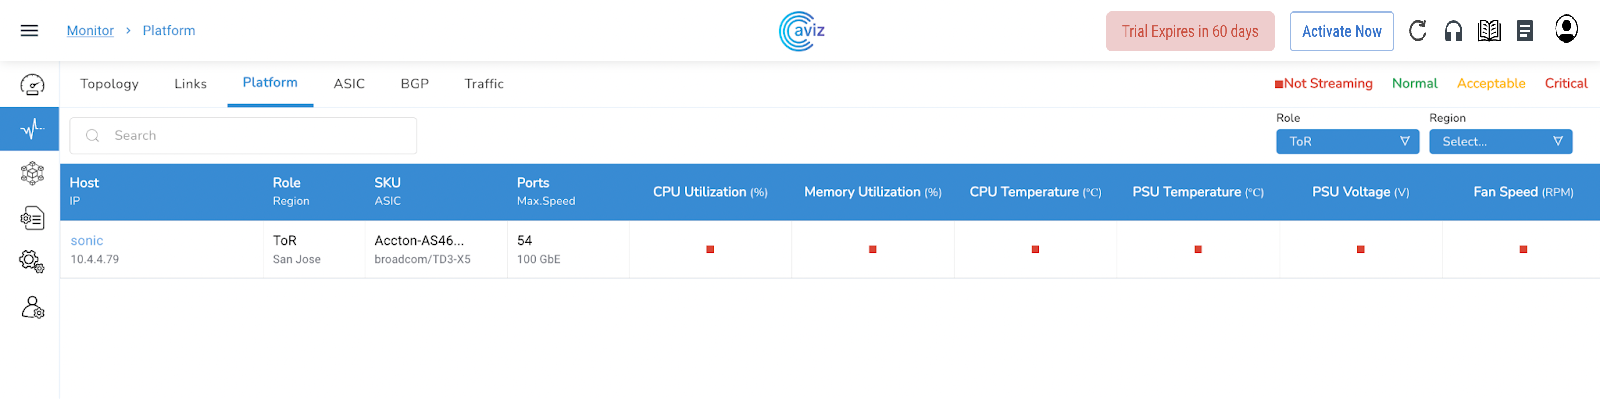
Region-based Customization
We can choose a role using the available Region-based option
Two roles available
San Jose
After selecting Asia Pacific input, here is the new view of only devices that belongs to the Asia Pacific Region
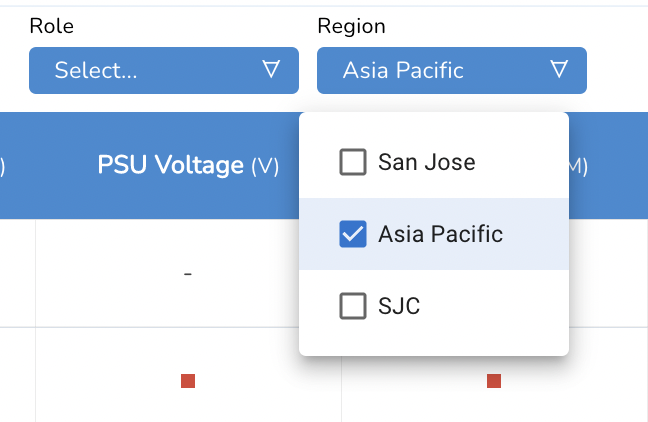
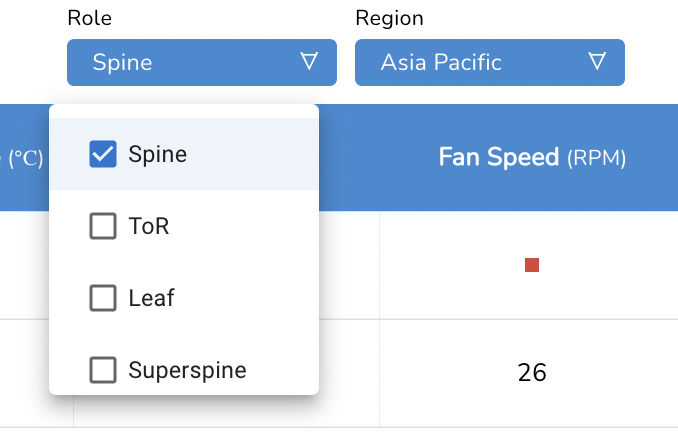
Role / Region based Customization
We have the liberty to do the filtering by both combination Role-based and Region based at the same time
As of now, we have two Region available
San Jose
After selecting both Roles and Region-based filter, here is the new view of the device that belongs to the Spine role and parallel belongs to Asia Pacific Region
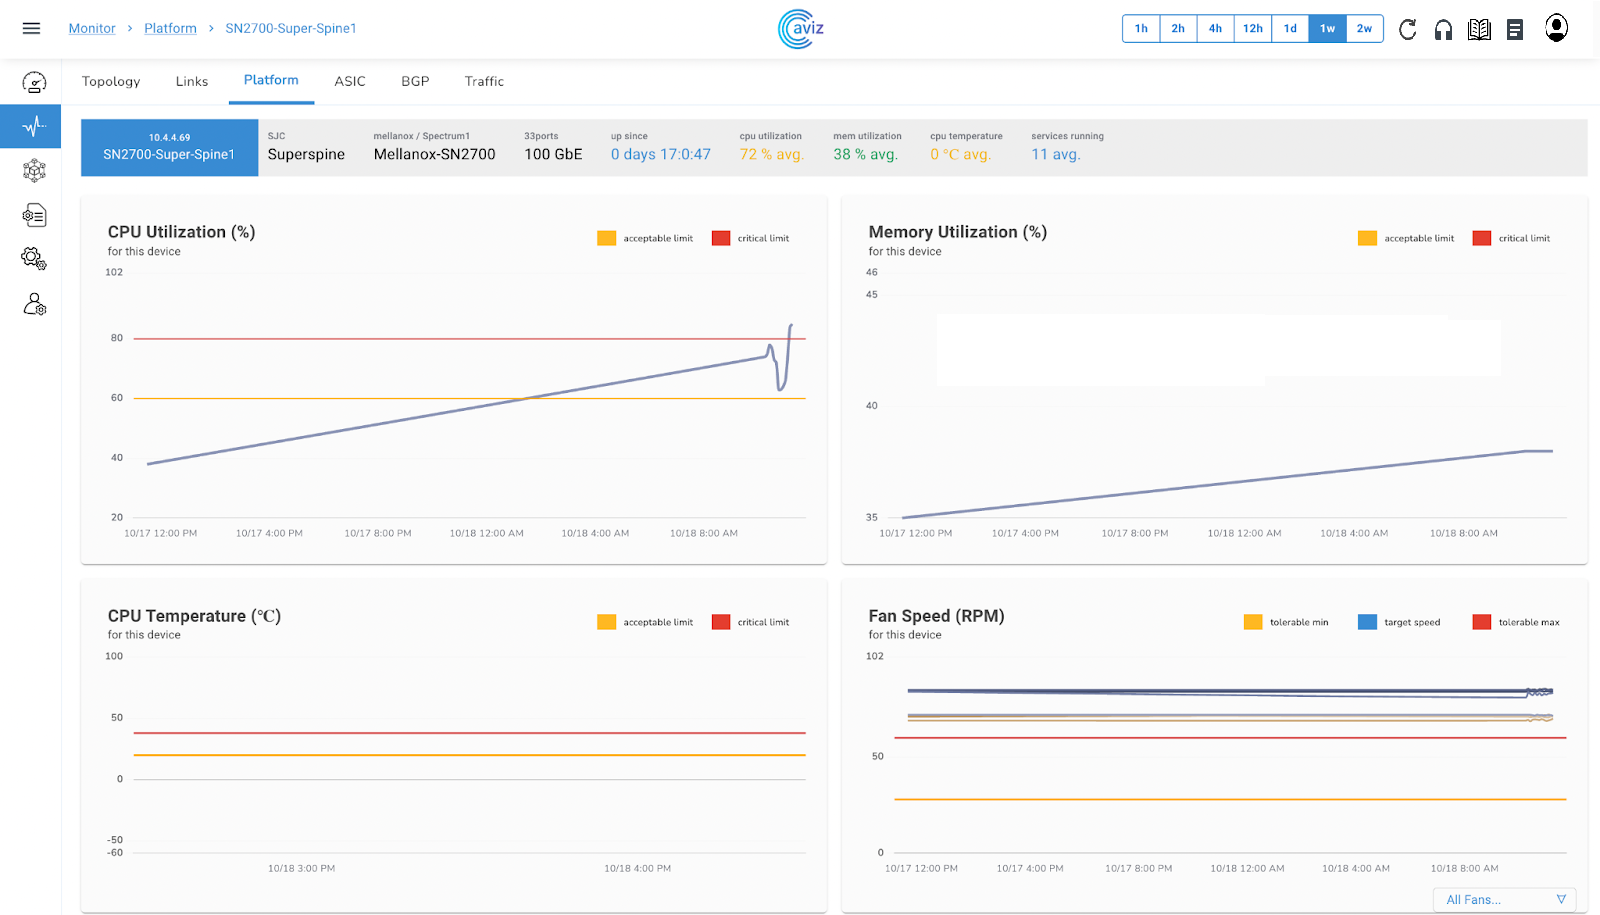
Per Device Status
This Platform Widget also gives the option to check the extended capability view of the device
Apart from this monitoring view, we can also verify/check extended feature sets like:
PSU Current (A)
When we choose a specific device we get an output like this
Device Info Ribbon
Feature
Use
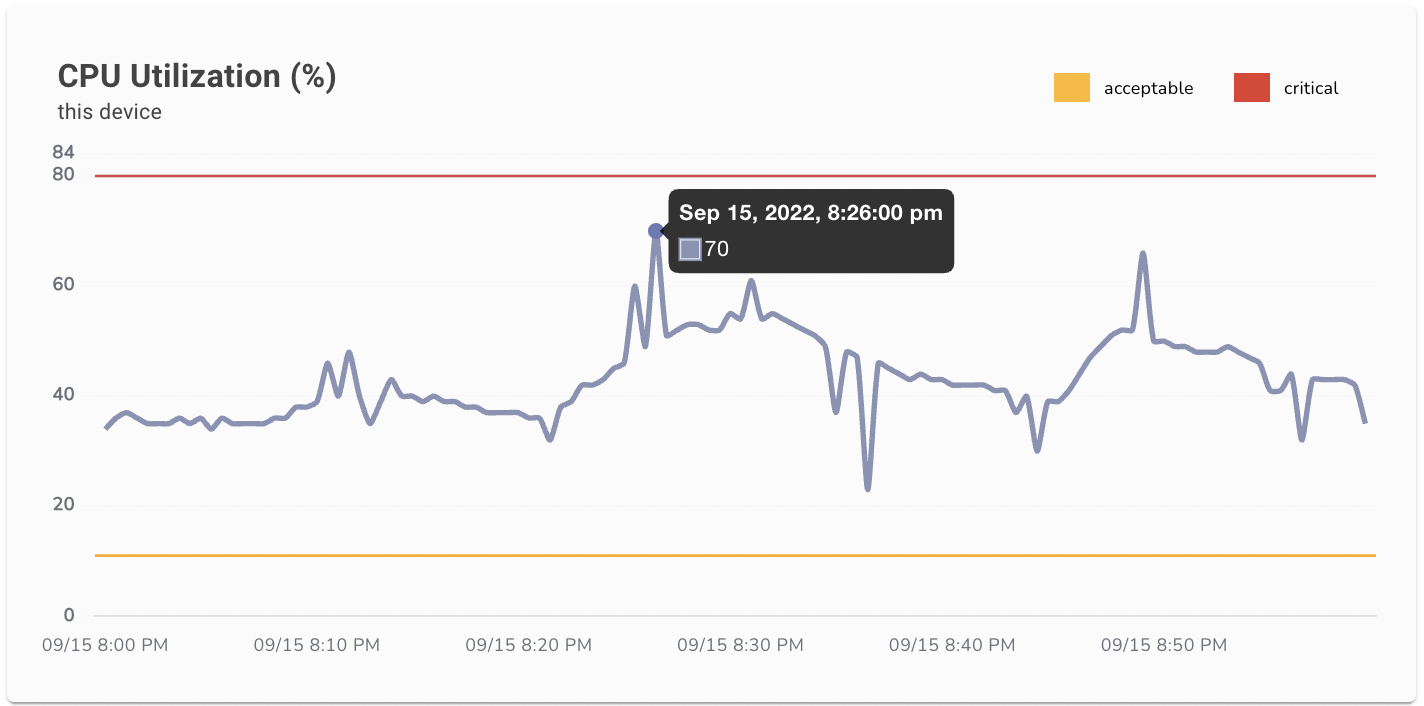
CPU Utilization (%)
Here we get the complete status of CPU utilization with a time range A complete status What was the utilization from starting to end
To check a specific time detail we can hover the cursor to any level
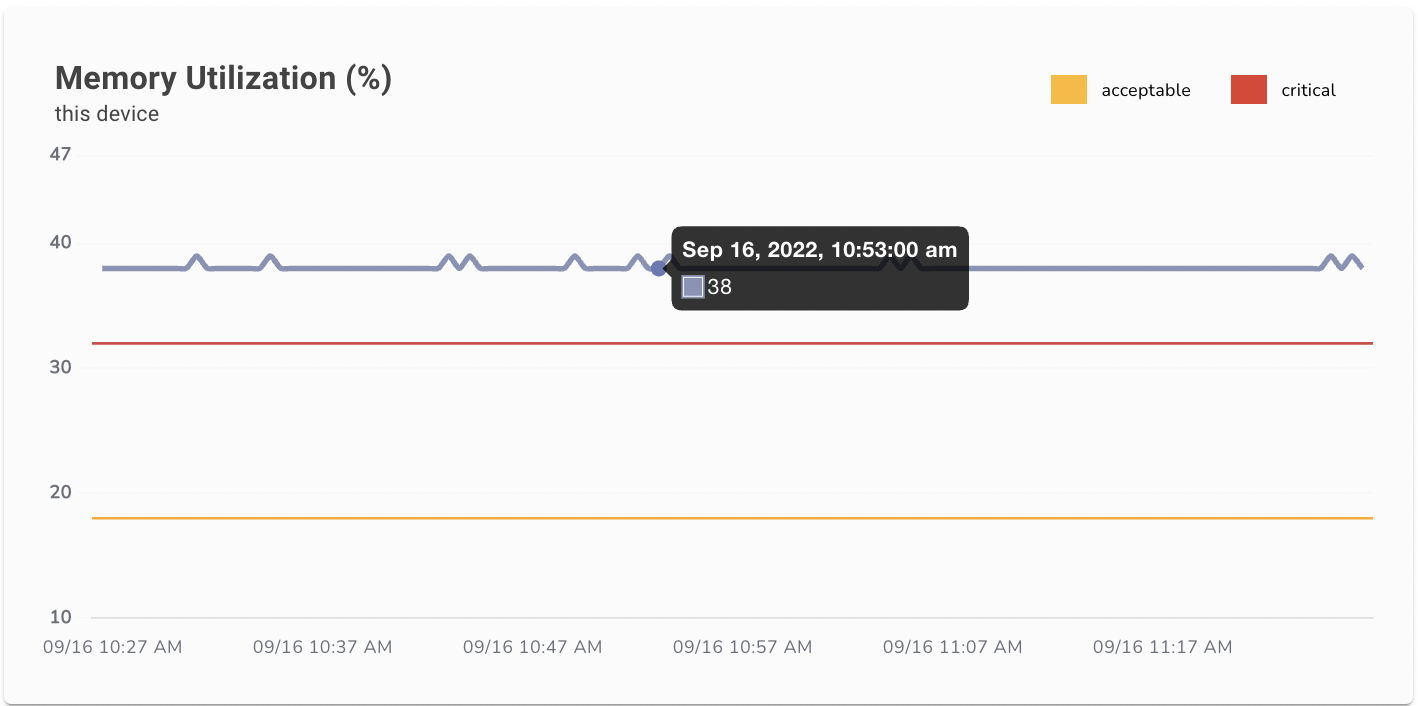
Memory Utilization (%)
Now here we get the status of memory utilization of selected device
To check a specific time detail with memory utilization, we can hover the cursor to any level
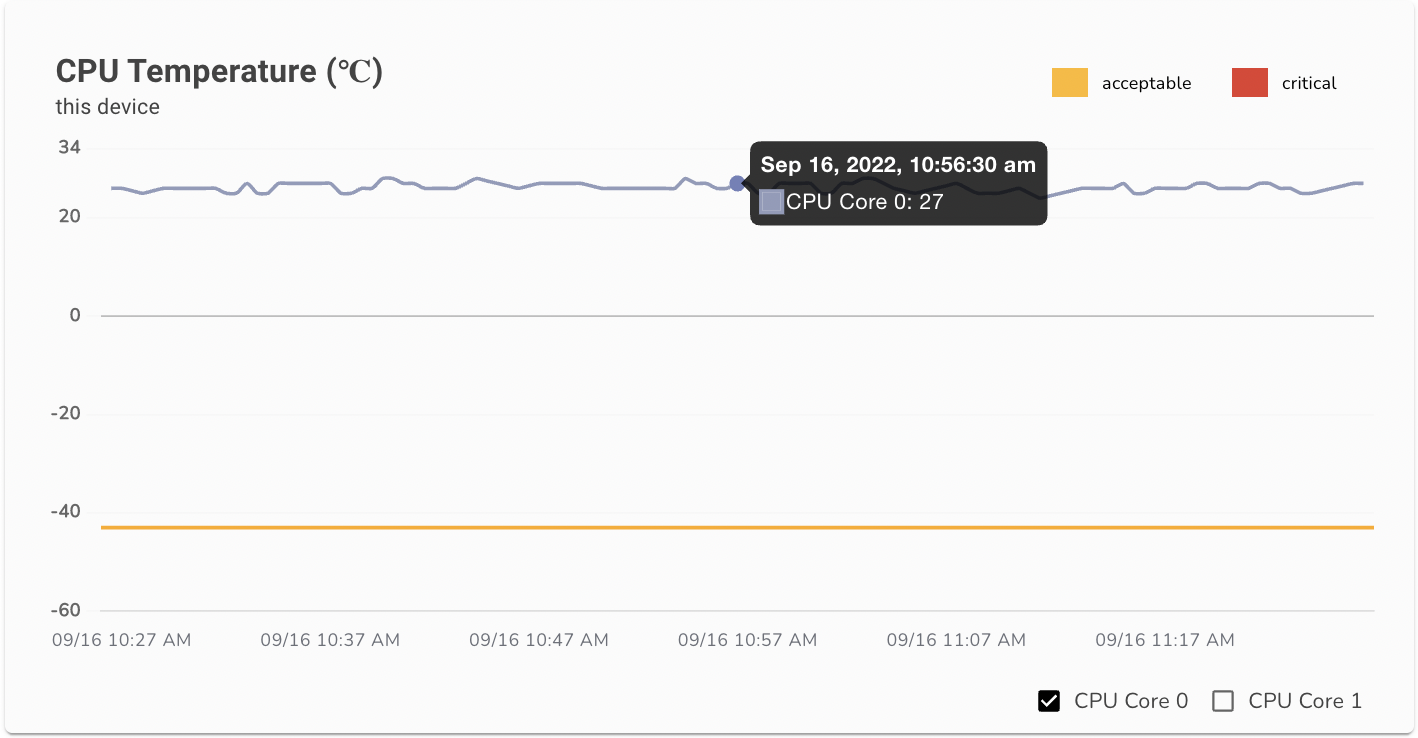
CPU Temperature (C)
This template shows the status of CPU temperature in degree celsius
Here we get the status of all the CPU and Core running on the device
To check a specific time detail for all the CPU/Cores, we can hover the cursor on any level
We can also check Per CPU Core details
We can see here the customized view per CPU Core
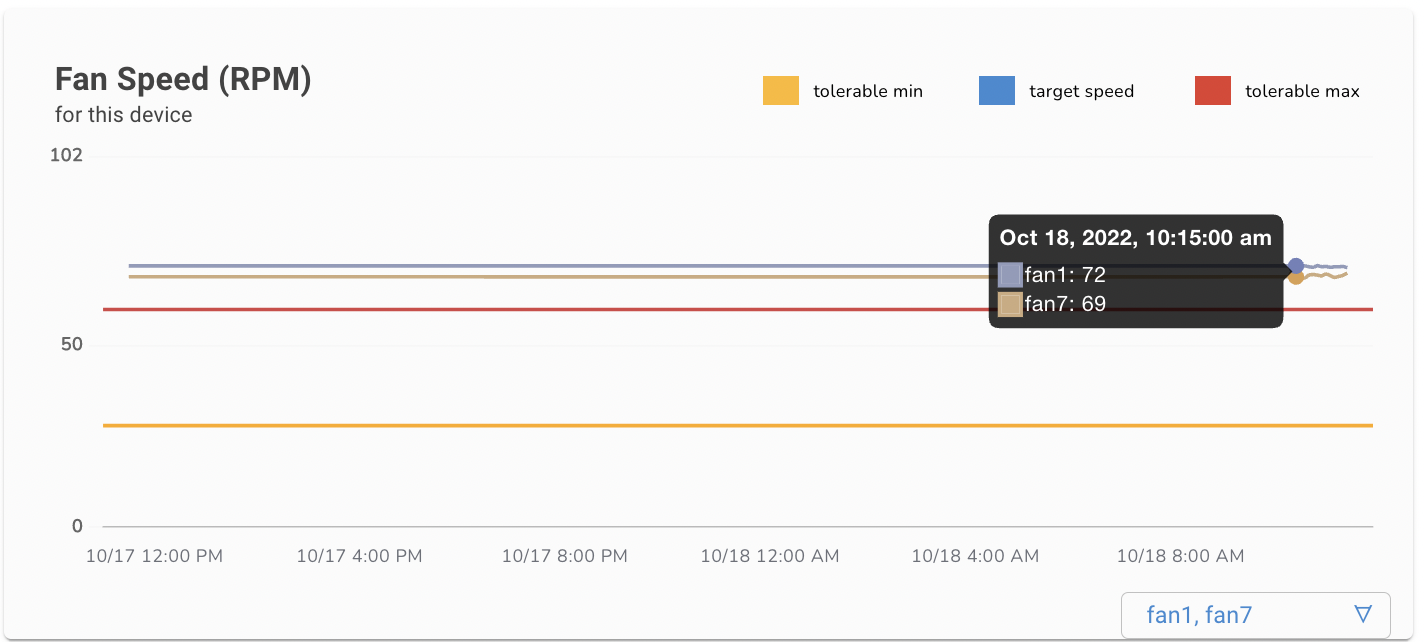
Fan Speed (%)
Here we get the status of the FAN speed percentage level across all fans available on the device
To check a specific time detail we can hover the cursor on any level
We can choose to view the customized view of a few fans at once
Here we can see the output of fan1 and fan7 in this customized view
When we move the cursor to check the exact status of fans at a particular time
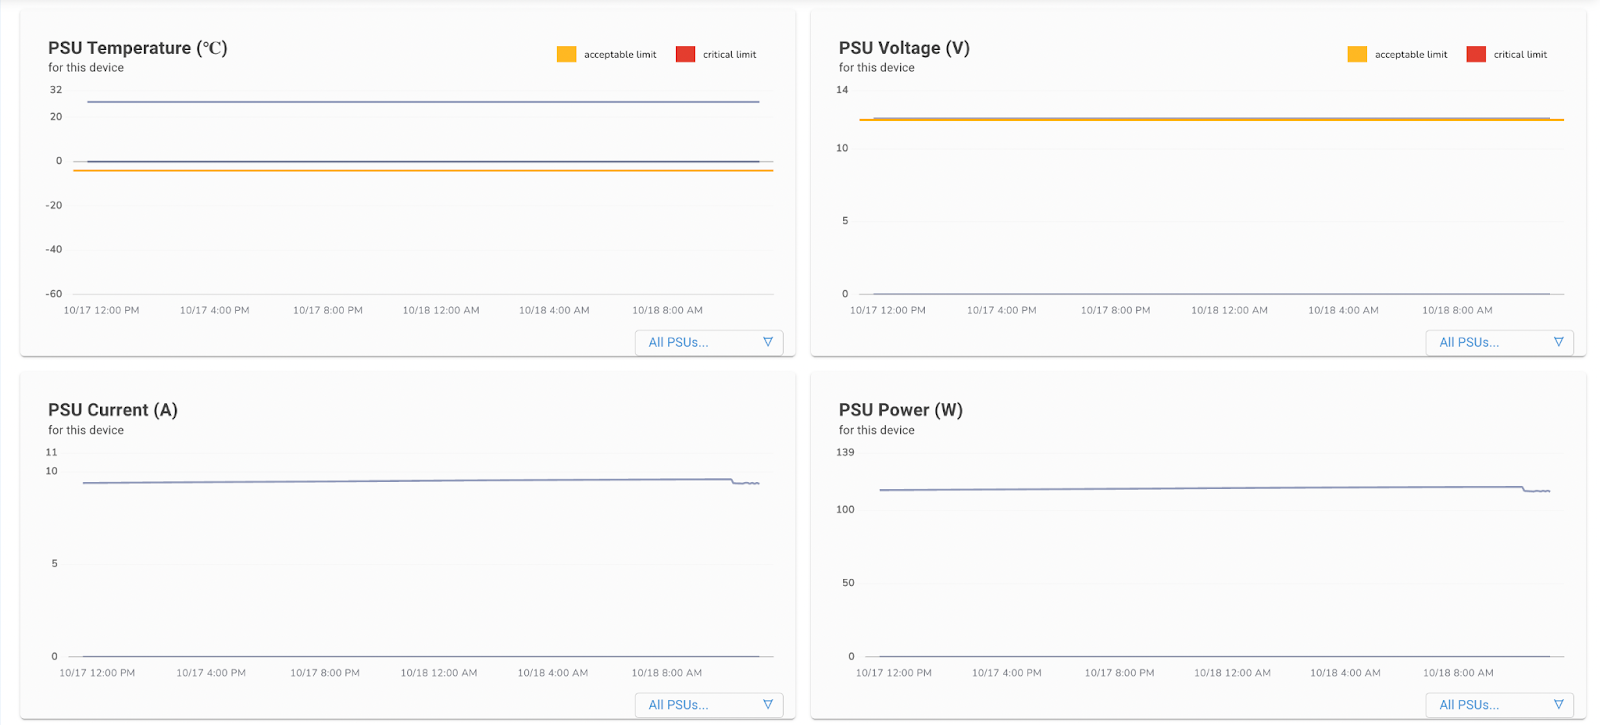
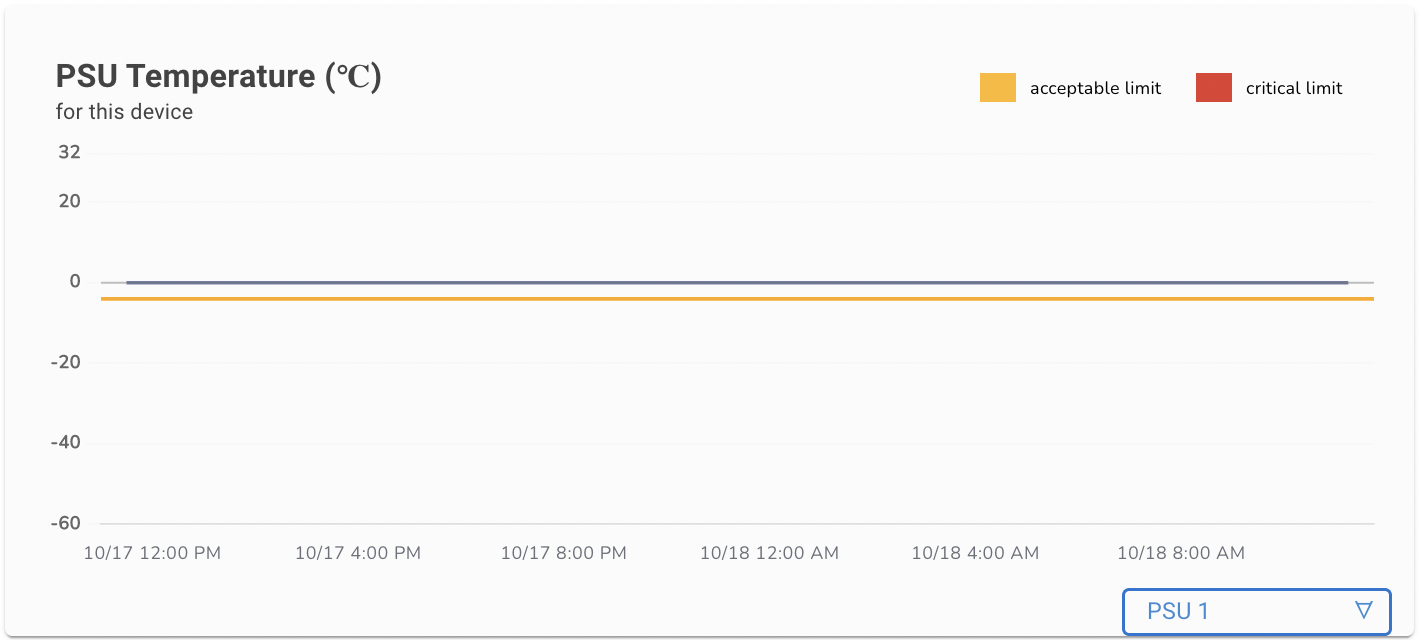
PSU Temperature (C)
This widget provides the status of the Power Supply Unit (PSU) temperature (in degree celsius) across all power supplies available on a particular device.
To check a specific time detail we can hover the cursor on any level
We can choose to view the customized view of a few PSUs at once
In our case, we have 2 PSUs, so now let's choose one of them and check the output
When we move the cursor to check the exact status of the PSU at a particular time
PSU Voltage (V)
This widget provides the status of the Power Supply Unit (PSU) voltage across all power supplies available on a particular device.
To check a specific time detail we can hover the cursor on any level
Same we can check the customized view by choosing one or two PSUs
Let us choose one of the PSU to check individual Voltage, so here we have taken PSU2 to check individual Voltage
PSU Current (A)
This widget provides the status of the Power Supply Unit (PSU) current in Amperes, across all PSUs available on a particular device.
To check a specific time detail, hover the cursor on any level
Same here as per other power supply customized views we can also check the customized view here by choosing specific PSUs
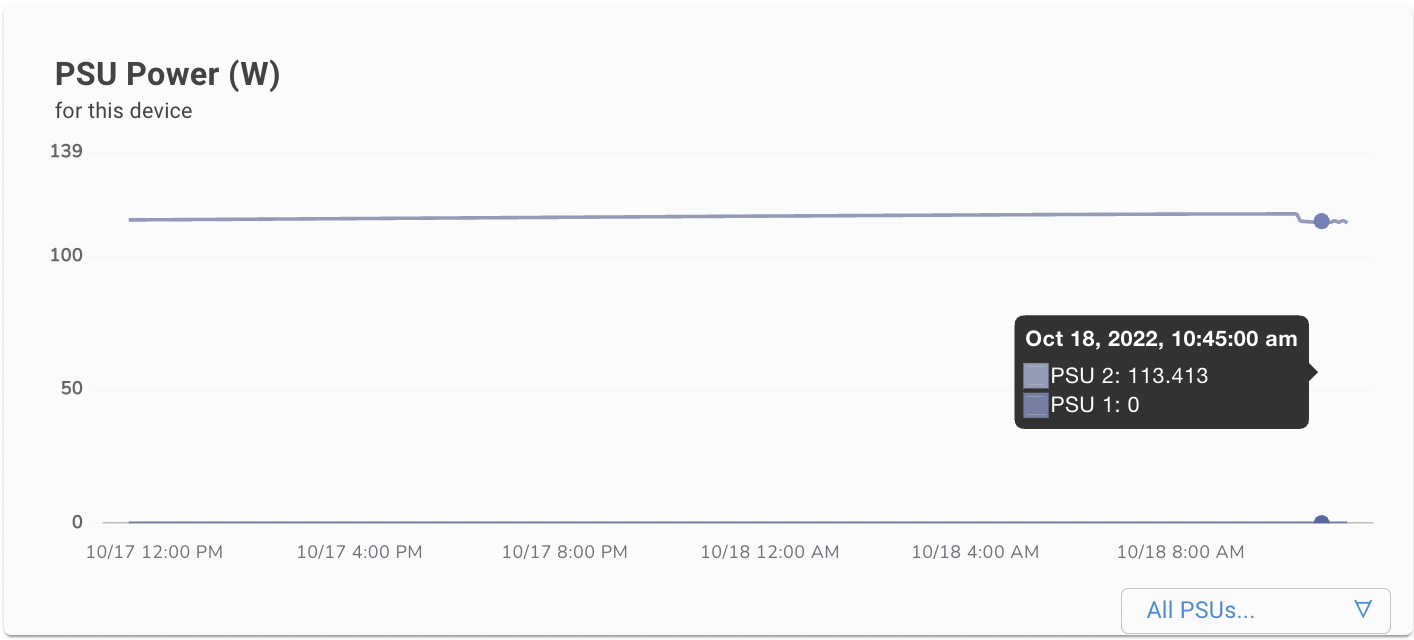
PSU Power (W)
Here we get the status of Power supply power in Watt across all power supply present on the device
To check a specific time detail we can hover the cursor on any level
We can also check the customized view of this
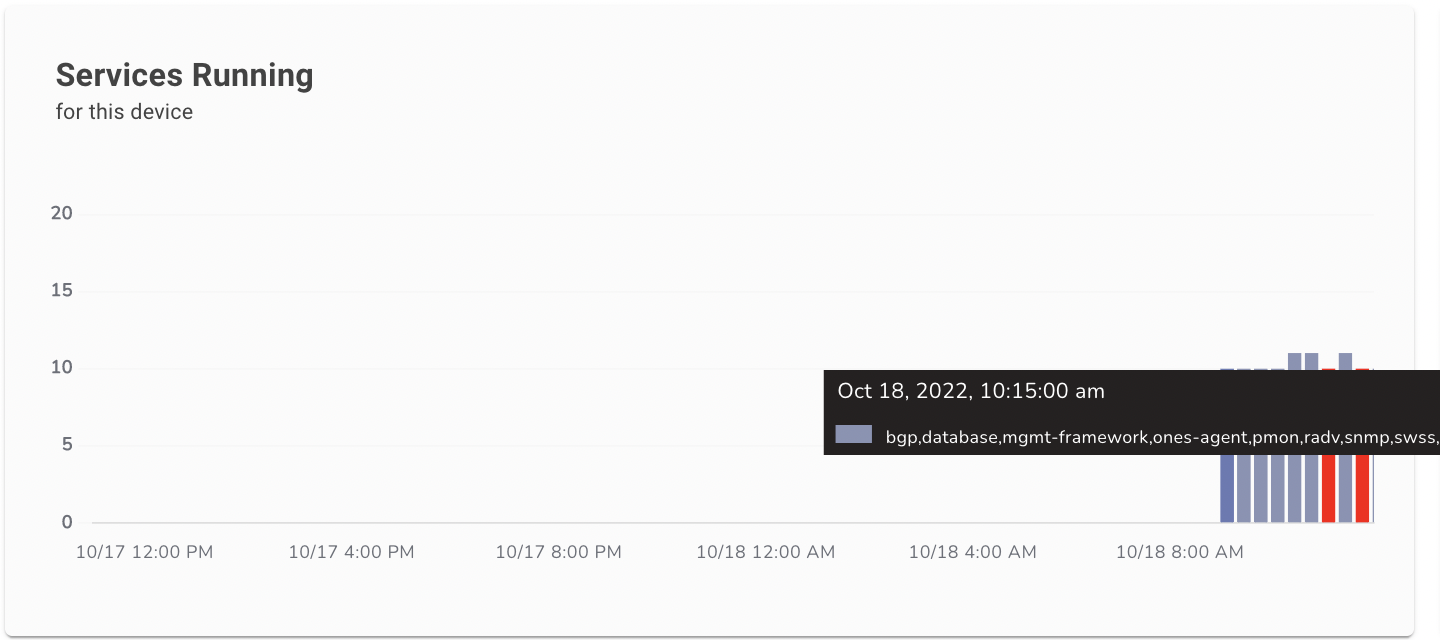
Services Running
The best widget here for Services
We can also check the total number of count of services running on the platform
This graph shows the red colour bar, red colour show at what time one of the services went down
To check a specific time detail we can hover the cursor on any level
Here we get the name and count of all the services running on the platform
Services CPU Consumption (%)
This widget shows us the CPU consumption percentage level of all services / per service.
Here we can see we have the option to check the consumption view of CPU
To check a specific time detail we can hover the cursor on any level
When we get this output we get a clear view of both CPU Utilization per service based
We can also customise the view of this widget by choosing some specific application
We have all the services button here to choose
Again we can check the view of all the services we need
So here is the view of only the BGP service
We can see the CPU and Memory consumption for these 2 services
Services Memory Consumption (%)
This widget shows us the Memory consumption percentage level of all services / per service.
Here we can also check the consumption view of only Memory.
To check a specific time detail we can hover the cursor on any level
Here we get a clear view of Memory Utilization per service based
We can also customise the view of this widget by choosing some specific application
We have all the services button here to choose
So here is the view of only the BGP service
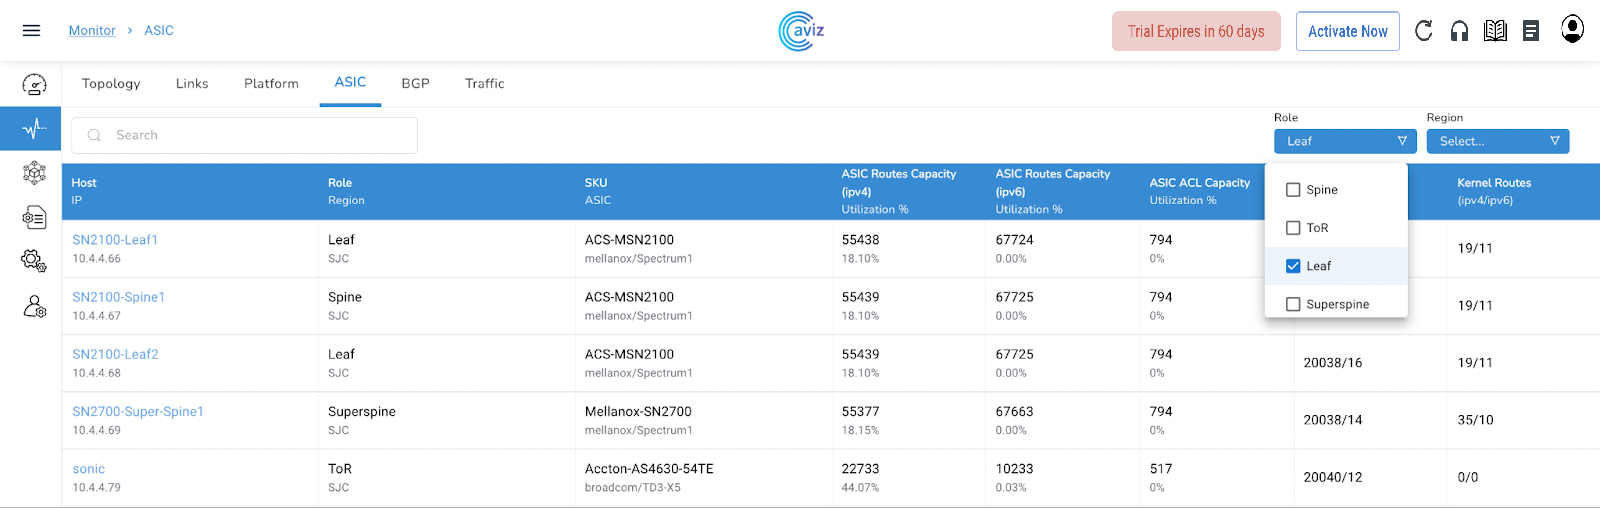
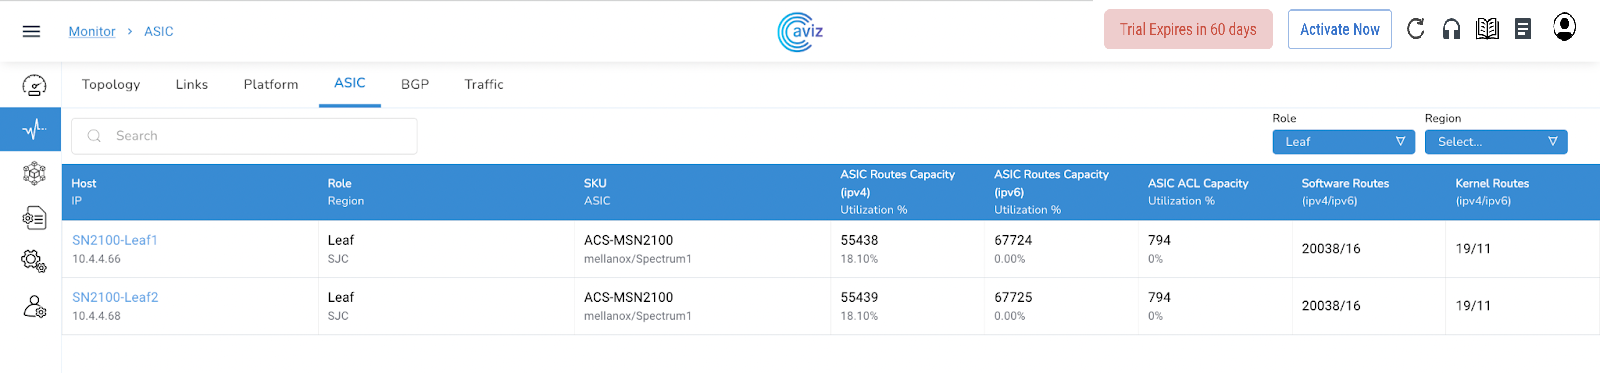
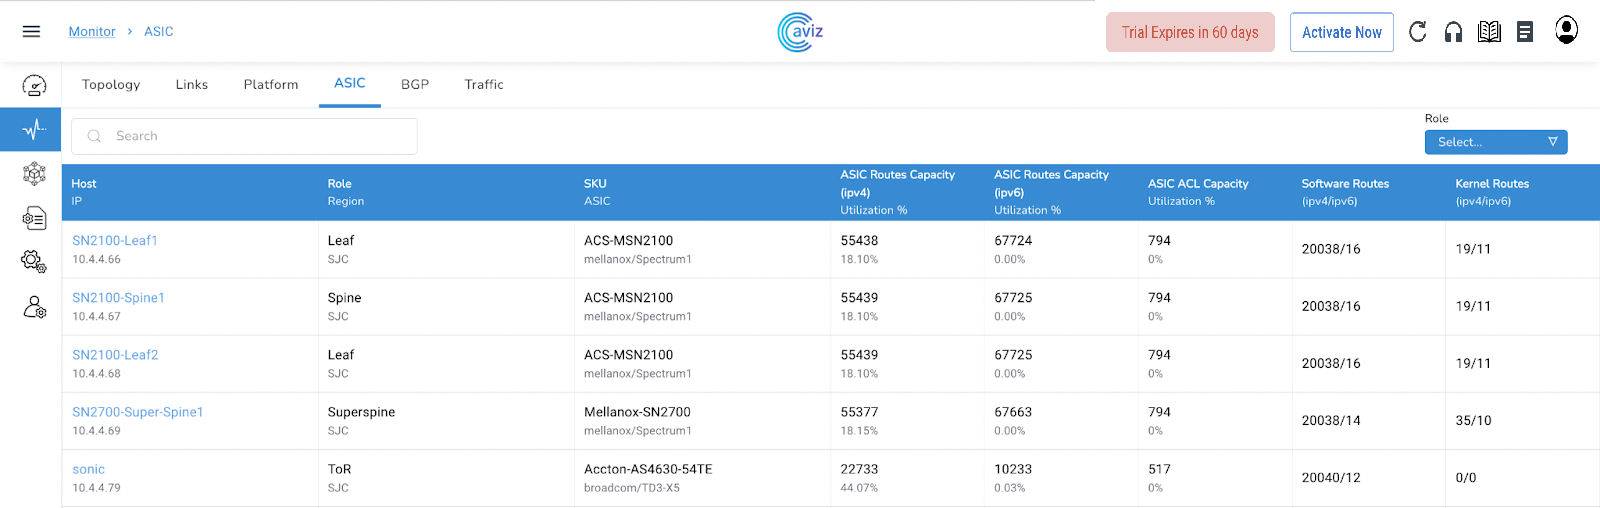
ASIC
This page shows the view of ASIC Capacity and a few more details related to ASIC
This widget Shows
Roles/Region per device
SKU and ASIC details per device
Feature
Details
This ASIC Widget give us the control to get the output per Role and Region basis also
Let's choose Leaf Role to get the customized view
In the same way, we can customize the view by Region
This is the extended view of the device capacity for all the IPv4 and IPv6 ASIC routes, ACL utilization, software, and kernel routes
Using this page a user will be able to troubleshoot the protocol or any misbehavior happening on the devices due to any capacity issue of routes
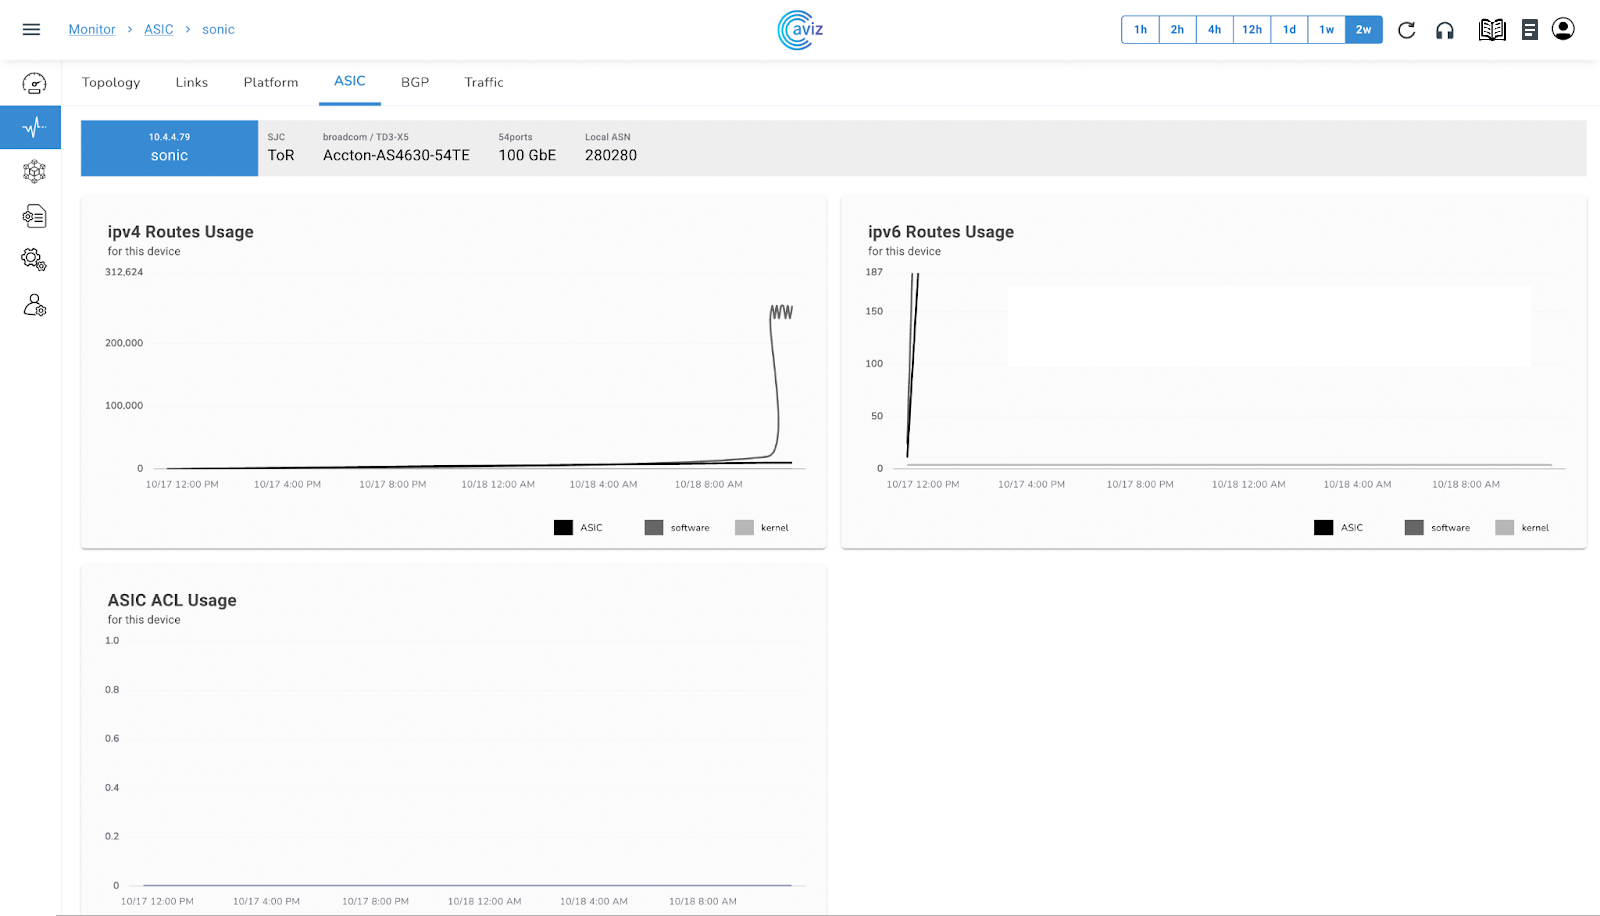
Per Device Status
This widget gives us the capability to check the extended view of the Routes & ACL usage with a range of time
Click on any of the devices to get the extended view
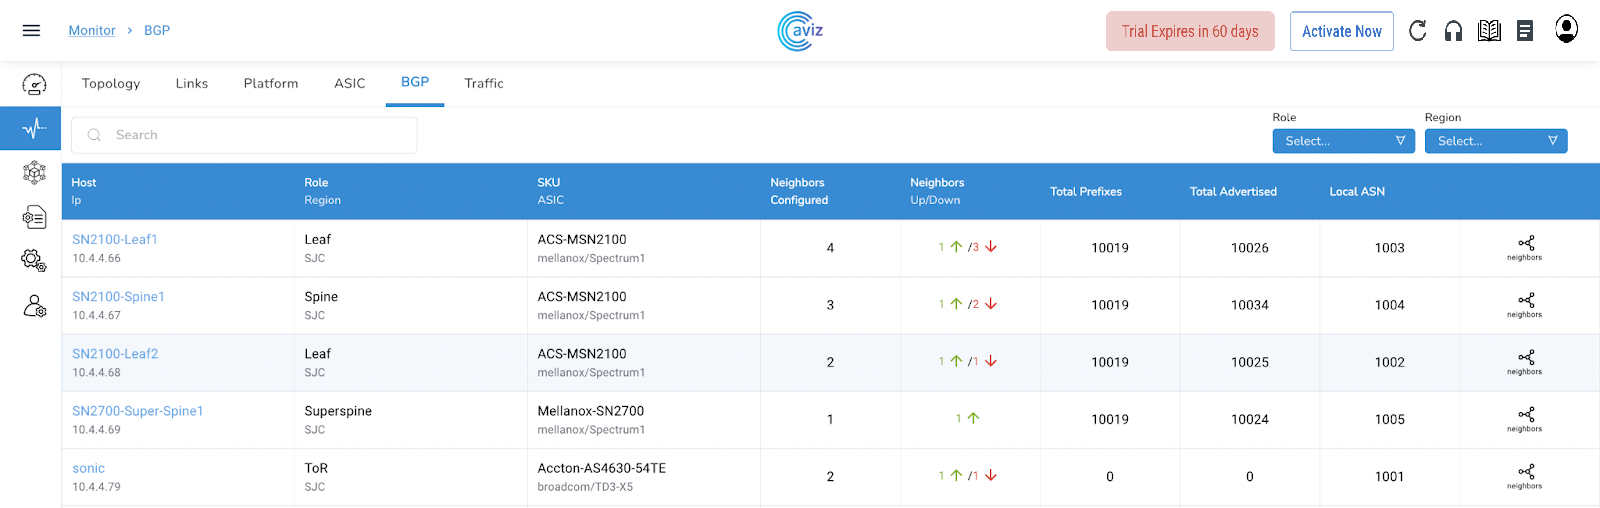
BGP
This BGP Page shares the data of BGP neighbours present across managed devices
Feature
Feature
This page gives the best details of the BGP neighbours connected with the devices and possible metrics/values a user can use to troubleshoot a BGP neighbour
Neighbor View
This shows the status of the neighbour's details, the total number of neighbours, received routes, neighbour RID, BGP AS number & much moreWe have the option here to check the neighbour details and status of RoutesWe can click on neighbours to get more details about all neighbours connected
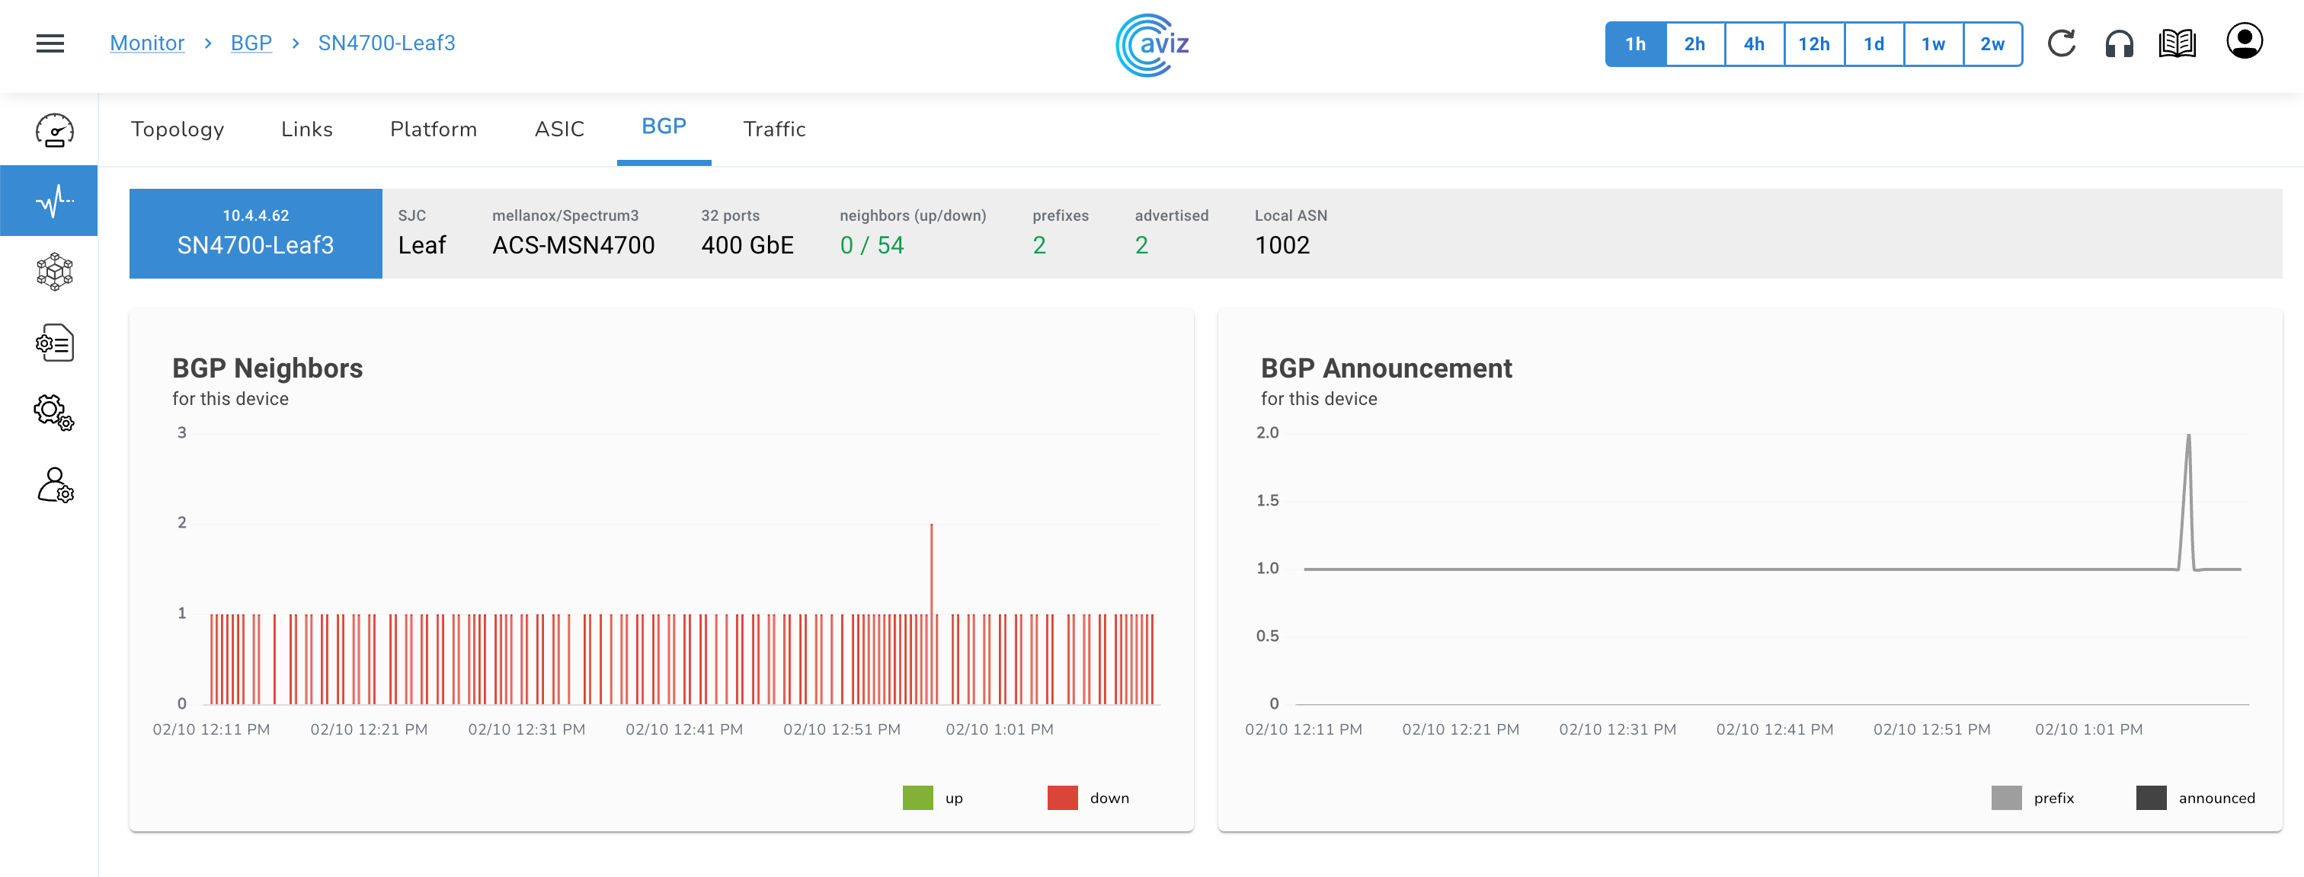
Per device status (Neighbour's & Announcement)
The user can get per-device status by choosing a particular neighbour
Click on the device name to get the status
This new page shows the status of BGP neighbours about UP and Down status
On right side it shows the BGP announcements and the local prefixes present in BGP table
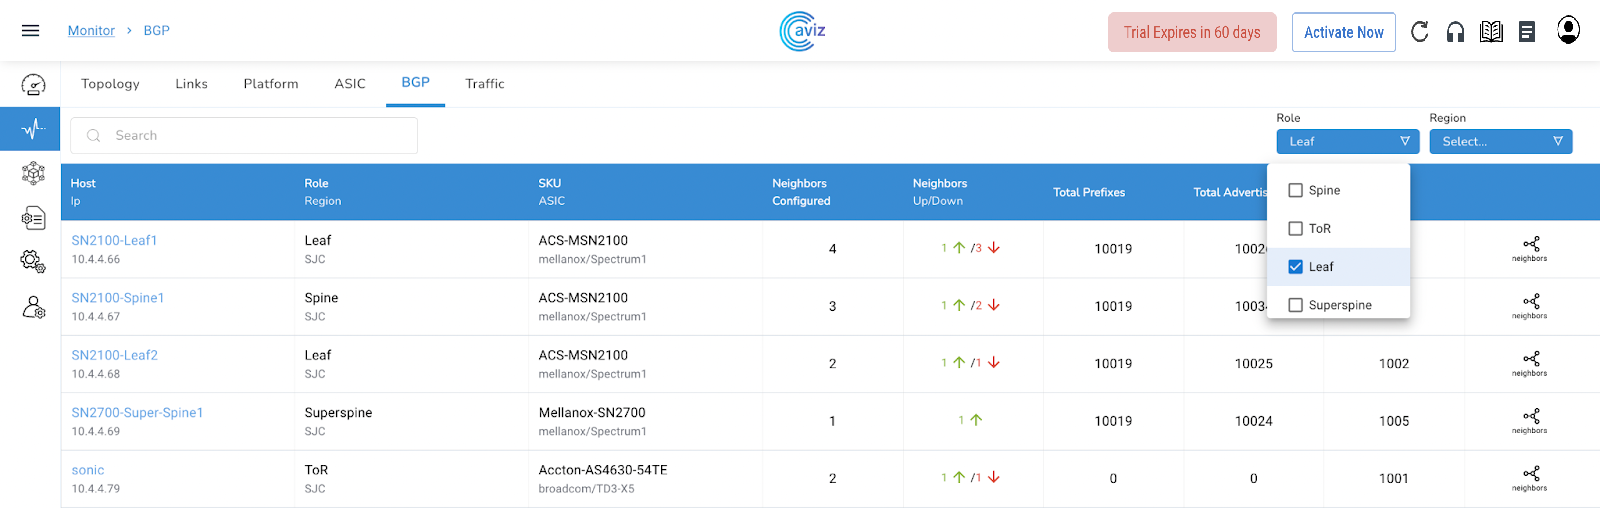
Customized view
This page gives us the power to check neighbours as per Roles and Region-based
Let's check how we can filter as per Role-based
Here is the global view of all the Devices with BGP status
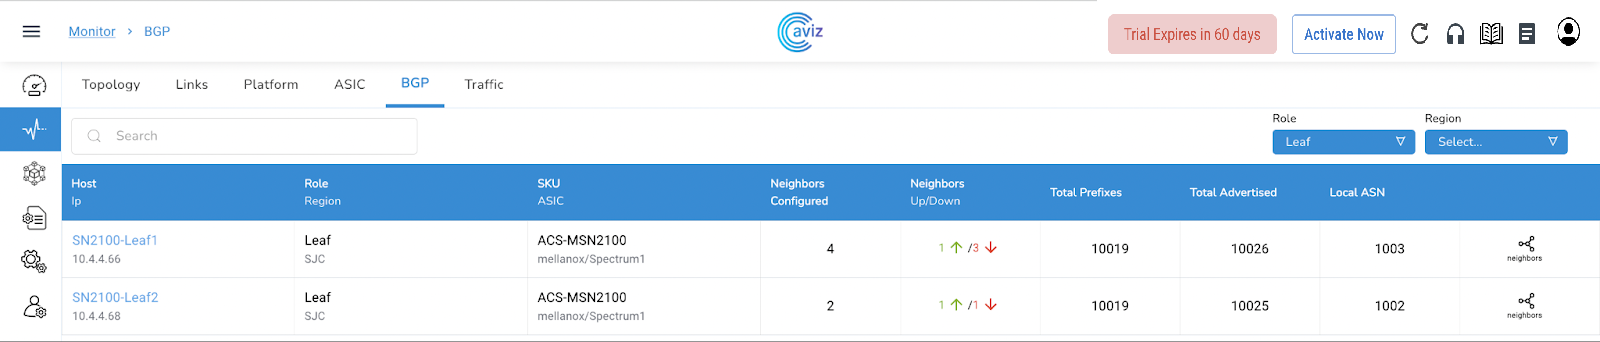
Choose Leaf Role to check customized view
After having only Leaf Roles here is the modified output
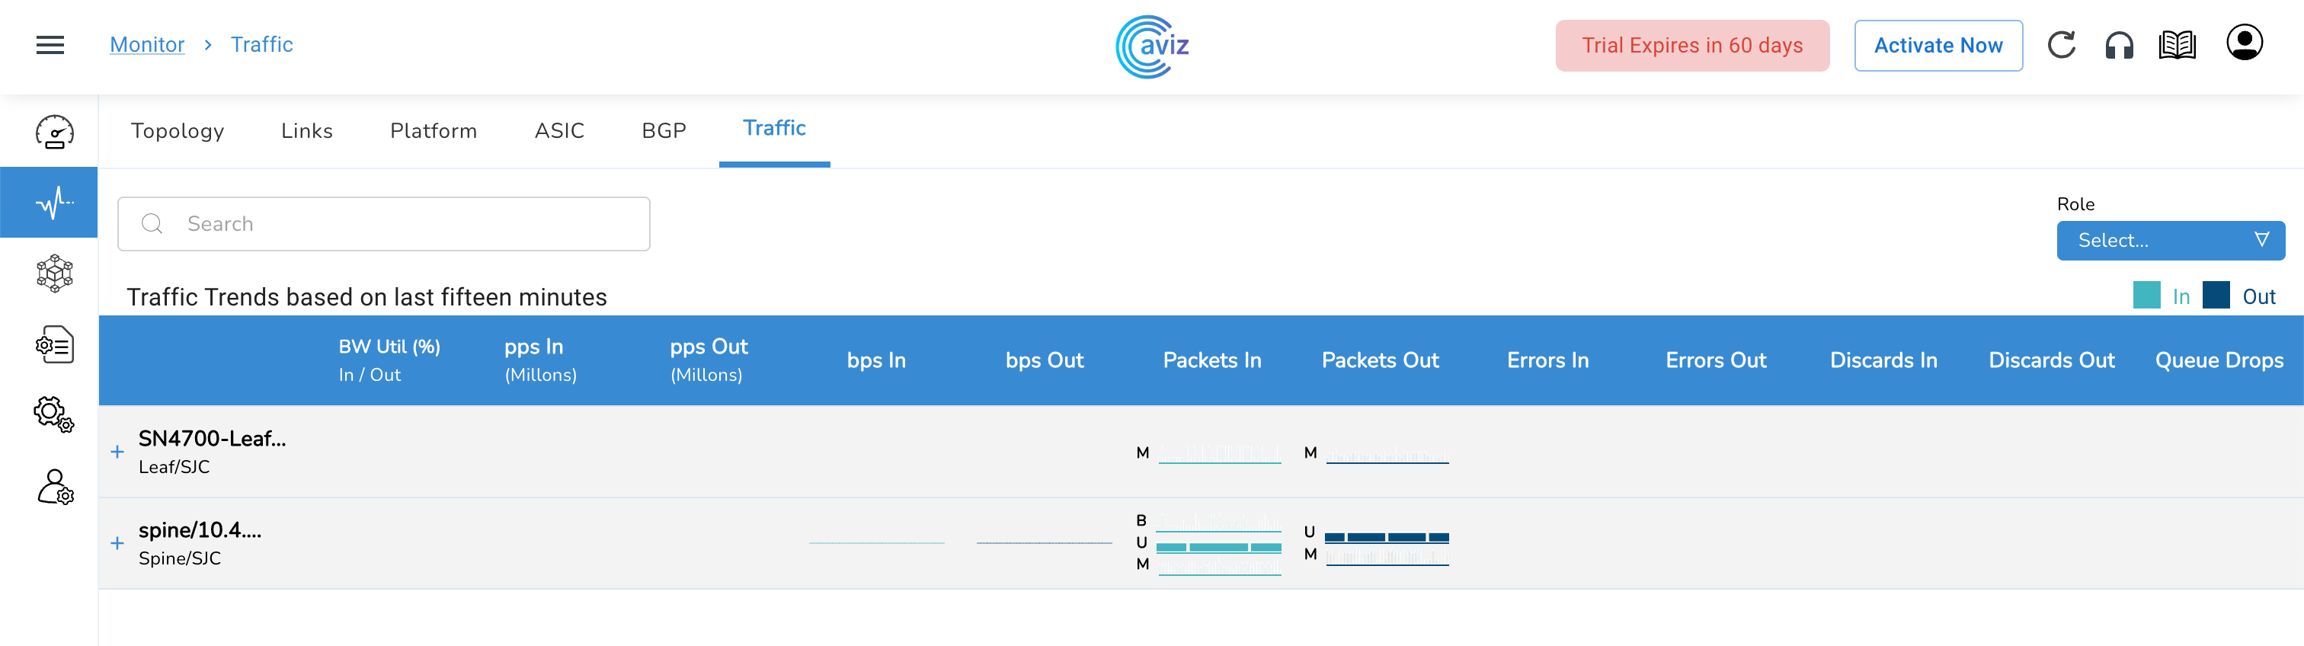
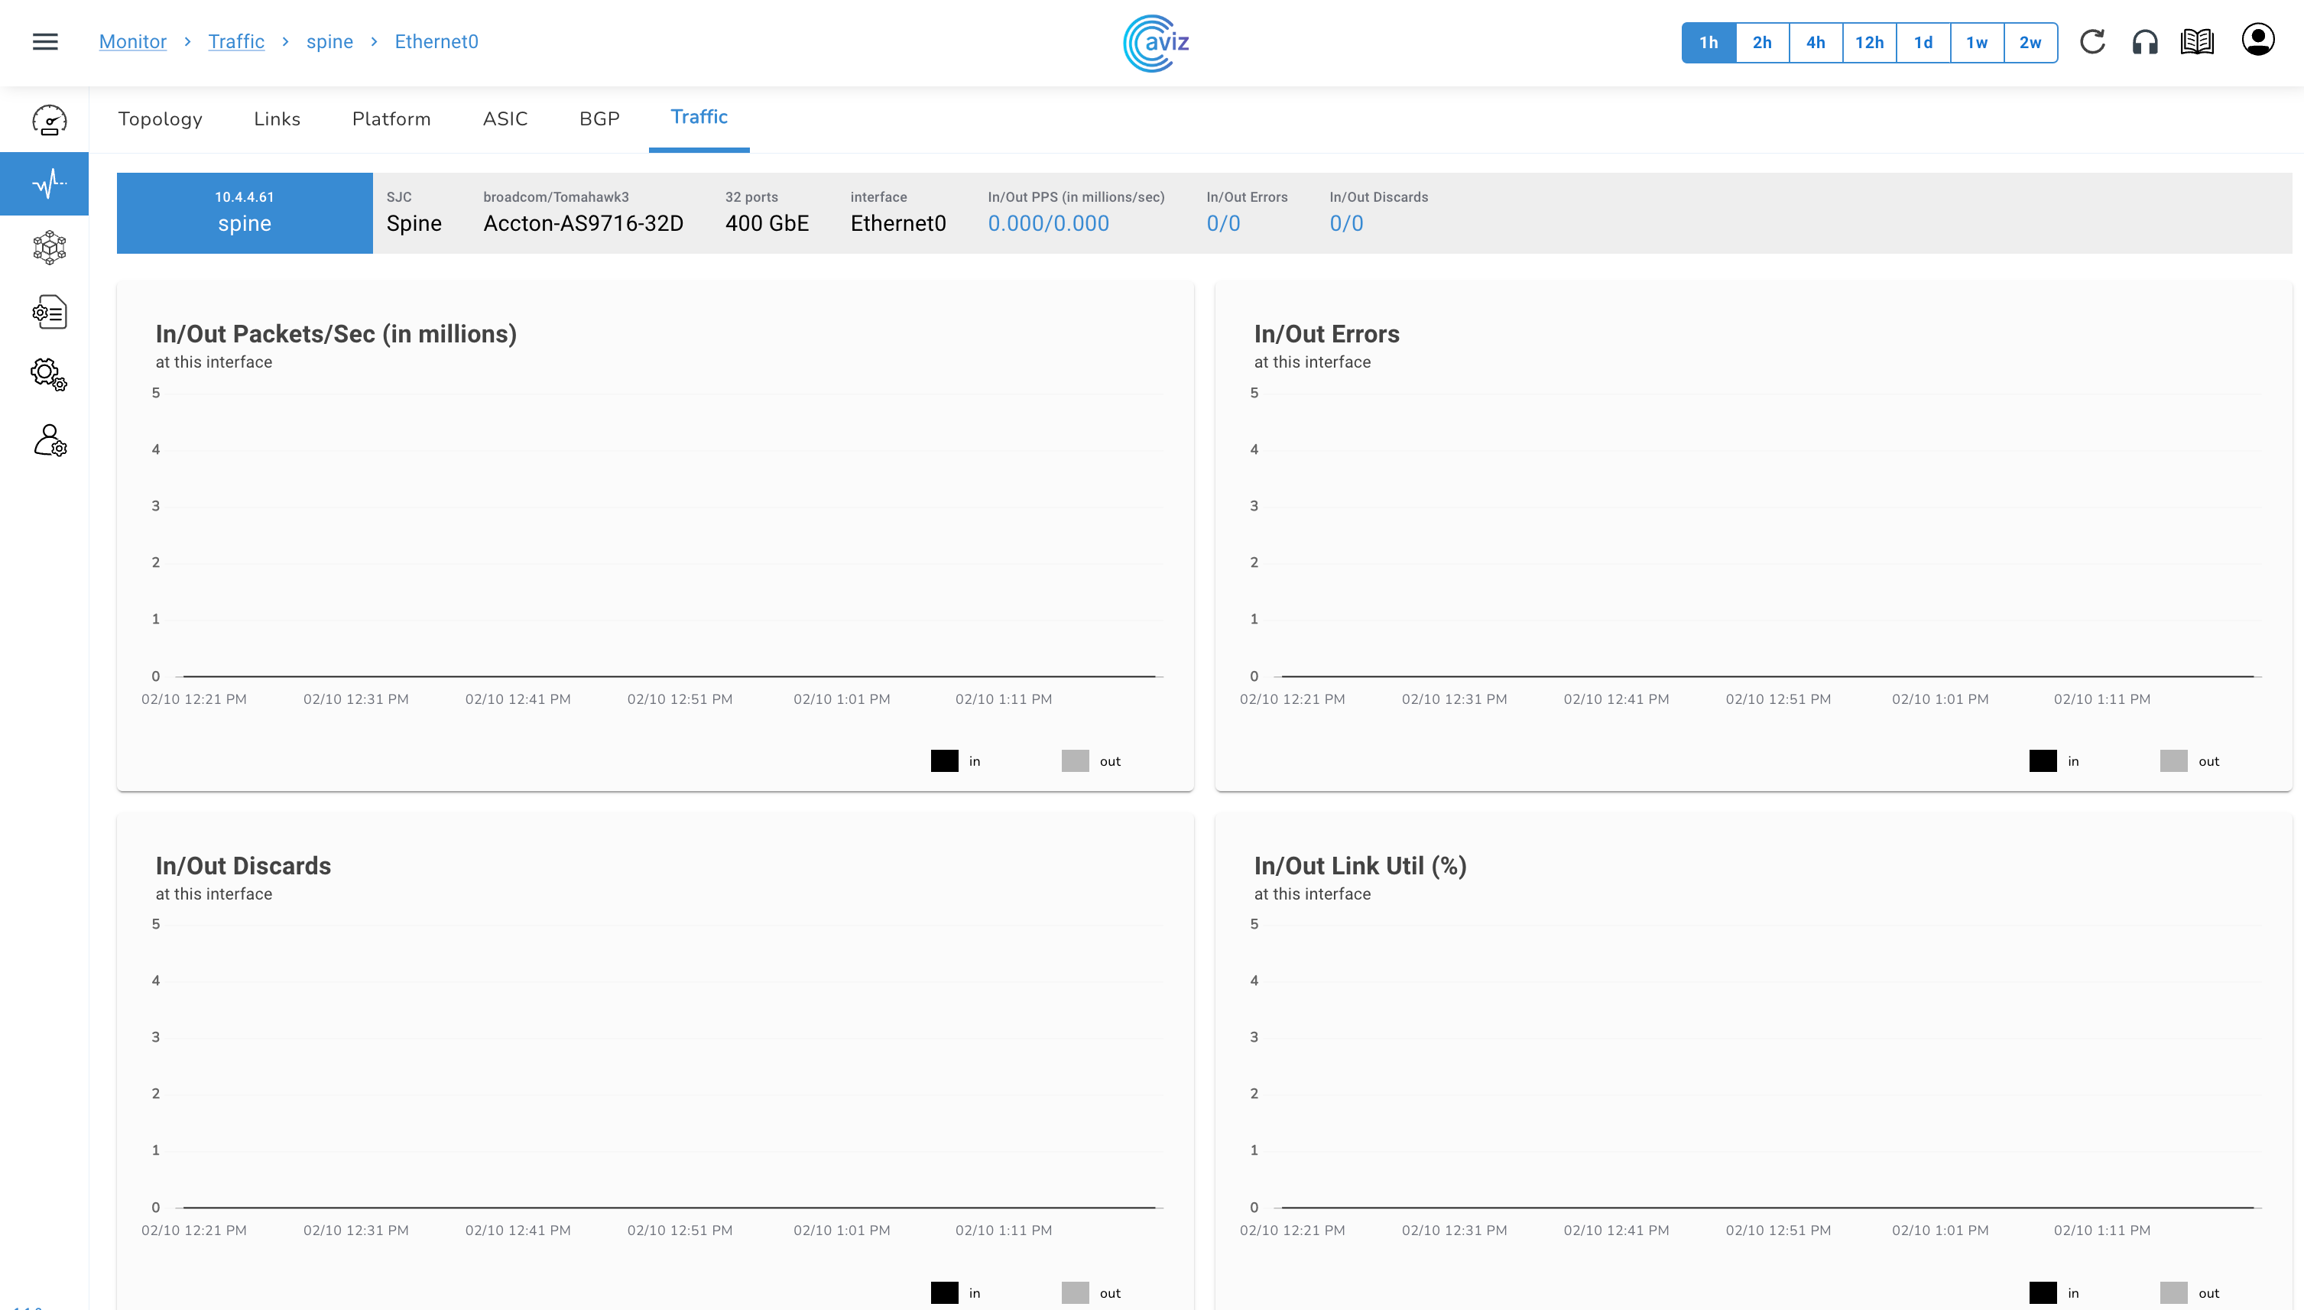
Traffic
Using this widget we can check the input and output errors across all the devices
This widget also shows the input and output packet per device
Navigate to Monitor >> Traffic
This page shows the information:
Bandwidth utilization in percentage
Input packets per second in millions
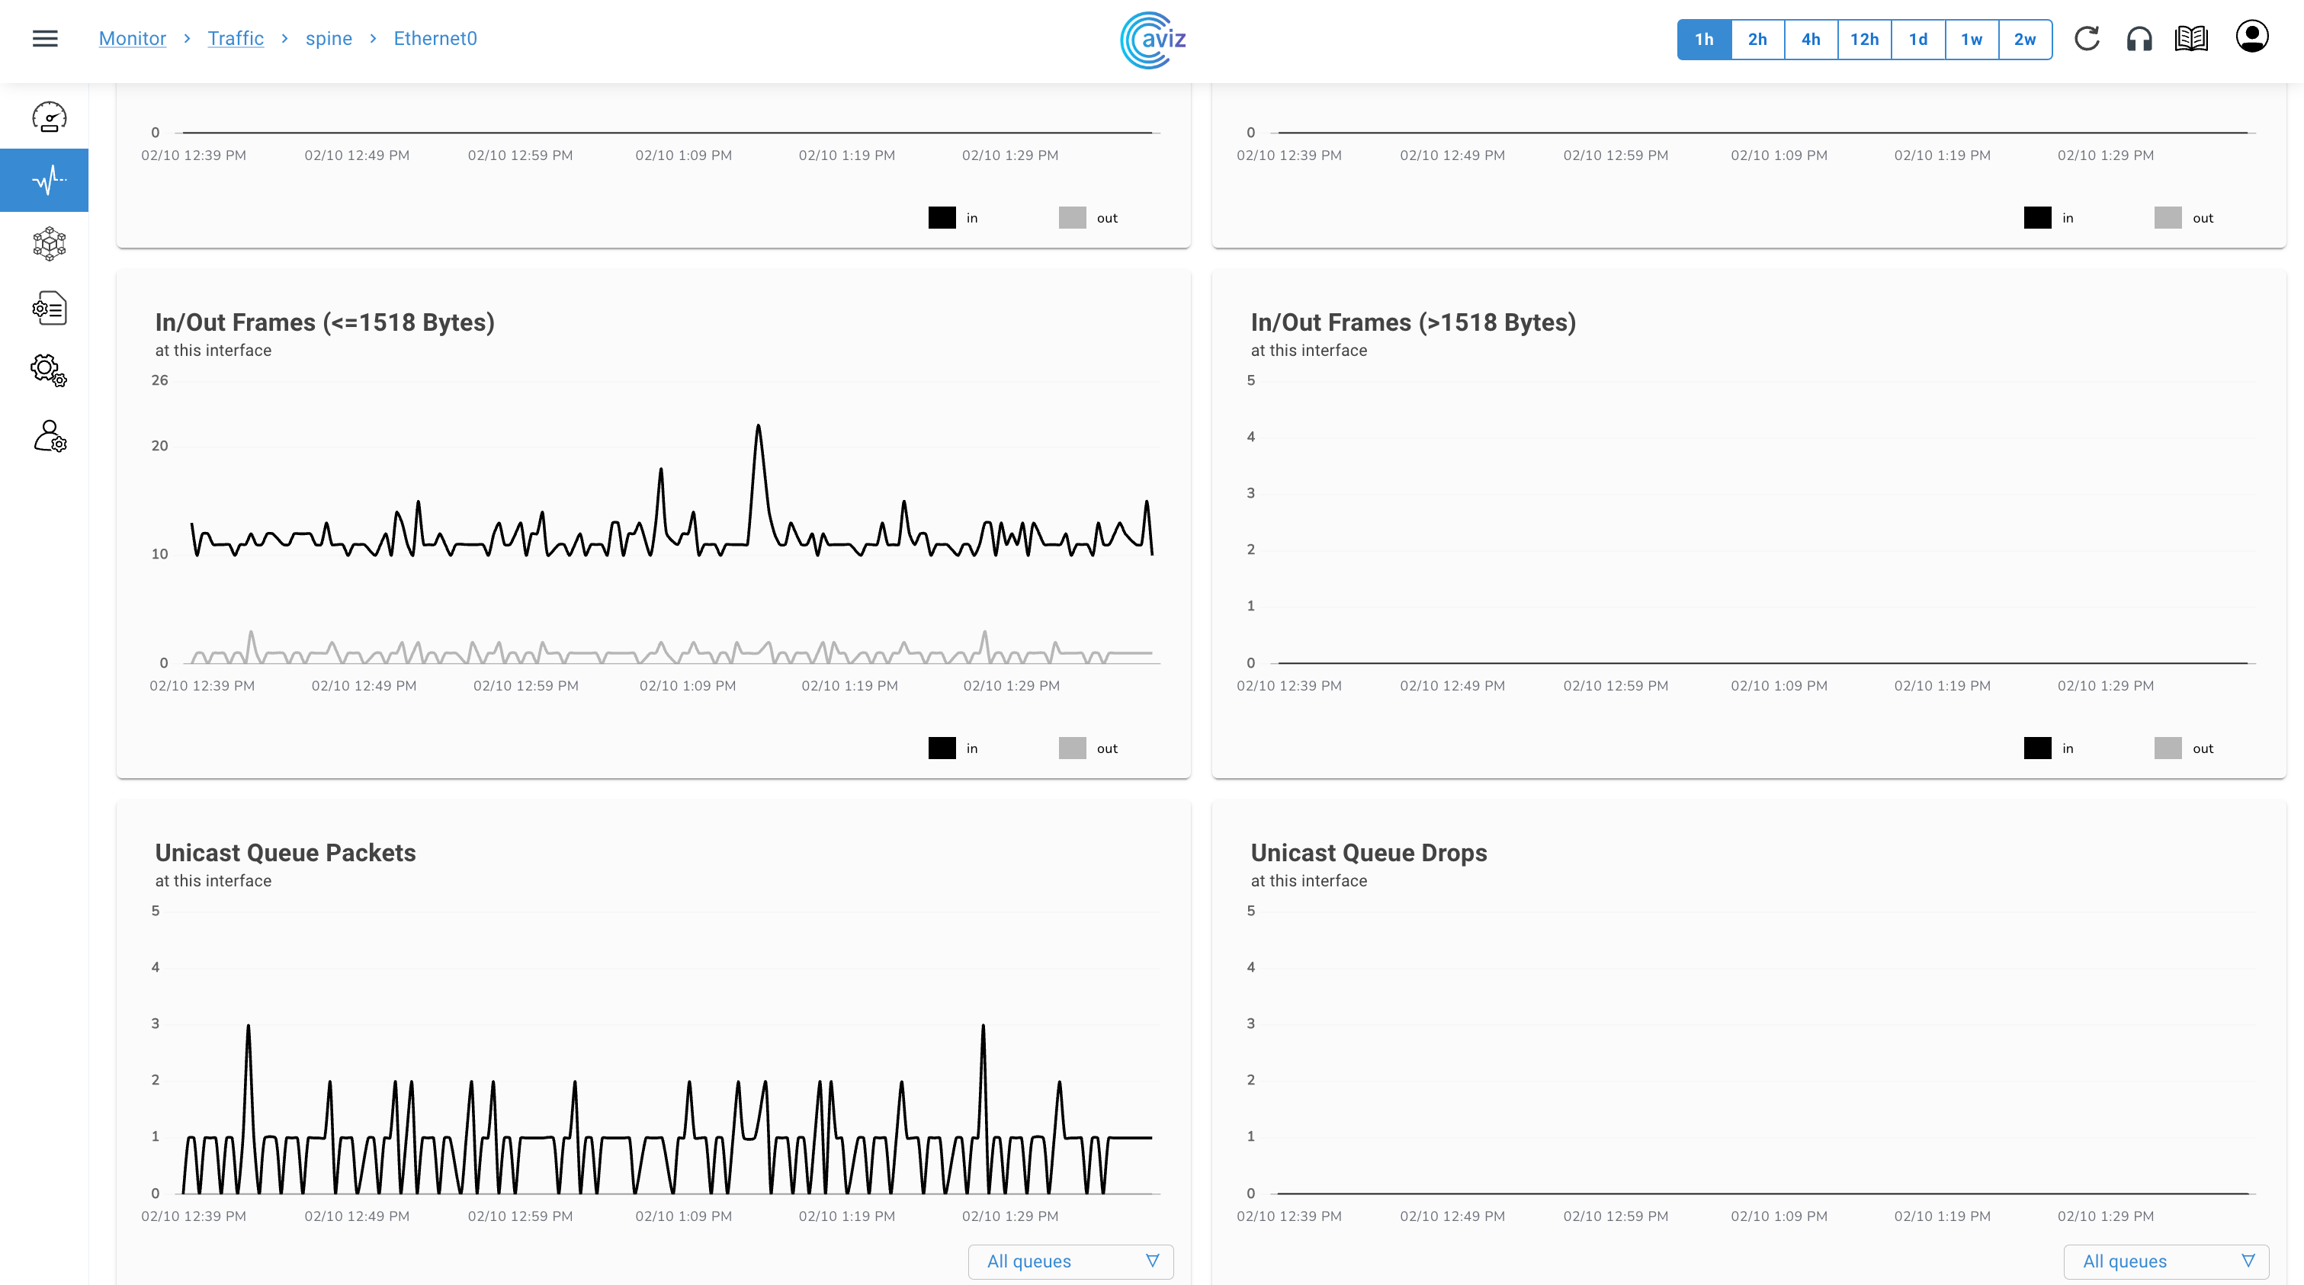
This page shows the traffic drop rate per interface based and will be very useful while doing any troubleshooting for a traffic drop
Using these details a user can check more details inside to fix the issue of dropping/discarding packets
Common Issues and Troubleshooting Steps
Prefixes (Total/Advertised)
ASN
Leaf
ToR
When we hover the cursor over any device, we get the device status and device details popup
Device Manufacturer
Manufactured Date
Date of Manufacturing
Admin and Operator status
Local and Remote status of link
Role: ToR
Region: San Jose
CPU Utilization (%)
Memory Utilization (%)
CPU Temperature (℃)
PSU Temperature (℃)
PSU Voltage (V)
Fan Speed (RPM)
Details of the temperature of the CPU across all the devices in degrees celsius
Any device that breaches the configured acceptable or critical value will be shown here
Click on any device to get the view/status of all the components related to that device
Average PSU Temperature (C)
Power Supply Temperature in degrees celsius
Any device that breaches the configured acceptable or critical value will be shown here
Click on any device to get the view/status of all the components related to that device
PSU (Voltage)
Power Supply Voltage readings in volts
Any device that breaches the configured acceptable or critical value will be shown here
Click on any device to get the view/status of all the components related to that device
Average Fan Speed (%)
Fan Speed in % of maximum supported RPM
Any device that breaches the configured acceptable or critical value will be shown here
Click on any device to get the view/status of all the components related to that device
Region
Spine
Leaf
ToR
Let’s check it with a ToR filter
Asia Pacific
Let’s check it with Asia Pacific Region
Asia Pacific
3 Roles available
Super Spine
Spine
Leaf
ToR
Let’s check it with a combination of Asia Pacific & Spine Role
PSU Power (W)
Services Running
Services CPU/Memory Consumption (%)
To view per device status including these new widgets, click on any of the device statuses present on the Platform tab
ASIC Route Capacity in IPv4 & current utilization
ASIC Route Capacity in IPv6 & current utilization
ASCI ACL capacity & utilization
Software routes for IPv4 and IPv6
Kernel Routes for IPv4 and IPv6
Kernel Routes for IPv4 and IPv6
routes that are installed in main Routing table
These are the total number of advertised prefixes by the router to other BGP neighbours
This is the Local BGP AS number
Here we have the control to check more details on neighbours
This share the count of established and dropped connections per neighbour
Here is the view of the Keep Alive timer:
Tx: how many keepalives have been transmitted
Here is the view of the Route Refresh messages count:
Tx: how many Route-Refresh messages have been transmitted
RX: how many Route-Refresh messages have been received
Here is the view of the Updates Count:
Tx: how many times updates have been transmitted
RX: how many times updates have been received
Output packets per second in millions
Input packets
Output packets
Input and Output discards
When we click on any particular interface it gives the timescale of the inputs and output packets with Errors and Discards & all metrics in detail
Hostname
Hostname of the managed device
Role
Role of the device
Port/Interface
Interface details
Port Speed
Link speed of connected devices
Transceiver
SFP/QSFP Optics statuts
HOST / IP
Device Name
Device IP
Roles/Region
Device Role
Device Region
SKU/ASIC
SKU (Stock Keeping Unit)
ASIC
Port/Max Speed
Total number of ports available
Speed of ports
CPU Utilization (%)
CPU Utilization reported in 4 states
Normal
Acceptable
Critical - Action needed
Not Streaming - Agent is not up
Click on any device to get the view/status of all the components related to that device
Memory Utilization (%)
Memory Utilization reported in 4 states
Normal
Acceptable
Critical - Action needed
Not Streaming - Agent is not up
Click on any device to get the view/status of all the components related to that device
1
Time Frame: Check Utilization Trends based on Time Range
The application has the capacity to store up to 2 weeks of data
2
Refresh Component Status
3
Raise a Ticket for Technical Support
4
Device Details
Platform
Number of Ports and Speed
Agent Version
Uptime
CPU Utilization
Memory Utilization
CPU Temperature
Services running on the device
Roles/Region per device
SKU and ASIC details per device
ASIC Route Capacity in IPv4 & current utilization
ASIC Route Capacity in IPv6 & current utilization
ASCI ACL capacity & utilization
Feature
Use
When we move the cursor to metrics this gives the usage view of ipv4:
ASIC
Kernel
Software
When we move the cursor to metrics this gives the usage view of ipv6:
ASIC
Kernel
Software
When we move the cursor to metrics this gives the usage view of ACL:
ASIC
Kernel
Software
Here we can get:
Device name
Device IP
Here We get the view of:
Roles and Region
this column shares the details of:
SKU
ASIC
This shared the count of total BGP neighbours
This column share the status of
how many BGP neighbours are UP and running
How many BGP neighbours are in Down state
Feature
Feature
Here we get the details of connected neighbours
Neighbour Device Name
Neighbour IP
This is the view Roles and Region per neighbour basis
This column shares the neighbour:
SKU details per neighbour
ASIC details per neighbour
Here we get the Neighbour BGP AS number
This shares the neighbour status of uptime, from how long the neighbour is connected
Manufacturer
Average CPU Temperature (C)
Software routes for IPv4 and IPv6
routes we get in BGP table
This column shares the Total Prefixes Present in BGP
Here we get the detail of the last neighbour reset timer
RX: how many keepalives have been received
VXLAN EVPN Asymmetric IRB with MCLAG
Template Details: VXLAN EVPN Asymmetric IRB with MCLAG in the given topology
Devices used
2- Spine Devices
4- Leaf Devices
2- End Host
Topology
BGP-IP-CLOS VXLAN EVPN Asymmetric IRB with MCLAG Standard Template
This section explains how you can upgrade the device OS using ONES.
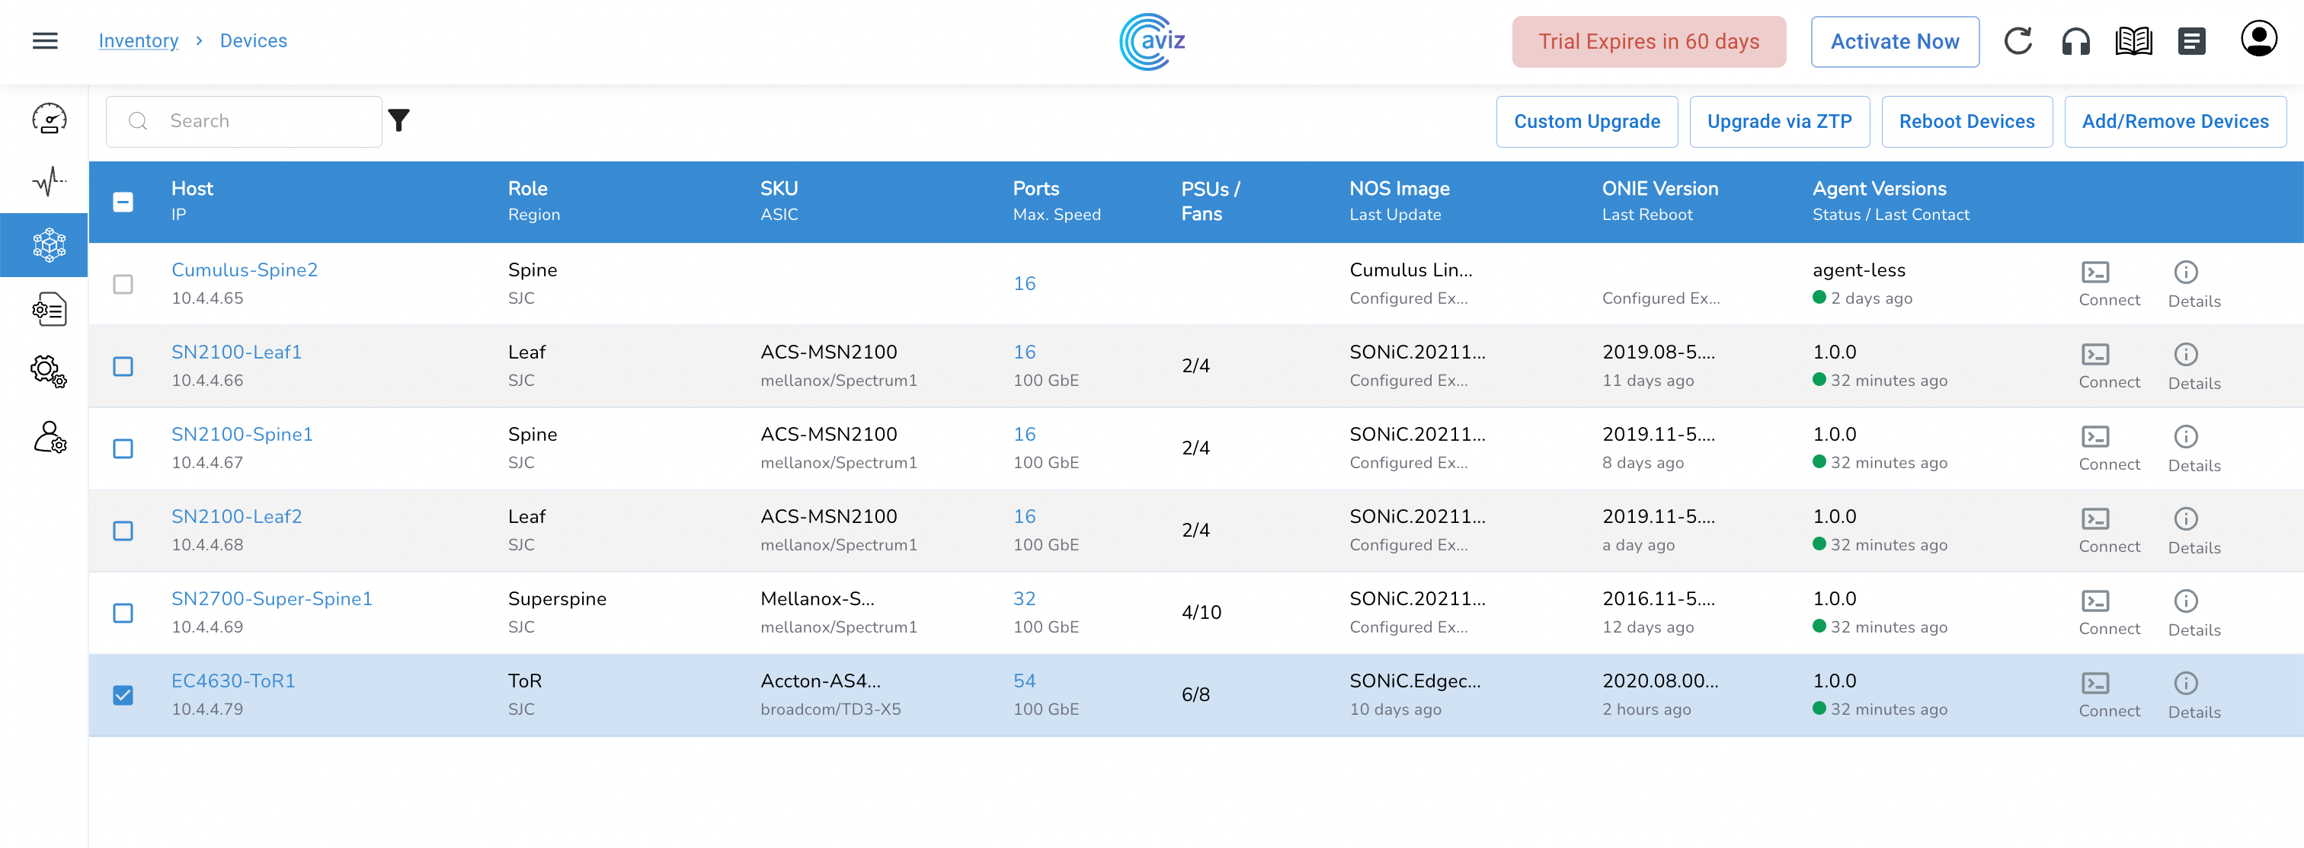
You can onboard all the devices on the application and can get a complete view of all the populated tables
The Inventory tab has the below mentioned features:
Custom OS upgrade: Upgrade the device OS with any customised image. You need to provide the correct path to ensure the OS is updated successfully
OS upgrade via ZTP: Upgrade the device OS via Zero touch provisioning
Reboot devices: Reboot the device from a single click in the UI
Add/Remove devices from the dashboard: You can onboard the devices using the YAML file upload or via in-built editor in the UI
Devices
Navigate to Inventory >> Devices
Using this tab, user can:
Onboard the device to the application using ADD/Remove Devices
Upgrade the device using Custom Upgrade
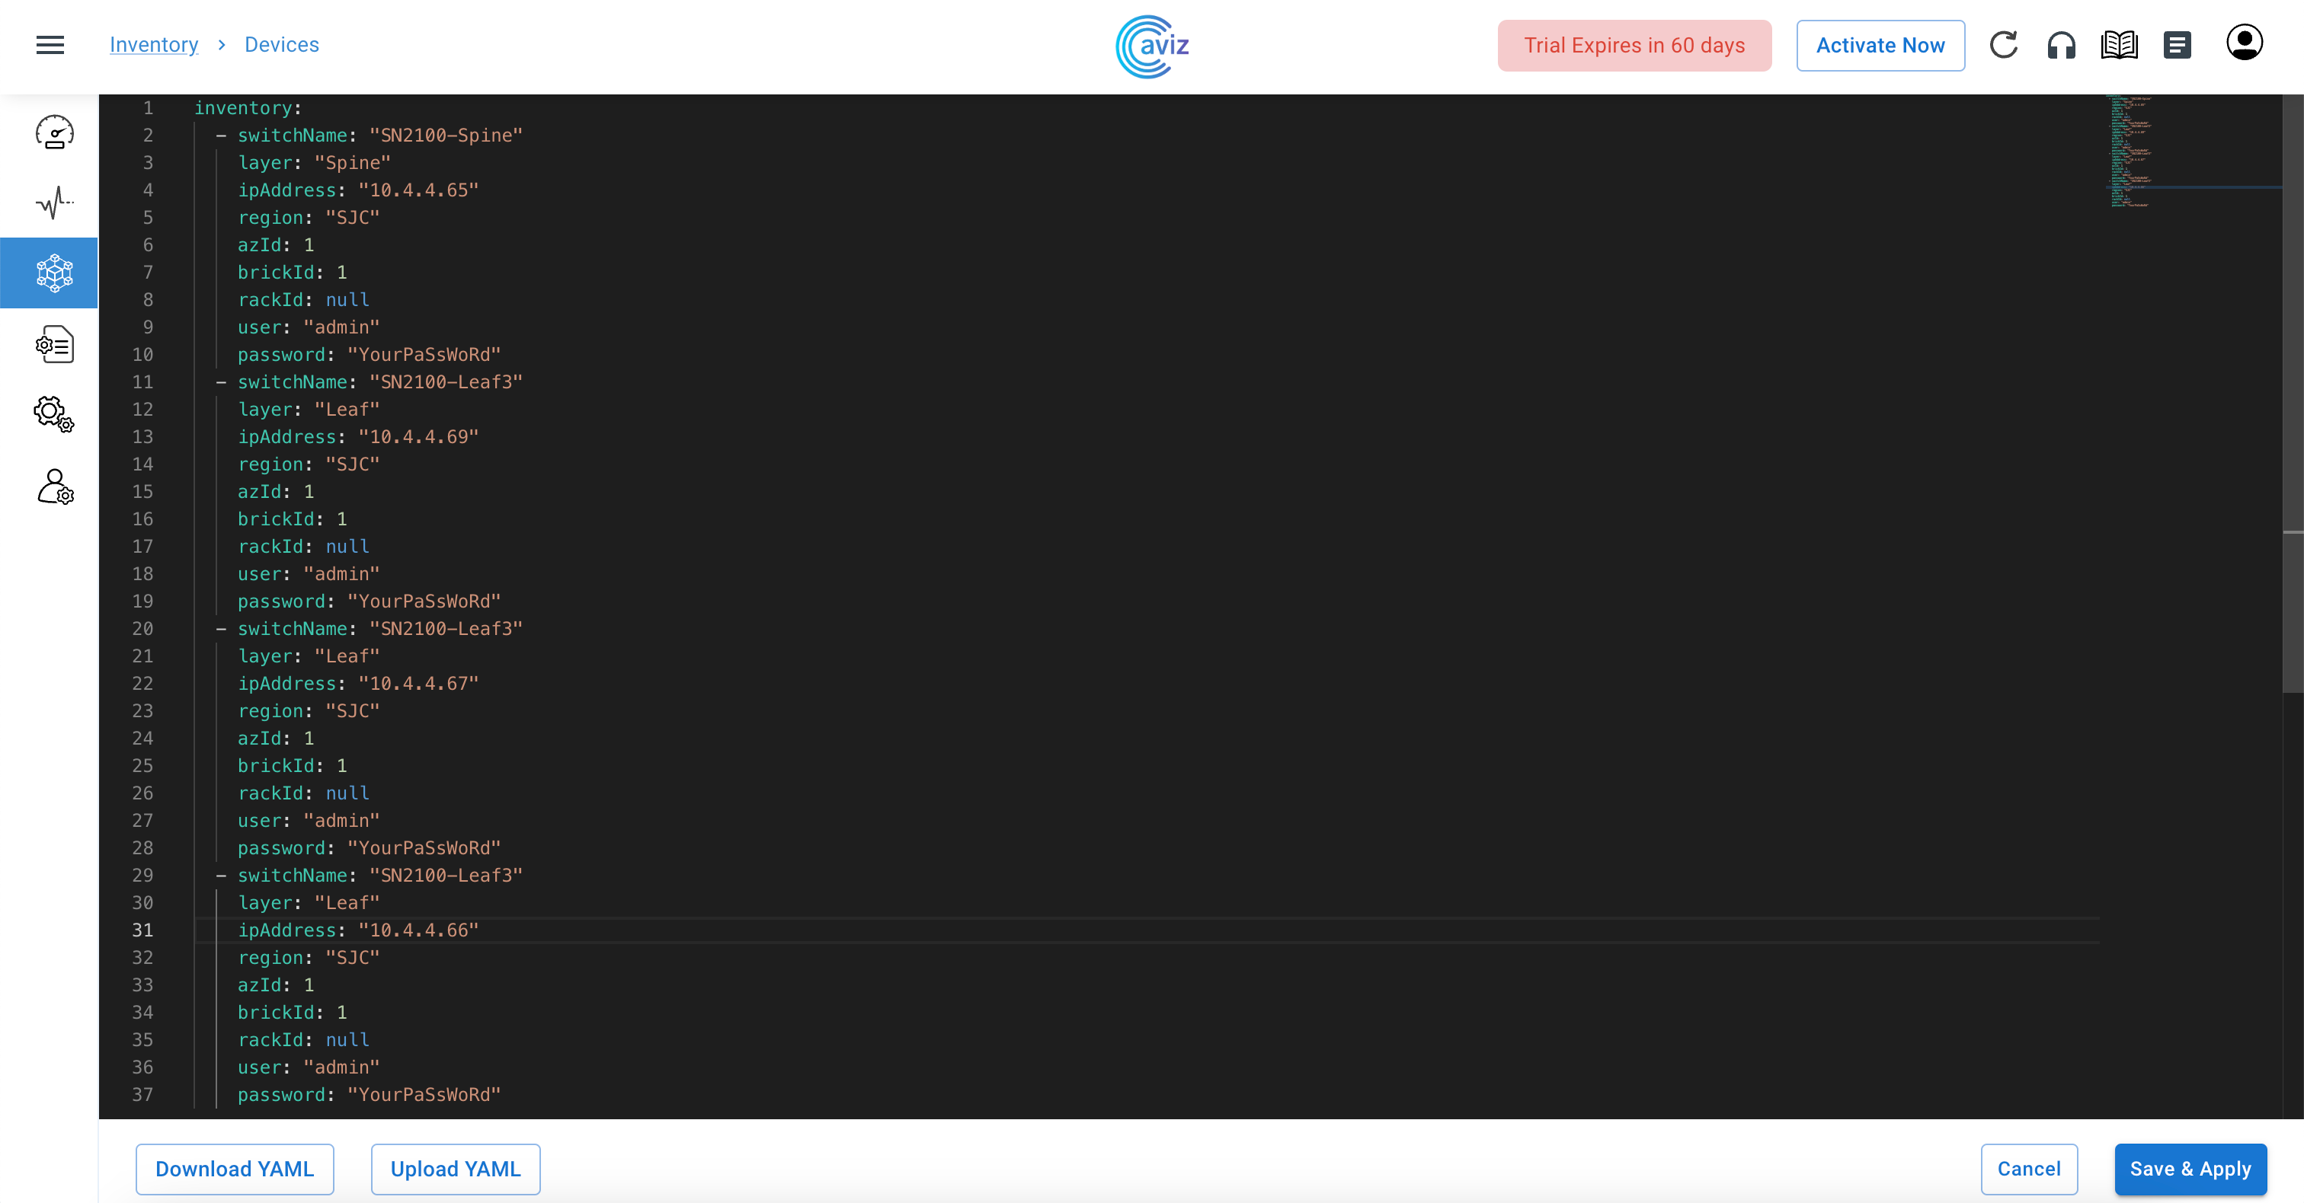
Add Devices
Upload Device Inventory using YAML editor
Navigate to Inventory >> Devices >> Add/Remove Devices
Use the below format to add devices to the application
Make sure to use the correct indentation for the YAML files
Make sure the Switch Name matches to Hostname of the device
Click Save & Apply
ONES Application is now ready to manage the added devices
Feature Set
Role / Region: Shows the device roles and regions
SKU / ASIC: Shows the device hardware SKU and ASIC vendor
Port / Max Speed
PSUs / Fans: Shows the total number of Power supplies and Fans present on a particular device
NOS Image: Shows the details of the network operating system running on the device and when it was last updated
ONIE Version: Shows which ONIE version is running on the device and when the last reboot time of the device
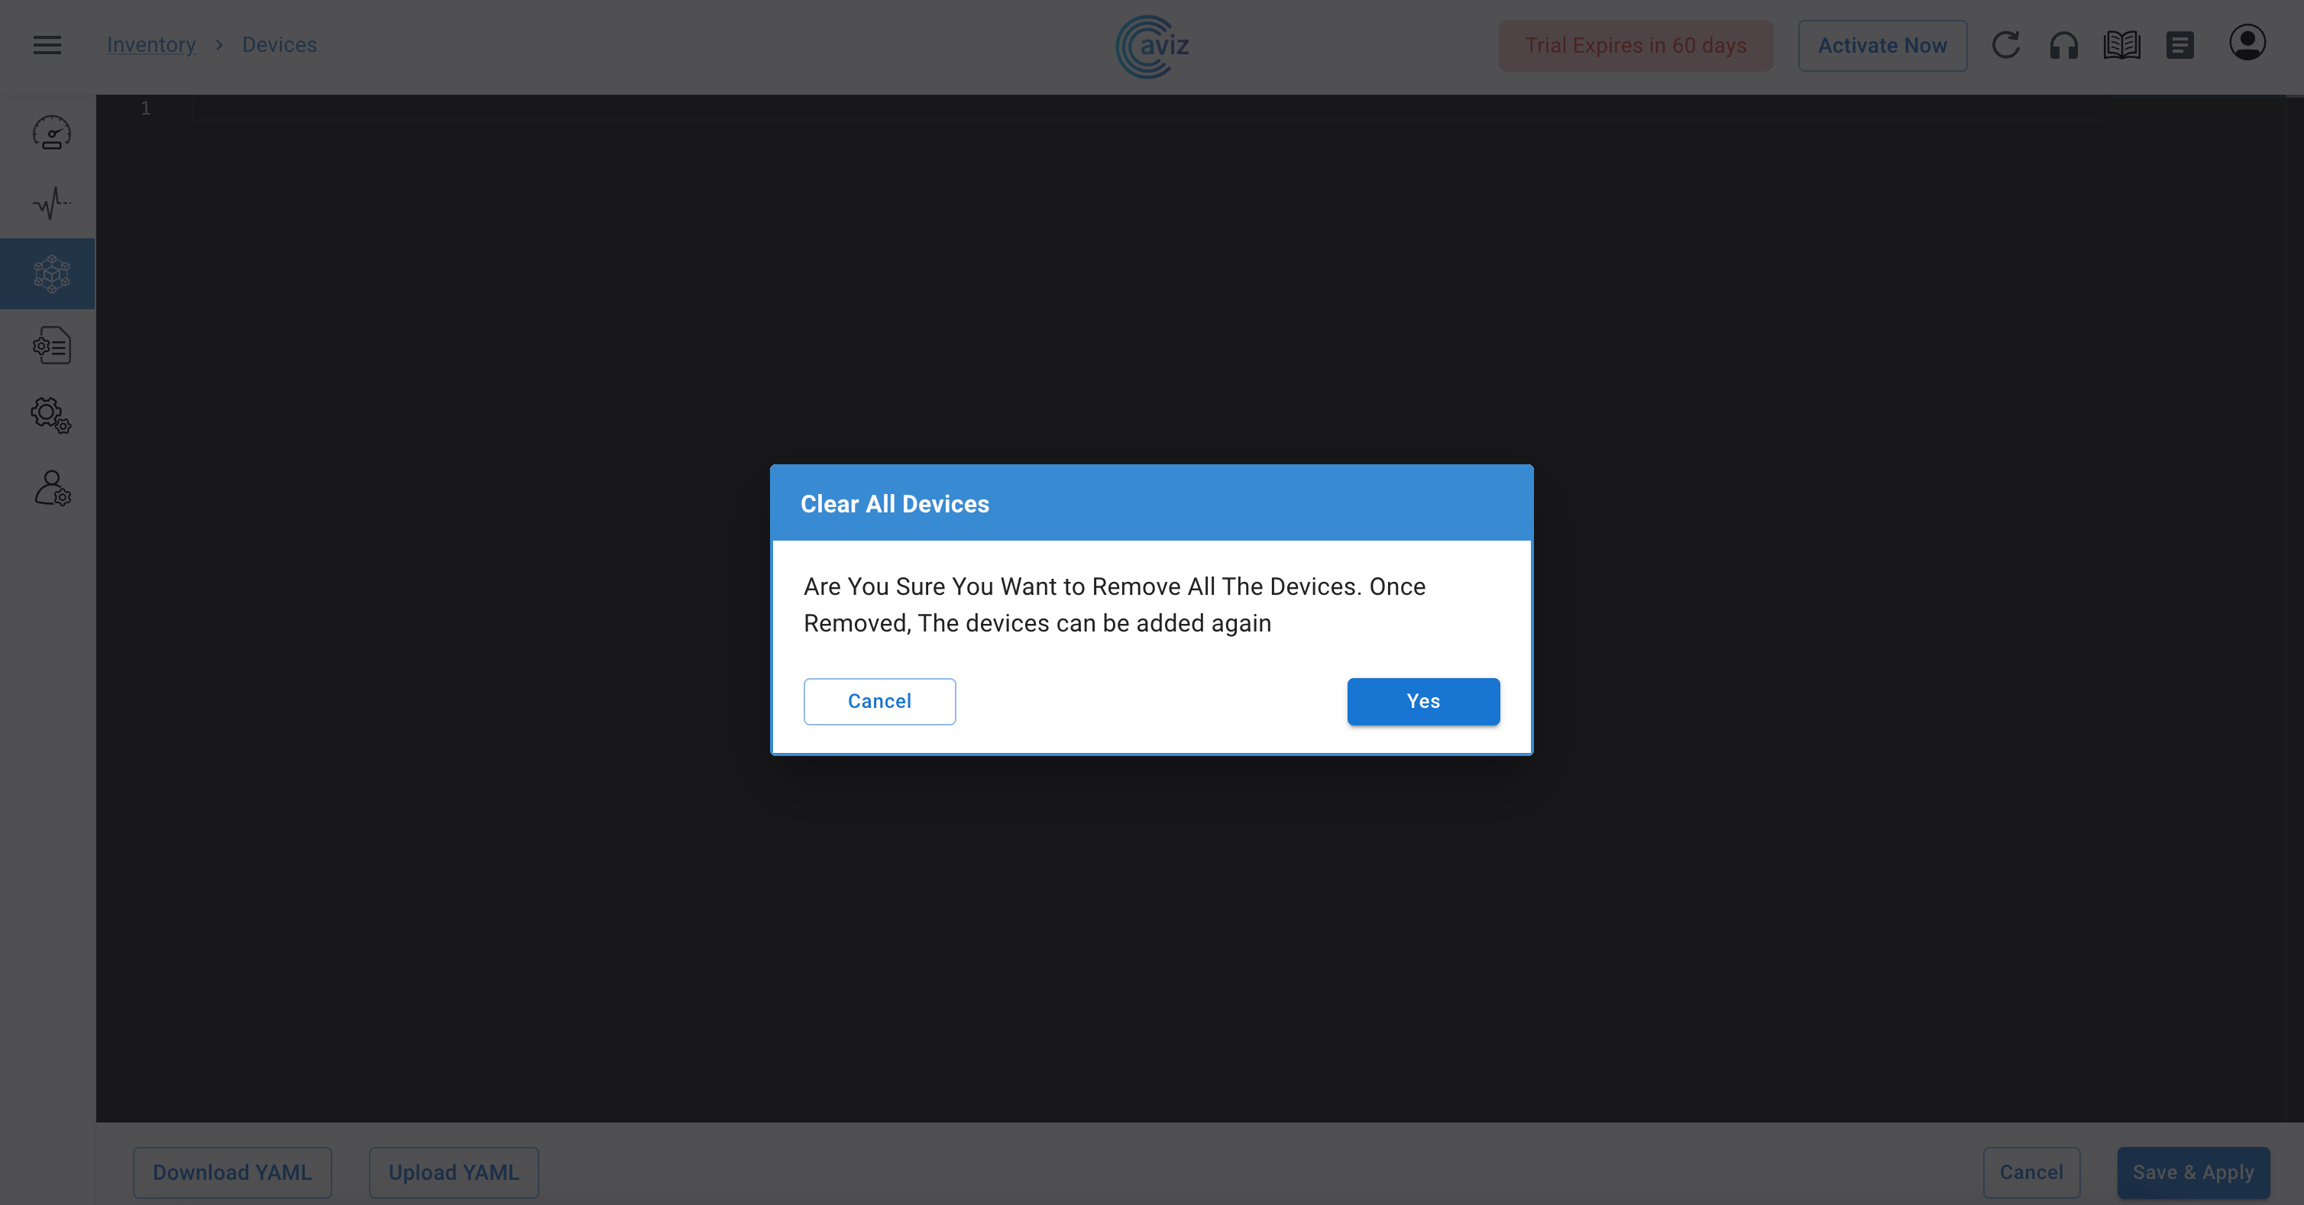
Remove Devices from the Application
Navigate to Inventory >> Devices >> Add/Remove Devices
Remove all the inputs entered by the user
Click Save and Apply
Once the application detects, a user is trying to remove devices it shows one confirmation dialogue box to cross-check the status
Now all the devices have been removed from the ONES application
Custom Upgrade
This feature gives the control to upgrade the device to the new version
An HTTP image link is required to use the custom upgrade
Select any of the devices to upgrade to the new version
Click on Custom Upgrade
put the new Image URL and then Submit
HTTP image URL should be accessible
This image will be downloaded to the device and configured as the next boot image and devices will be reloaded
Once the device comes up with the new image, the ONES application will install Telemetry and Fabric manager agent
when we upgrade any device that will be locked to do any further changes after a successful upgrade user can again use the same device for another task
Upgrade via ZTP
Using this page a user can directly upgrade the box
Select any of the devices to upgrade via ZTP
Click on Upgrade via ZTP
Click on Yes
when we upgrade any device that will be locked to do any further changes, after a successful upgrade user can again use the same device for another task
Reboot Device
Here we will see how we can reboot a device using
We have the option to choose one or multiple devices at a time to reboot
Choose one of the devices that we want to reboot
Click on Reboot
Click on Yes
While rebooting the device, the device will be locked to do any other task, once the reboot is successful, the lock will be removed and the user can take any new action
Upgrade the device using ZTP (Zero Touch Provisioning)
Reboot individual devices or multiple devices by selecting them in one click
Shows the number of ports per device and max ports speed on the device
Click on the number of ports to get a detailed view of all the ports on a particular device
Agent Version / Network OS: Shows the agent version running on the device and the current active OS version on the device
Agent status / Last contact: Latest status of the Agent and when it was last communicated with that Agent.
Connect: Using this feature we directly get the CLI access of the device, so we can use this if we need some tuning or need to push some extra config
Details: This last option we can again use to get the details of the device
Once the image is loaded, the ONES application will show the last image details and time stamp
This section explains how large data centers can be designed seamlessly using ONES.
Configuring Devices
Most fabric orchestration solutions available today are complex and often difficult to understand. ONES provides simple and effective tools, such as predefined templates (YAML file), to configure data centers at scale.ONES allows a customized way of configuring devices that includes enhancements to the standard configuration.
Configuration Commands:
Save Config:
Copy to File:
Restore Config: //If needed only
Speed config for the Host Facing port should be updated before Orchestration if there is any change in the default speed config.
Ex: Interface speed is 25G, but you can use it with 10G Transceiver. In such cases, user needs to update speed.
Configuration Commands:
Save Config:
Copy to File:
Restore Config: //If needed only
You need to provide the following inputs to configure the devices:
Local AS number - Local BGP AS number a user wants to use
Subnet Details
IPv4 Subnet - IPv4 address range a user wants to use in the domain
IPv4 Loopback - IPv4 address range to use on the devices only for the loopback address
IPv6 Subnet - IPv6 address range a user wants to use in the domain
Connectivity
Link connectivity between (SuperSpine, Spine, Leaf & TOR)
Link Type (Access Trunk)
Layer-2 / Layer3 - interface type
MCLAG Details
VLAN - VLAN to b used for interfaces
PO Group - PortChannel number to be used to bundle the interface
Keepalive VLAN - VLAN a user wants to use to send keepalive messages
VRF number - VRF number to be used for MC-LAG
Host Interface
L2 Access & VLAN - Host facing interface with Access port & VLAN allocation
L2 Trunk & VLAN - Host facing interface with trunk port & VLAN allocation
L3 - Host facing interface with Layer 3 properties
Network Service Address
NTP server - NTP server a user wants to add
Syslog - Syslog server IP address
SNMP - SNMP Server address a user wants to add
VXLAN
VLAN Range - VLAN range a user wants to use for VXLAN Ex. 200-205
VNI Range - VNI range a user wants to use for VXLAN Ex.20000-20005
Any-Cast Gateway - Any-cast Gateway Subnet
Host Per Vlan - Allocation of Host per VLAN
IRB VLAN Range - IRB VLAN is a separate input and should not overlap with VXLAN VNI
ONES requires a minimal set of information from the users to configure the devices. The tool is simple to use and allows to configure a large number of devices simultaneously.
Configuration Overview
This section explains the device configuration procedures, that gets applied seamlessly across the entire fabric
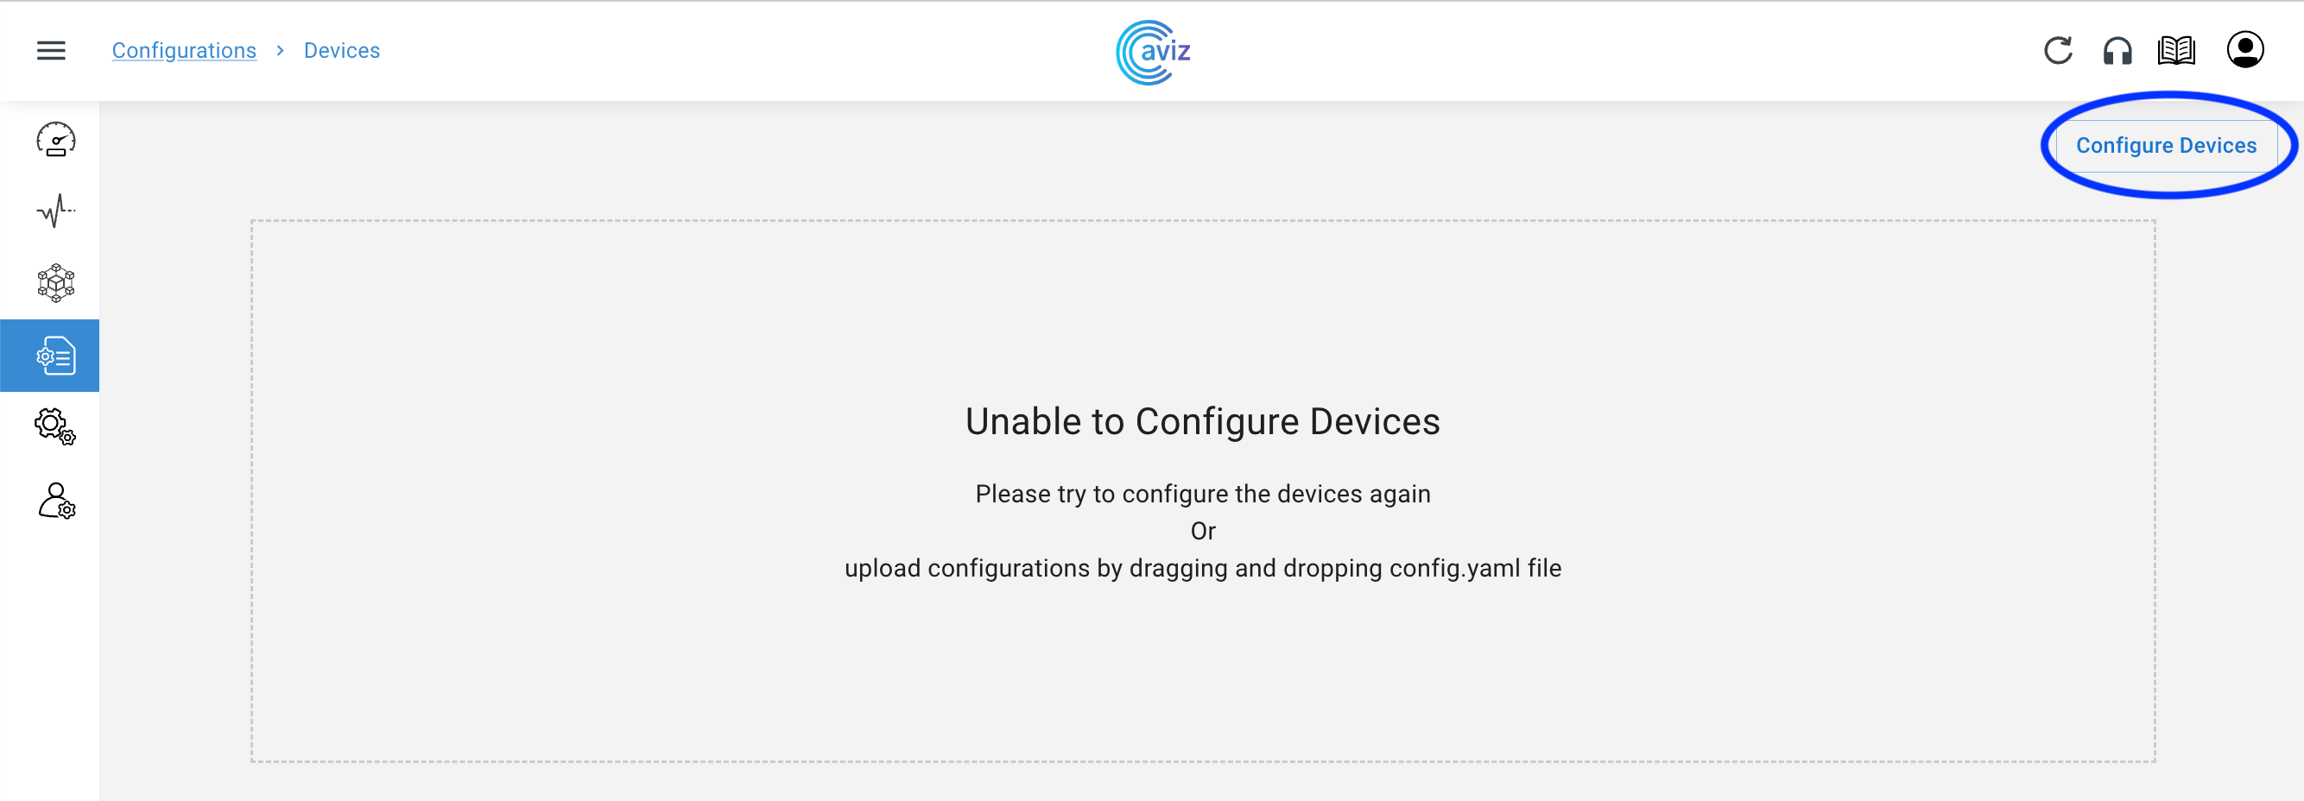
Navigate to Configurations >> Devices
Click on the Configure Devices button in the top right corner. This opens a new screen with a sample device configuration. You can edit the configurations directly in the UI to make the desired changes. You can also download the sample YAML file by clicking on Download YAML button, provided at the bottom of the above screen, make new changes and upload the YAML file using UploadYAML button.
A detailed explanation of all the intend fields
Inventory: Specify how many devices you want to add in any particular role - Super Spine, Spine, Leaf, and ToR.
Connectivity: Specify the parameters required to establish link connectivity such as:
Device switch ID: unique ID for every device, required to correctly render the topology
Switch name: hostname of the device
IP address: management address of the device
BGP: Specify if you want to enable regular BGP peering or BGP unnumbered peering.
PhysicalIfCfg: Enable or disable FEC and change the MTU settings on all the links being configured.
ASN: Assign a BGP ASN (Autonomous System Number) from the specified pool. Dynamic assigning ASN will be implemented in ONES release 2.0. For release 1.0, you need to specify the ASN under the device configuration, as shown in the sample YAML file.
IPv4Pool: Assign IP pools to different subnets. ONES automatically divides the subnets according to the number of available links.
ONES application uses IPv4 subnets for:
Interfaces
Loopbacks
Host interfaces
IPv6Pool: Assign IPv6 subnet.
ONES application uses:
IPv6 subnet for interfaces
Subnets to configure BGP neighborship
Automatically advertise these subnets in BGP
Note* IPv6 loopback is not supported
NTP: Provide the NTP server address, to enable NTP. You can choose your desired timezone.
Supported Time Zone
Africa/Abidjan
Africa/Accra
Africa/Addis_Ababa
Africa/Algiers
Africa/Asmara
SYSLOG: Provide the SYSLOG server address, to enable SYSLOG.
SNMP: Provide the SNMP server address, to enable SNMP.
VXLAN: this eables the feature of VXLAN
Creating Configuration
Navigate to Configurations >> Devices >> Configure Devices
Applying Configuration
Click on Apply Configs button in the bottom right corner of the above screen, to push the configs across the entire fabric.
ONES provides real-time updates when the devices are being configured and validates the configurations automatically to ensure the network is ready to use.
You will see the below screen, after the configurations are successfully verified:
Various fields shown in the top right corner of the above slide are explained below:
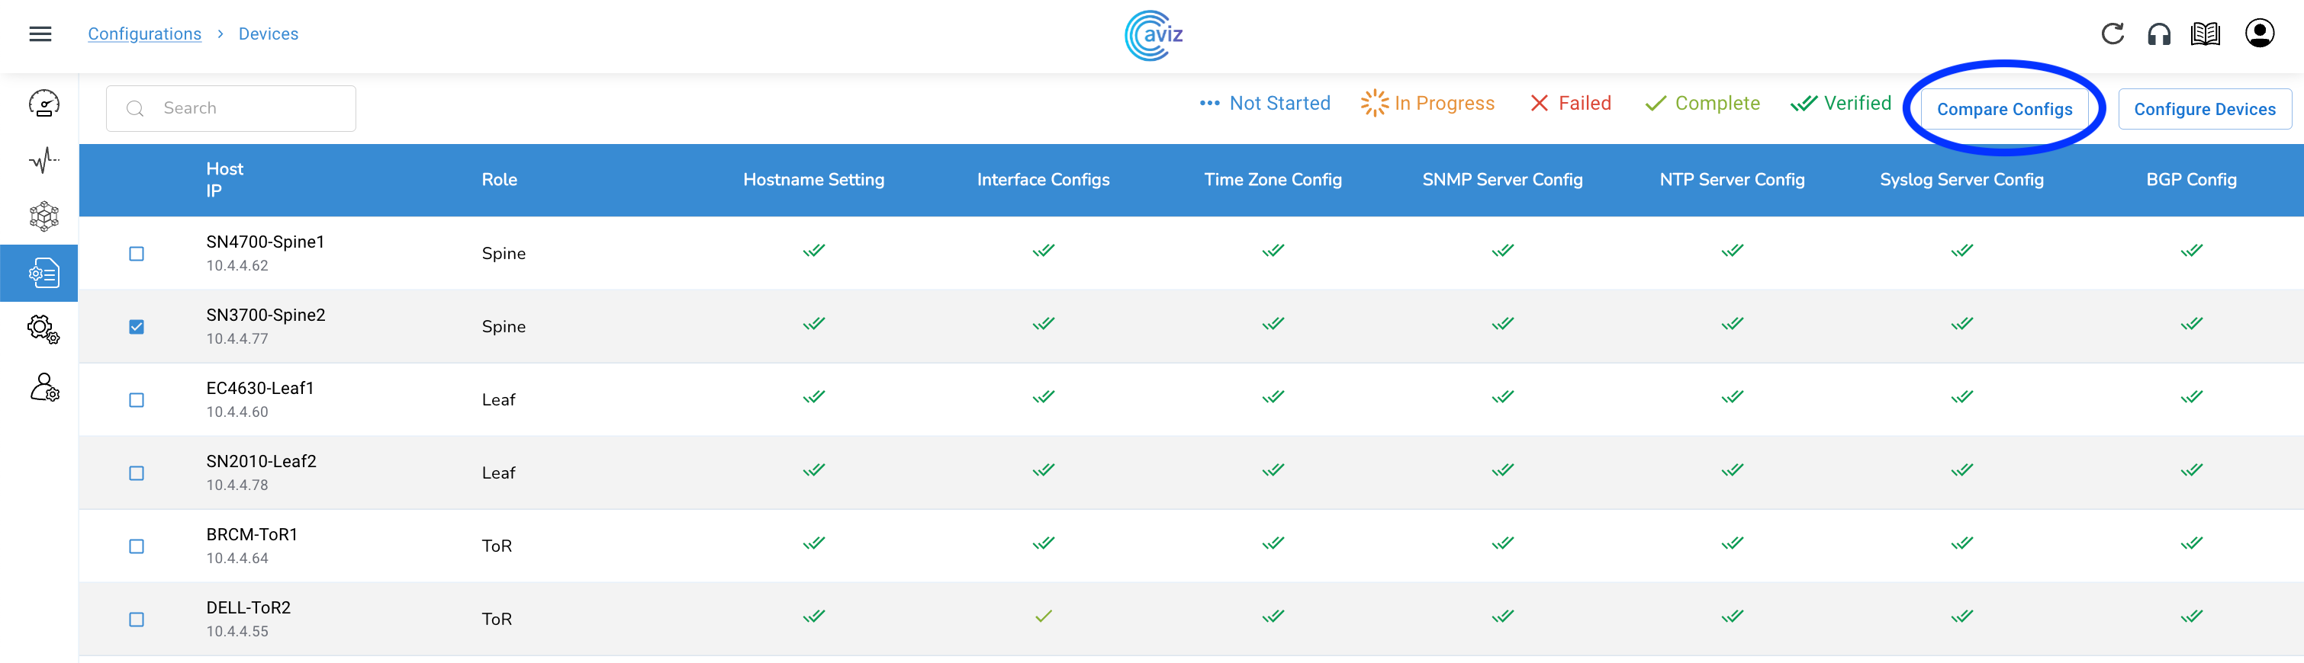
Compare Configuration
This section describes the compare configuration feature of ONES using which you can compare the applied and running configurations.
This page allows the user to compare applied configurations to the running configuration of a selected device.
The user should select only one device from the list and perform 'Compare Config' on this page, it may take several minutes to fetch the running configuration from the device
YAML Editor will appear with two windows comparing applied and running configurations as depicted in the below picture
The difference in configuration is highlighted with color coding in the respective window of the configuration
The merge feature/version control is in our roadmap, as of now the user needs to manually update the changes as per the diff in the compare config.
BGP IP-CLOS with MCLAG
Template Details: BGP IP-CLOS with MCLAG in the given topology
Devices used
2- Spine Devices
4- Leaf Devices
2- End Host
Topology
BGP-IP-CLOS-MCLAG Standard Template
Supported Time Zone
Africa/Abidjan
Africa/Accra
Africa/Addis_Ababa
Africa/Algiers
Africa/Asmara
The device should not have any IP, VLAN, Portchannel, BGP, SAG, or MCLAG config on any of the Interfaces to avoid overlapping during the orchestration and run into cleanup issues.
Post that, the user needs to save the config to a file, in case of any orchestration failure, or misconfiguration user can rollback to the saved config.
Configuration Commands:
Update Speed:
IRB VNI Range - IRB VNI is separate input and should not overlap with VXLAN VNI
Autonomous System Number (ASN): BGP AS number to use
Device Credentials: Username & Password.
MCLAG: Multichassis Link Aggregation
Links: links connected with another device
To configure BGP neighborship
ONES automatically advertises these subnets in BGP
Africa/Asmera
Africa/Bamako
Africa/Bangui
Africa/Banjul
Africa/Bissau
Africa/Blantyre
Africa/Brazzaville
Africa/Bujumbura
Africa/Cairo
Africa/Casablanca
Africa/Ceuta
Africa/Conakry
Africa/Dakar
Africa/Dar_es_Salaam
Africa/Djibouti
Africa/Douala
Africa/El_Aaiun
Africa/Freetown
Africa/Gaborone
Africa/Harare
Africa/Johannesburg
Africa/Juba
Africa/Kampala
Africa/Khartoum
Africa/Kigali
Africa/Kinshasa
Africa/Lagos
Africa/Libreville
Africa/Lome
Africa/Luanda
Africa/Lubumbashi
Africa/Lusaka
Africa/Malabo
Africa/Maputo
Africa/Maseru
Africa/Mbabane
Africa/Mogadishu
Africa/Monrovia
Africa/Nairobi
Africa/Ndjamena
Africa/Niamey
Africa/Nouakchott
Africa/Ouagadougou
Africa/Porto-Novo
Africa/Sao_Tome
Africa/Timbuktu
Africa/Tripoli
Africa/Tunis
Africa/Windhoek
America/Adak
America/Anchorage
America/Anguilla
America/Antigua
America/Araguaina
America/Argentina/Buenos_Aires
America/Argentina/Catamarca
America/Argentina/ComodRivadavia
America/Argentina/Cordoba
America/Argentina/Jujuy
America/Argentina/La_Rioja
America/Argentina/Mendoza
America/Argentina/Rio_Gallegos
America/Argentina/Salta
America/Argentina/San_Juan
America/Argentina/San_Luis
America/Argentina/Tucuman
America/Argentina/Ushuaia
America/Aruba
America/Asuncion
America/Atikokan
America/Atka
America/Bahia
America/Bahia_Banderas
America/Barbados
America/Belem
America/Belize
America/Blanc-Sablon
America/Boa_Vista
America/Bogota
America/Boise
America/Buenos_Aires
America/Cambridge_Bay
America/Campo_Grande
America/Cancun
America/Caracas
America/Catamarca
America/Cayenne
America/Cayman
America/Chicago
America/Chihuahua
America/Ciudad_Juarez
America/Coral_Harbour
America/Cordoba
America/Costa_Rica
America/Creston
America/Cuiaba
America/Curacao
America/Danmarkshavn
America/Dawson
America/Dawson_Creek
America/Denver
America/Detroit
America/Dominica
America/Edmonton
America/Eirunepe
America/El_Salvador
America/Ensenada
America/Fort_Nelson
America/Fort_Wayne
America/Fortaleza
America/Glace_Bay
America/Godthab
America/Goose_Bay
America/Grand_Turk
America/Grenada
America/Guadeloupe
America/Guatemala
America/Guayaquil
America/Guyana
America/Halifax
America/Havana
America/Hermosillo
America/Indiana/Indianapolis
America/Indiana/Knox
America/Indiana/Marengo
America/Indiana/Petersburg
America/Indiana/Tell_City
America/Indiana/Vevay
America/Indiana/Vincennes
America/Indiana/Winamac
America/Indianapolis
America/Inuvik
America/Iqaluit
America/Jamaica
America/Jujuy
America/Juneau
America/Kentucky/Louisville
America/Kentucky/Monticello
America/Knox_IN
America/Kralendijk
America/La_Paz
America/Lima
America/Los_Angeles
America/Louisville
America/Lower_Princes
America/Maceio
America/Managua
America/Manaus
America/Marigot
America/Martinique
America/Matamoros
America/Mazatlan
America/Mendoza
America/Menominee
America/Merida
America/Metlakatla
America/Mexico_City
America/Miquelon
America/Moncton
America/Monterrey
America/Montevideo
America/Montreal
America/Montserrat
America/Nassau
America/New_York
America/Nipigon
America/Nome
America/Noronha
America/North_Dakota/Beulah
America/North_Dakota/Center
America/North_Dakota/New_Salem
America/Nuuk
America/Ojinaga
America/Panama
America/Pangnirtung
America/Paramaribo
America/Phoenix
America/Port-au-Prince
America/Port_of_Spain
America/Porto_Acre
America/Porto_Velho
America/Puerto_Rico
America/Punta_Arenas
America/Rainy_River
America/Rankin_Inlet
America/Recife
America/Regina
America/Resolute
America/Rio_Branco
America/Rosario
America/Santa_Isabel
America/Santarem
America/Santiago
America/Santo_Domingo
America/Sao_Paulo
America/Scoresbysund
America/Shiprock
America/Sitka
America/St_Barthelemy
America/St_Johns
America/St_Kitts
America/St_Lucia
America/St_Thomas
America/St_Vincent
America/Swift_Current
America/Tegucigalpa
America/Thule
America/Thunder_Bay
America/Tijuana
America/Toronto
America/Tortola
America/Vancouver
America/Virgin
America/Whitehorse
America/Winnipeg
America/Yakutat
America/Yellowknife
Antarctica/Casey
Antarctica/Davis
Antarctica/DumontDUrville
Antarctica/Macquarie
Antarctica/Mawson
Antarctica/McMurdo
Antarctica/Palmer
Antarctica/Rothera
Antarctica/South_Pole
Antarctica/Syowa
Antarctica/Troll
Antarctica/Vostok
Arctic/Longyearbyen
Asia/Aden
Asia/Almaty
Asia/Amman
Asia/Anadyr
Asia/Aqtau
Asia/Aqtobe
Asia/Ashgabat
Asia/Ashkhabad
Asia/Atyrau
Asia/Baghdad
Asia/Bahrain
Asia/Baku
Asia/Bangkok
Asia/Barnaul
Asia/Beirut
Asia/Bishkek
Asia/Brunei
Asia/Calcutta
Asia/Chita
Asia/Choibalsan
Asia/Chongqing
Asia/Chungking
Asia/Colombo
Asia/Dacca
Asia/Damascus
Asia/Dhaka
Asia/Dili
Asia/Dubai
Asia/Dushanbe
Asia/Famagusta
Asia/Gaza
Asia/Harbin
Asia/Hebron
Asia/Ho_Chi_Minh
Asia/Hong_Kong
Asia/Hovd
Asia/Irkutsk
Asia/Istanbul
Asia/Jakarta
Asia/Jayapura
Asia/Jerusalem
Asia/Kabul
Asia/Kamchatka
Asia/Karachi
Asia/Kashgar
Asia/Kathmandu
Asia/Katmandu
Asia/Khandyga
Asia/Kolkata
Asia/Krasnoyarsk
Asia/Kuala_Lumpur
Asia/Kuching
Asia/Kuwait
Asia/Macao
Asia/Macau
Asia/Magadan
Asia/Makassar
Asia/Manila
Asia/Muscat
Asia/Nicosia
Asia/Novokuznetsk
Asia/Novosibirsk
Asia/Omsk
Asia/Oral
Asia/Phnom_Penh
Asia/Pontianak
Asia/Pyongyang
Asia/Qatar
Asia/Qostanay
Asia/Qyzylorda
Asia/Rangoon
Asia/Riyadh
Asia/Saigon
Asia/Sakhalin
Asia/Samarkand
Asia/Seoul
Asia/Shanghai
Asia/Singapore
Asia/Srednekolymsk
Asia/Taipei
Asia/Tashkent
Asia/Tbilisi
Asia/Tehran
Asia/Tel_Aviv
Asia/Thimbu
Asia/Thimphu
Asia/Tokyo
Asia/Tomsk
Asia/Ujung_Pandang
Asia/Ulaanbaatar
Asia/Ulan_Bator
Asia/Urumqi
Asia/Ust-Nera
Asia/Vientiane
Asia/Vladivostok
Asia/Yakutsk
Asia/Yangon
Asia/Yekaterinburg
Asia/Yerevan
Atlantic/Azores
Atlantic/Bermuda
Atlantic/Canary
Atlantic/Cape_Verde
Atlantic/Faeroe
Atlantic/Faroe
Atlantic/Jan_Mayen
Atlantic/Madeira
Atlantic/Reykjavik
Atlantic/South_Georgia
Atlantic/St_Helena
Atlantic/Stanley
Australia/ACT
Australia/Adelaide
Australia/Brisbane
Australia/Broken_Hill
Australia/Canberra
Australia/Currie
Australia/Darwin
Australia/Eucla
Australia/Hobart
Australia/LHI
Australia/Lindeman
Australia/Lord_Howe
Australia/Melbourne
Australia/NSW
Australia/North
Australia/Perth
Australia/Queensland
Australia/South
Australia/Sydney
Australia/Tasmania
Australia/Victoria
Australia/West
Australia/Yancowinna
Brazil/Acre
Brazil/DeNoronha
Brazil/East
Brazil/West
CET
CST6CDT
Canada/Atlantic
Canada/Central
Canada/Eastern
Canada/Mountain
Canada/Newfoundland
Canada/Pacific
Canada/Saskatchewan
Canada/Yukon
Chile/Continental
Chile/EasterIsland
Cuba
EET
EST
EST5EDT
Egypt
Eire
Etc/GMT
Etc/GMT+0
Etc/GMT+1
Etc/GMT+10
Etc/GMT+11
Etc/GMT+12
Etc/GMT+2
Etc/GMT+3
Etc/GMT+4
Etc/GMT+5
Etc/GMT+6
Etc/GMT+7
Etc/GMT+8
Etc/GMT+9
Etc/GMT-0
Etc/GMT-1
Etc/GMT-10
Etc/GMT-11
Etc/GMT-12
Etc/GMT-13
Etc/GMT-14
Etc/GMT-2
Etc/GMT-3
Etc/GMT-4
Etc/GMT-5
Etc/GMT-6
Etc/GMT-7
Etc/GMT-8
Etc/GMT-9
Etc/GMT0
Etc/Greenwich
Etc/UCT
Etc/UTC
Etc/Universal
Etc/Zulu
Europe/Amsterdam
Europe/Andorra
Europe/Astrakhan
Europe/Athens
Europe/Belfast
Europe/Belgrade
Europe/Berlin
Europe/Bratislava
Europe/Brussels
Europe/Bucharest
Europe/Budapest
Europe/Busingen
Europe/Chisinau
Europe/Copenhagen
Europe/Dublin
Europe/Gibraltar
Europe/Guernsey
Europe/Helsinki
Europe/Isle_of_Man
Europe/Istanbul
Europe/Jersey
Europe/Kaliningrad
Europe/Kiev
Europe/Kirov
Europe/Kyiv
Europe/Lisbon
Europe/Ljubljana
Europe/London
Europe/Luxembourg
Europe/Madrid
Europe/Malta
Europe/Mariehamn
Europe/Minsk
Europe/Monaco
Europe/Moscow
Europe/Nicosia
Europe/Oslo
Europe/Paris
Europe/Podgorica
Europe/Prague
Europe/Riga
Europe/Rome
Europe/Samara
Europe/San_Marino
Europe/Sarajevo
Europe/Saratov
Europe/Simferopol
Europe/Skopje
Europe/Sofia
Europe/Stockholm
Europe/Tallinn
Europe/Tirane
Europe/Tiraspol
Europe/Ulyanovsk
Europe/Uzhgorod
Europe/Vaduz
Europe/Vatican
Europe/Vienna
Europe/Vilnius
Europe/Volgograd
Europe/Warsaw
Europe/Zagreb
Europe/Zaporozhye
Europe/Zurich
Factory
GB
GB-Eire
GMT
GMT+0
GMT-0
GMT0
Greenwich
HST
Hongkong
Iceland
Indian/Antananarivo
Indian/Chagos
Indian/Christmas
Indian/Cocos
Indian/Comoro
Indian/Kerguelen
Indian/Mahe
Indian/Maldives
Indian/Mauritius
Indian/Mayotte
Indian/Reunion
Iran
Israel
Jamaica
Japan
Kwajalein
Libya
MET
MST
MST7MDT
Mexico/BajaNorte
Mexico/BajaSur
Mexico/General
NZ
NZ-CHAT
Navajo
PRC
PST8PDT
Pacific/Apia
Pacific/Auckland
Pacific/Bougainville
Pacific/Chatham
Pacific/Chuuk
Pacific/Easter
Pacific/Efate
Pacific/Enderbury
Pacific/Fakaofo
Pacific/Fiji
Pacific/Funafuti
Pacific/Galapagos
Pacific/Gambier
Pacific/Guadalcanal
Pacific/Guam
Pacific/Honolulu
Pacific/Johnston
Pacific/Kanton
Pacific/Kiritimati
Pacific/Kosrae
Pacific/Kwajalein
Pacific/Majuro
Pacific/Marquesas
Pacific/Midway
Pacific/Nauru
Pacific/Niue
Pacific/Norfolk
Pacific/Noumea
Pacific/Pago_Pago
Pacific/Palau
Pacific/Pitcairn
Pacific/Pohnpei
Pacific/Ponape
Pacific/Port_Moresby
Pacific/Rarotonga
Pacific/Saipan
Pacific/Samoa
Pacific/Tahiti
Pacific/Tarawa
Pacific/Tongatapu
Pacific/Truk
Pacific/Wake
Pacific/Wallis
Pacific/Yap
Poland
Portugal
ROC
ROK
Singapore
SystemV/AST4
SystemV/AST4ADT
SystemV/CST6
SystemV/CST6CDT
SystemV/EST5
SystemV/EST5EDT
SystemV/HST10
SystemV/MST7
SystemV/MST7MDT
SystemV/PST8
SystemV/PST8PDT
SystemV/YST9
SystemV/YST9YDT
Turkey
UCT
US/Alaska
US/Aleutian
US/Arizona
US/Central
US/East-Indiana
US/Eastern
US/Hawaii
US/Indiana-Starke
US/Michigan
US/Mountain
US/Pacific
US/Samoa
UTC
Universal
W-SU
WET
Zulu
is used to configure or modify a configuration when we need to add several other devices with the same file
Configure Devices
Allows to make the config changes directly in the in-built UI editor
Download YAML
Download the sample YAML file and make the required changes
Upload YAML
Upload the modified YAML file
Device configuration is not yet started
In case of the user has not applied any feature like (VXLAN, MCLAG and so on..)
Device configuration is in progress
The device configuration has failed. Move the cursor to the failed option to see the Error message.
Device configuration is completed successfully
Device configuration is validated successfully
Compare the applied config vs running config on the selected device and highlight the diff changes, if any
Device configurations in progress
Africa/Asmera
Africa/Bamako
Africa/Bangui
Africa/Banjul
Africa/Bissau
Africa/Blantyre
Africa/Brazzaville
Africa/Bujumbura
Africa/Cairo
Africa/Casablanca
Africa/Ceuta
Africa/Conakry
Africa/Dakar
Africa/Dar_es_Salaam
Africa/Djibouti
Africa/Douala
Africa/El_Aaiun
Africa/Freetown
Africa/Gaborone
Africa/Harare
Africa/Johannesburg
Africa/Juba
Africa/Kampala
Africa/Khartoum
Africa/Kigali
Africa/Kinshasa
Africa/Lagos
Africa/Libreville
Africa/Lome
Africa/Luanda
Africa/Lubumbashi
Africa/Lusaka
Africa/Malabo
Africa/Maputo
Africa/Maseru
Africa/Mbabane
Africa/Mogadishu
Africa/Monrovia
Africa/Nairobi
Africa/Ndjamena
Africa/Niamey
Africa/Nouakchott
Africa/Ouagadougou
Africa/Porto-Novo
Africa/Sao_Tome
Africa/Timbuktu
Africa/Tripoli
Africa/Tunis
Africa/Windhoek
America/Adak
America/Anchorage
America/Anguilla
America/Antigua
America/Araguaina
America/Argentina/Buenos_Aires
America/Argentina/Catamarca
America/Argentina/ComodRivadavia
America/Argentina/Cordoba
America/Argentina/Jujuy
America/Argentina/La_Rioja
America/Argentina/Mendoza
America/Argentina/Rio_Gallegos
America/Argentina/Salta
America/Argentina/San_Juan
America/Argentina/San_Luis
America/Argentina/Tucuman
America/Argentina/Ushuaia
America/Aruba
America/Asuncion
America/Atikokan
America/Atka
America/Bahia
America/Bahia_Banderas
America/Barbados
America/Belem
America/Belize
America/Blanc-Sablon
America/Boa_Vista
America/Bogota
America/Boise
America/Buenos_Aires
America/Cambridge_Bay
America/Campo_Grande
America/Cancun
America/Caracas
America/Catamarca
America/Cayenne
America/Cayman
America/Chicago
America/Chihuahua
America/Ciudad_Juarez
America/Coral_Harbour
America/Cordoba
America/Costa_Rica
America/Creston
America/Cuiaba
America/Curacao
America/Danmarkshavn
America/Dawson
America/Dawson_Creek
America/Denver
America/Detroit
America/Dominica
America/Edmonton
America/Eirunepe
America/El_Salvador
America/Ensenada
America/Fort_Nelson
America/Fort_Wayne
America/Fortaleza
America/Glace_Bay
America/Godthab
America/Goose_Bay
America/Grand_Turk
America/Grenada
America/Guadeloupe
America/Guatemala
America/Guayaquil
America/Guyana
America/Halifax
America/Havana
America/Hermosillo
America/Indiana/Indianapolis
America/Indiana/Knox
America/Indiana/Marengo
America/Indiana/Petersburg
America/Indiana/Tell_City
America/Indiana/Vevay
America/Indiana/Vincennes
America/Indiana/Winamac
America/Indianapolis
America/Inuvik
America/Iqaluit
America/Jamaica
America/Jujuy
America/Juneau
America/Kentucky/Louisville
America/Kentucky/Monticello
America/Knox_IN
America/Kralendijk
America/La_Paz
America/Lima
America/Los_Angeles
America/Louisville
America/Lower_Princes
America/Maceio
America/Managua
America/Manaus
America/Marigot
America/Martinique
America/Matamoros
America/Mazatlan
America/Mendoza
America/Menominee
America/Merida
America/Metlakatla
America/Mexico_City
America/Miquelon
America/Moncton
America/Monterrey
America/Montevideo
America/Montreal
America/Montserrat
America/Nassau
America/New_York
America/Nipigon
America/Nome
America/Noronha
America/North_Dakota/Beulah
America/North_Dakota/Center
America/North_Dakota/New_Salem
America/Nuuk
America/Ojinaga
America/Panama
America/Pangnirtung
America/Paramaribo
America/Phoenix
America/Port-au-Prince
America/Port_of_Spain
America/Porto_Acre
America/Porto_Velho
America/Puerto_Rico
America/Punta_Arenas
America/Rainy_River
America/Rankin_Inlet
America/Recife
America/Regina
America/Resolute
America/Rio_Branco
America/Rosario
America/Santa_Isabel
America/Santarem
America/Santiago
America/Santo_Domingo
America/Sao_Paulo
America/Scoresbysund
America/Shiprock
America/Sitka
America/St_Barthelemy
America/St_Johns
America/St_Kitts
America/St_Lucia
America/St_Thomas
America/St_Vincent
America/Swift_Current
America/Tegucigalpa
America/Thule
America/Thunder_Bay
America/Tijuana
America/Toronto
America/Tortola
America/Vancouver
America/Virgin
America/Whitehorse
America/Winnipeg
America/Yakutat
America/Yellowknife
Antarctica/Casey
Antarctica/Davis
Antarctica/DumontDUrville
Antarctica/Macquarie
Antarctica/Mawson
Antarctica/McMurdo
Antarctica/Palmer
Antarctica/Rothera
Antarctica/South_Pole
Antarctica/Syowa
Antarctica/Troll
Antarctica/Vostok
Arctic/Longyearbyen
Asia/Aden
Asia/Almaty
Asia/Amman
Asia/Anadyr
Asia/Aqtau
Asia/Aqtobe
Asia/Ashgabat
Asia/Ashkhabad
Asia/Atyrau
Asia/Baghdad
Asia/Bahrain
Asia/Baku
Asia/Bangkok
Asia/Barnaul
Asia/Beirut
Asia/Bishkek
Asia/Brunei
Asia/Calcutta
Asia/Chita
Asia/Choibalsan
Asia/Chongqing
Asia/Chungking
Asia/Colombo
Asia/Dacca
Asia/Damascus
Asia/Dhaka
Asia/Dili
Asia/Dubai
Asia/Dushanbe
Asia/Famagusta
Asia/Gaza
Asia/Harbin
Asia/Hebron
Asia/Ho_Chi_Minh
Asia/Hong_Kong
Asia/Hovd
Asia/Irkutsk
Asia/Istanbul
Asia/Jakarta
Asia/Jayapura
Asia/Jerusalem
Asia/Kabul
Asia/Kamchatka
Asia/Karachi
Asia/Kashgar
Asia/Kathmandu
Asia/Katmandu
Asia/Khandyga
Asia/Kolkata
Asia/Krasnoyarsk
Asia/Kuala_Lumpur
Asia/Kuching
Asia/Kuwait
Asia/Macao
Asia/Macau
Asia/Magadan
Asia/Makassar
Asia/Manila
Asia/Muscat
Asia/Nicosia
Asia/Novokuznetsk
Asia/Novosibirsk
Asia/Omsk
Asia/Oral
Asia/Phnom_Penh
Asia/Pontianak
Asia/Pyongyang
Asia/Qatar
Asia/Qostanay
Asia/Qyzylorda
Asia/Rangoon
Asia/Riyadh
Asia/Saigon
Asia/Sakhalin
Asia/Samarkand
Asia/Seoul
Asia/Shanghai
Asia/Singapore
Asia/Srednekolymsk
Asia/Taipei
Asia/Tashkent
Asia/Tbilisi
Asia/Tehran
Asia/Tel_Aviv
Asia/Thimbu
Asia/Thimphu
Asia/Tokyo
Asia/Tomsk
Asia/Ujung_Pandang
Asia/Ulaanbaatar
Asia/Ulan_Bator
Asia/Urumqi
Asia/Ust-Nera
Asia/Vientiane
Asia/Vladivostok
Asia/Yakutsk
Asia/Yangon
Asia/Yekaterinburg
Asia/Yerevan
Atlantic/Azores
Atlantic/Bermuda
Atlantic/Canary
Atlantic/Cape_Verde
Atlantic/Faeroe
Atlantic/Faroe
Atlantic/Jan_Mayen
Atlantic/Madeira
Atlantic/Reykjavik
Atlantic/South_Georgia
Atlantic/St_Helena
Atlantic/Stanley
Australia/ACT
Australia/Adelaide
Australia/Brisbane
Australia/Broken_Hill
Australia/Canberra
Australia/Currie
Australia/Darwin
Australia/Eucla
Australia/Hobart
Australia/LHI
Australia/Lindeman
Australia/Lord_Howe
Australia/Melbourne
Australia/NSW
Australia/North
Australia/Perth
Australia/Queensland
Australia/South
Australia/Sydney
Australia/Tasmania
Australia/Victoria
Australia/West
Australia/Yancowinna
Brazil/Acre
Brazil/DeNoronha
Brazil/East
Brazil/West
CET
CST6CDT
Canada/Atlantic
Canada/Central
Canada/Eastern
Canada/Mountain
Canada/Newfoundland
Canada/Pacific
Canada/Saskatchewan
Canada/Yukon
Chile/Continental
Chile/EasterIsland
Cuba
EET
EST
EST5EDT
Egypt
Eire
Etc/GMT
Etc/GMT+0
Etc/GMT+1
Etc/GMT+10
Etc/GMT+11
Etc/GMT+12
Etc/GMT+2
Etc/GMT+3
Etc/GMT+4
Etc/GMT+5
Etc/GMT+6
Etc/GMT+7
Etc/GMT+8
Etc/GMT+9
Etc/GMT-0
Etc/GMT-1
Etc/GMT-10
Etc/GMT-11
Etc/GMT-12
Etc/GMT-13
Etc/GMT-14
Etc/GMT-2
Etc/GMT-3
Etc/GMT-4
Etc/GMT-5
Etc/GMT-6
Etc/GMT-7
Etc/GMT-8
Etc/GMT-9
Etc/GMT0
Etc/Greenwich
Etc/UCT
Etc/UTC
Etc/Universal
Etc/Zulu
Europe/Amsterdam
Europe/Andorra
Europe/Astrakhan
Europe/Athens
Europe/Belfast
Europe/Belgrade
Europe/Berlin
Europe/Bratislava
Europe/Brussels
Europe/Bucharest
Europe/Budapest
Europe/Busingen
Europe/Chisinau
Europe/Copenhagen
Europe/Dublin
Europe/Gibraltar
Europe/Guernsey
Europe/Helsinki
Europe/Isle_of_Man
Europe/Istanbul
Europe/Jersey
Europe/Kaliningrad
Europe/Kiev
Europe/Kirov
Europe/Kyiv
Europe/Lisbon
Europe/Ljubljana
Europe/London
Europe/Luxembourg
Europe/Madrid
Europe/Malta
Europe/Mariehamn
Europe/Minsk
Europe/Monaco
Europe/Moscow
Europe/Nicosia
Europe/Oslo
Europe/Paris
Europe/Podgorica
Europe/Prague
Europe/Riga
Europe/Rome
Europe/Samara
Europe/San_Marino
Europe/Sarajevo
Europe/Saratov
Europe/Simferopol
Europe/Skopje
Europe/Sofia
Europe/Stockholm
Europe/Tallinn
Europe/Tirane
Europe/Tiraspol
Europe/Ulyanovsk
Europe/Uzhgorod
Europe/Vaduz
Europe/Vatican
Europe/Vienna
Europe/Vilnius
Europe/Volgograd
Europe/Warsaw
Europe/Zagreb
Europe/Zaporozhye
Europe/Zurich
Factory
GB
GB-Eire
GMT
GMT+0
GMT-0
GMT0
Greenwich
HST
Hongkong
Iceland
Indian/Antananarivo
Indian/Chagos
Indian/Christmas
Indian/Cocos
Indian/Comoro
Indian/Kerguelen
Indian/Mahe
Indian/Maldives
Indian/Mauritius
Indian/Mayotte
Indian/Reunion
Iran
Israel
Jamaica
Japan
Kwajalein
Libya
MET
MST
MST7MDT
Mexico/BajaNorte
Mexico/BajaSur
Mexico/General
NZ
NZ-CHAT
Navajo
PRC
PST8PDT
Pacific/Apia
Pacific/Auckland
Pacific/Bougainville
Pacific/Chatham
Pacific/Chuuk
Pacific/Easter
Pacific/Efate
Pacific/Enderbury
Pacific/Fakaofo
Pacific/Fiji
Pacific/Funafuti
Pacific/Galapagos
Pacific/Gambier
Pacific/Guadalcanal
Pacific/Guam
Pacific/Honolulu
Pacific/Johnston
Pacific/Kanton
Pacific/Kiritimati
Pacific/Kosrae
Pacific/Kwajalein
Pacific/Majuro
Pacific/Marquesas
Pacific/Midway
Pacific/Nauru
Pacific/Niue
Pacific/Norfolk
Pacific/Noumea
Pacific/Pago_Pago
Pacific/Palau
Pacific/Pitcairn
Pacific/Pohnpei
Pacific/Ponape
Pacific/Port_Moresby
Pacific/Rarotonga
Pacific/Saipan
Pacific/Samoa
Pacific/Tahiti
Pacific/Tarawa
Pacific/Tongatapu
Pacific/Truk
Pacific/Wake
Pacific/Wallis
Pacific/Yap
Poland
Portugal
ROC
ROK
Singapore
SystemV/AST4
SystemV/AST4ADT
SystemV/CST6
SystemV/CST6CDT
SystemV/EST5
SystemV/EST5EDT
SystemV/HST10
SystemV/MST7
SystemV/MST7MDT
SystemV/PST8
SystemV/PST8PDT
SystemV/YST9
SystemV/YST9YDT
Turkey
UCT
US/Alaska
US/Aleutian
US/Arizona
US/Central
US/East-Indiana
US/Eastern
US/Hawaii
US/Indiana-Starke
US/Michigan
US/Mountain
US/Pacific
US/Samoa
UTC
Universal
W-SU
WET
Zulu
L2 VXLAN EVPN with MCLAG
Template Details: L2 VXLAN EVPN with MCLAG in the given topology
Devices used
2- Spine Devices
4- Leaf Devices
2- End Host
Topology
BGP-IP-CLOS VXLAN EVPN Asymmetric IRB with MCLAG Standard Template
Supported Time Zone
Africa/Abidjan
Africa/Accra
Africa/Addis_Ababa
Africa/Algiers
Africa/Asmara
ONES Uninstallation
L2 VXLAN EVPN
Template Details: L2 VXLAN EVPN Config with given topology
Inventory:
SSpines: 2 #Define the count of devices in the SuperSpine role
Spines: 2 #Define the count of devices in the Spine role
Leafs: 2 #Define the count of devices in the Leaf role
Tors: 1 #Define the count of devices in the Tor role
Connectivity:
SSpine: [] #A role that does not have any device, presented as []
Spine: #Delcare all details, the device needs to update.
- switchId: 1 #Every device we define for a given Role should have an ID that is unique to that Role.
switchName: EC01 #Use the hostname of the switch
ipAddress: 10.4.4.61 #Management IP address of the device to connect
ASN: 1001 #BGP Local AS number
Credentials: #User needs to enter device credentials
user: admin
password: YourPaSsWoRd
mclag: #used to create multichassis link aggregation
enabled: True #used to activate mclag property
peer: L2 #Neighbor Device ID (Leaf Switch 2)
keepalive_vlan: 10 #Vlan to use for Keepalive messages
Links: #The links between all the devices we manage
#SS indicates SuperSpine Role
#S indicates Spine Role
#L indicates Leaf Role
#T indicates Tor Role
#H indicates Host port
#The next number is device's unique ID from the same respective Role
#Then interface name and number
- link: S1_Ethernet96 | L1_Ethernet96
#S1_Ethernet96 : Spine Role, Switch ID 1 with Interface Ethernet 96
is connected to
#L1_Ethernet96 : Leaf Role, Switch ID 1 with Interface Ethernet 96
staticLink: True #True indicates the status is up
properties: #This indicates the use of link properties
mode: L2-Trunk #Used as Layer-2 Trunk
vlan: 200 #Vlan used for mclag
mc_po_group: 200 #Po number for mclag
vrf: 1 #VRF to be used for mclag
BGP:
#BGP_U If set to False, this configures regular BGP peering.
#BGP_U If set to True, this configures BGP unnumbered peering
#ND_RA is reserved for future development
BGP_U: False
ND_RA: 30
PhysicalIfCfg:
FEC: On #Possible values are On or Off
MTU: 8000 #MTU value a user wants to change
AdminStatus: Up #Set the status UP
VXLAN:
vlan: 200-205
vni: 20000-20005
anycast_gateway: 100.10.0.0/23
anycast_mac: 00:11:22:33:44:55
hosts_per_vlan: 10
routing_symmetric: True # True / False to indicate its syymetric routing or asymmetric routing
irb_vlan: 300-305 # irb vlan is separate input and should not overlap with vxlan vni
irb_vni: 30000-30005 # irb vni is separate input and should not overlap with vxlan vni
###############Connecting to switch###############
Connection to switch 10.4.4.61 successful.....................
Looking for previous installation........................
avizdock/ones-agent:latest
Previous installation found commencing unistallation on the device 10.4.4.61........
stop ones-agent docker on the device 10.4.4.61........
docker stopped successfully on the device 10.4.4.61........
...
...
...
The current architecture of ONES on-premise backend involves two database engines. One of the engines, TimescaleDB supports storage and access of time series telemetry data while the other, PostgreSQL, supports the same for aggregated CRUD data. The current deployment form factor of these engines is single server. Being the backbones of the ONES application, they therefore require proper functioning to guarantee its overall availability.
In this document, we will first present a few unavailability scenarios relevant to the ONES application. For each unavailability scenario, we will highlight the impact in terms of mean time between occurrences, mean time to recovery, and last but not the least, whether the scenario would require a data recovery/migration aspect. Finally we will propose a standard set of solutions that are recommended by both TimescaleDB and Postgres to handle data and service recovery in such situations.
Scenarios Considered
Scenario
Impact
Mean Time Between Occurrences
Mean Time of Unavailability
Mean Time to Recover
Service Loss Impact
Data Loss Impact
Need for Data Recovery/Migration
From the above table, it is evident that even though the scenarios that would require data migration/recovery are infrequent, the availability impact is high. The rest of the document presents a set of solutions, pros and cons of each of them, assumptions, and end user side requirements
ONES Solution
ONES provide DB backup service performs periodic backups to remote NFS backup server endpoint provided by the customer. On disaster scenarios, the customers can use our SRE teams to recover the data from backups.
In future, ONES will implement the backup and restore using a DB backup service which performs a transparent migration from single server Postgres/Timescale to distributed Timescale handling both fresh installs and upgrades.
ONES Application Upgrade
Low
Occasional, between releases (major as well as patch)
Low
Not applicable
Low
No
Not required
ONES TimescaleDB and Postgres Upgrade
Low
Occasional, when application needs new database features to be enabled
Low
Not applicable
Low
No
Not required
Application Crashes
Low
Occasional
Mostly low
Mostly low
Low
No
Not required
Database Instance Crashes (Recoverable)
Medium
Proven COTS components, very infrequent
Low
Low
Medium
No
Not required
Database Instance Crashes (Irrecoverable mainly due to data corruption)
High (depends on existing data volume)
Proven COTS components, very infrequent
Very High
Very High
High
No
Required within the same server
Media Failure (Recoverable)
High (depends on existing data volume)
Very infrequent
High
High
High
No
No
Media Failure (Irrecoverable)
High (depends on existing data volume)
Very infrequent
Very High
Very High
High
Yes
Required across different servers
Data Center Disaster
High (depends on existing data volume)
Extremely Infrequent
Extremely High
Extremely High
Extremely High
Extremely High
Cross location
Data Migration due to DB product replacement
High (depends on existing data volume)
Extremely Infrequent
Very High
Very High
High
Yes
Required
Application Installation
Storage Issue
Issue Summary
Error processing tar file(exit status 1): write /2782fef5844dd5a1e2174c448dd88e2fa69971d42810f6dfc87457fcdeaeb4a3/layer.tar: no space left on device
Error processing tar file(exit status 1): write /usr/lib/x86_64-linux-gnu/libz3.so.4: no space left on device
Loading UI..
Error processing tar file(exit status 1): write /bb3d2a51cf081d2b8d37b490acb74472df12dd2b6c16928d7000c5c6c468647b/layer.tar: no space left on device
Loading Gateway..
Error processing tar file(exit status 1): write /acd0b277f7bb7c7d1585a3ee7c444a081cce54eeace02121ae96258a8d808aac/layer.tar: no space left on device
Details
Resolution
docker dependency
Issue Summary
Permission issue during docker installation
Issue Summary
docker-compose Issue
Issue Summary
Permission issue during ONES Installation
Issue Summary
python3 Issue
Issue Summary
paramiko error during uninstallation
Issue Summary
paramiko error during installation
Issue Summary
ONES Application service continuous restart
Issue Summary
Details
Resolution
Details
Resolution
Details
Resolution
Details
Resolution
Details
Resolution
Details
Resolution
Details
Resolution
Details
Resolution
This issue persist when the device run out of the space on which user is trying to install ONES Application, ONES application need at least 256 GB storage to work with 128 devices
Before the installation user needs to make sure there is enough space to install ONES application
Check ONES-User-Guide for more Hardware requirement details
Increase the Server storage
Command : df -h // to check the size of server
Loading docker images..
Loading Collector..
./ones-installer.sh: line 25: docker: command not found
Loading DB..
./ones-installer.sh: line 28: docker: command not found
./ones-installer.sh: line 29: docker: command not found
Loading UI..
./ones-installer.sh: line 32: docker: command not found
Loading Gateway..
./ones-installer.sh: line 35: docker: command not found
Loading FM..
./ones-installer.sh: line 38: docker: command not found
./ones-installer.sh: line 40: docker: command not found
apt-get install docker.io
E: Could not open lock file /var/lib/dpkg/lock-frontend - open (13: Permission denied)
E: Unable to acquire the dpkg frontend lock (/var/lib/dpkg/lock-frontend), are you root?
Bringing up ONES app containers
./ones-installer.sh: line 46: docker-compose: command not found
./ones-installer.sh
Got permission denied while trying to connect to the Docker daemon socket at unix:///var/run/docker.sock: Post "http://%2Fvar%2Frun%2Fdocker.sock/v1.24/images/load?quiet=0": dial unix /var/run/docker.sock: connect: permission denied
Loading DB..
Got permission denied while trying to connect to the Docker daemon socket at unix:///var/run/docker.sock: Post "http://%2Fvar%2Frun%2Fdocker.sock/v1.24/images/load?quiet=0": dial unix /var/run/docker.sock: connect: permission denied
$./ones-installer.sh
Installing ONES application...
Bringing up ONES app containers
./ones-installer.sh: line 46: docker-compose: command not found
./ones-installer.sh: line 47: docker-compose: command not found
Creating default user accounts
Error: No such container: sh
Adding license..
Error: No such container: sh
Installed ONES application successfully.
Open browser at http://<host-ip>:3002
Before ONES application installation, the user needs to check the
prerequisite, ONES application has few dependencies on docker, docker must be
available before ONES application installation
Check ONES-User-Guide for installation prerequisite
Install Docker on Server
Command : apt-get install docker.io //to install
Command : docker --version //to verify
Docker version 20.10.12, build 20.10.12-0ubuntu4
While doing any installation related to Docker or any other dependencies,
user needs to make sure to do the installation using root credentials
User Root credentials or give super user user permission
Command : sudo su //to allow user to do any task using super user permission
While doing ONES-installation, docker-compose component is required as
dependencies
So user need to make sure all the dependencies should be addressed before doing
ONES installation
While executing ONES installation, user needs to make sure to do the installation
using root credentials
User Root credentials or give super user user permission
Command : sudo su //to allow user to do any task using super user permission
If Python is not available on Server so we get these errors and even user will
not be able to access the ONES application
As dependencies user needs to install python3 first
paramiko issue uninstallation
$python3 ones_agent_uninstaller.py
Traceback (most recent call last):
File "ones_agent_uninstaller.py", line 1, in <module>
import paramiko
File "/usr/local/lib/python3.8/dist-packages/paramiko/__init__.py", line 22, in <module>
from paramiko.transport import SecurityOptions, Transport
File "/usr/local/lib/python3.8/dist-packages/paramiko/transport.py", line 33, in <module>
from cryptography.hazmat.backends import default_backend
ModuleNotFoundError: No module named 'cryptography'
paramiko issue installation
$ python3 ones_agent_installer.py
Traceback (most recent call last):
File "ones_agent_installer.py", line 12, in <module>
from ones_agent_helper import install_ones_agent
File "/home/GA/ones_t_agent/ones_agent_helper.py", line 1, in <module>
import paramiko
File "/usr/local/lib/python3.8/dist-packages/paramiko/__init__.py", line 22, in <module>
from paramiko.transport import SecurityOptions, Transport
File "/usr/local/lib/python3.8/dist-packages/paramiko/transport.py", line 33, in <module>
from cryptography.hazmat.backends import default_backend
ModuleNotFoundError: No module named 'cryptography'
ones-collector java -jar /app/collector.jar Restarting
2022-11-02 02:36:20.648 INFO 1 --- [ main] c.a.collector.CollectorApplication : Starting CollectorApplication v0.0.1-SNAPSHOT using Java 11.0.16 on fe7dc44eb4cb with PID 1 (/app/collector.jar started by root in /app)
2022-11-02 02:36:20.673 INFO 1 --- [ main] c.a.collector.CollectorApplication : No active profile set, falling back to 1 default profile: "default"
2022-11-02 02:36:24.509 INFO 1 --- [ main] .s.d.r.c.RepositoryConfigurationDelegate : Bootstrapping Spring Data JPA repositories in DEFAULT mode.
2022-11-02 02:36:25.535 INFO 1 --- [ main] .s.d.r.c.RepositoryConfigurationDelegate : Finished Spring Data repository scanning in 971 ms. Found 26 JPA repository interfaces.
2022-11-02 02:36:29.916 INFO 1 --- [ main] o.f.c.internal.license.VersionPrinter : Flyway Community Edition 8.5.13 by Redgate
2022-11-02 02:36:29.950 INFO 1 --- [ main] o.f.c.internal.license.VersionPrinter : See what's new here: https://flywaydb.org/documentation/learnmore/releaseNotes#8.5.13
2022-11-02 02:36:29.950 INFO 1 --- [ main] o.f.c.internal.license.VersionPrinter :
2022-11-02 02:36:30.025 INFO 1 --- [ main] com.zaxxer.hikari.HikariDataSource : HikariPool-1 - Starting...
2022-11-02 02:36:30.685 INFO 1 --- [ main] com.zaxxer.hikari.HikariDataSource : HikariPool-1 - Start completed.
2022-11-02 02:36:30.814 INFO 1 --- [ main] o.f.c.i.database.base.BaseDatabaseType : Database: jdbc:postgresql://collector-db:5432/collector (PostgreSQL 13.7)
2022-11-02 02:36:31.362 INFO 1 --- [ main] o.f.core.internal.command.DbValidate : Successfully validated 25 migrations (execution time 00:00.295s)
2022-11-02 02:36:31.470 WARN 1 --- [ main] onfigReactiveWebServerApplicationContext : Exception encountered during context initialization - cancelling refresh attempt: org.springframework.beans.factory.BeanCreationException: Error creating bean with name 'flywayInitializer' defined in class path resource [org/springframework/boot/autoconfigure/flyway/FlywayAutoConfiguration$FlywayConfiguration.class]: Invocation of init method failed; nested exception is org.flywaydb.core.api.FlywayException: Found non-empty schema(s) "public" but no schema history table. Use baseline() or set baselineOnMigrate to true to initialize the schema history table.
ONES-GA package have few dependencies on python library, and Paramiko is one of
them,so while doing uninstallation we need paramiko python library to be activated
on server
ONES-GA package have few dependencies on python library, and Paramiko is one
of them,so while doing installation we need paramiko python library to be
activated on server
This happens when the DB is populated with some schema before the collector initializes the DB.
There is a order in which the DB schema has to be populated. First the Collector has to start and create the necessary tables. Then the UI will add more tables and create default users.
In this scenario, I believe the DB container took some time to start and ready to accept connections. We have a sleep time of 15s to wait for the collector and DB to start and initialize, then the UI will create it's own tables and user data. Here the UI created the tables first. That's the issue.
Command : docker-compose stop collector-db
Command : docker-compose rm collector-db
Command : docker-compose stop collector
Command : docker-compose rm collector
Command : docker-compose create collector
Command : docker-compose create collector-db
Command : docker-compose start collector-db
Command : docker-compose start collector
# we have to wait till the collector initilializes the DB. We can check the collector logs to verify that. Once initialized
How to contact Aviz Networks Support?
Contact Support
Aviz Network Support team can be reached by
Sending an email to
Submitting a Ticket at
Live Chat on
Submitting a Ticket
A ticket could be submitted with or without an account on
Mandatory Fields
Subject
Issue Type (Post Deployment, Pre-Deployment, General Query, RMA)
Priority (Low, Normal, High, Urgent)
Optional Fields
External ID (Community Request ID or Past Case Number)
Hardware (Switch Model)
ASIC vendor (chipset)
For Technical Issues, we recommend the description include;
Repro steps, if the issue is reproducible
The sequence of events that lead to the failure state